The Jefferson squat is a unique squat variation that can increase leg strength, size, core stability, and build power in multiple planes of movement. Named after circus strongman Charles Jefferson (1863-1911), the Jefferson Squat provides a one-of-a-kind stimulus that can give all athletes a competitive edge. However, like any exercise, its effectiveness depends on the execution — and if you’ve never done a Jefferson squat before, you may have a hard time. This will, without a doubt, be one of the more unique exercises you’ve ever done.
Alright, let’s get to it. Below, we’ll outline how to do the Jefferson squat and its benefits, alternatives, and set and rep suggestions.
- How to Do the Jefferson Squat Step by Step
- Benefits of the Jefferson Squat
- Muscles Worked by Jefferson Squat
- Who Should Do the Jefferson Squat
- Jefferson Squat Sets, Reps, and Programming Recommendations
- Jefferson Squat Variations
- Jefferson Squat Alternatives
- Jefferson Squat FAQs
Editor’s note: The content on BarBend is meant to be informative in nature, but it shouldn’t take the place of advice and/or supervision from a medical professional. The opinions and articles on this site are not intended for use as diagnosis, prevention, and/or treatment of health problems. Speak with your physician if you have any concerns.
How to Do the Jefferson Squat Step By Step
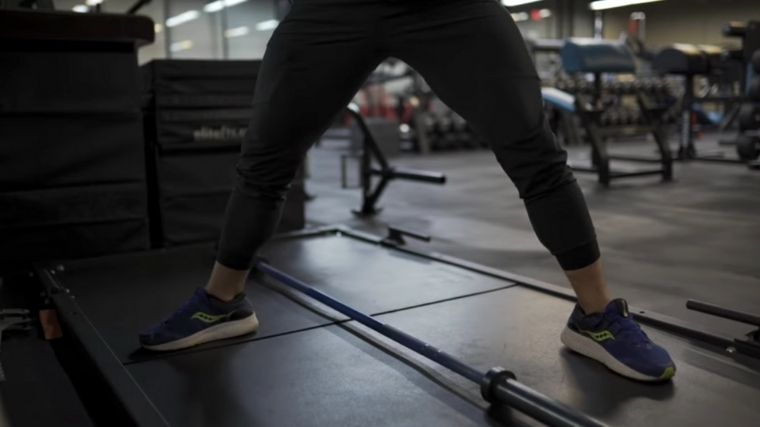
The Jefferson squat is done standing over a barbell with the front foot facing forward, and the rear foot turned out 90 degrees. The barbell runs perpendicular to the body beneath you. Here’s an in-depth breakdown of how to the exercise.
Step 1 — Find your Stance

Stand over a barbell, lengthwise, with your feet on either side of the bar. Your front foot should be facing forwards, and your rear foot rotated 90 degrees outwards relative to the front foot. Stand with feet at a distance so that as you go down into your squat, your knees are directly above your ankles, and your feet can stay flat on the floor throughout the lift.
Form Tip: Work on finding your stance without the barbell before stepping over the bar. Start by standing with your feet with heels together, and your feet turned out 90 degrees. Take a small step out with each foot. That will be close to your optimal stance. You can modify your stance and foot position based on your unique anatomy.
Step 2 — Squat Down and Grab the Bar

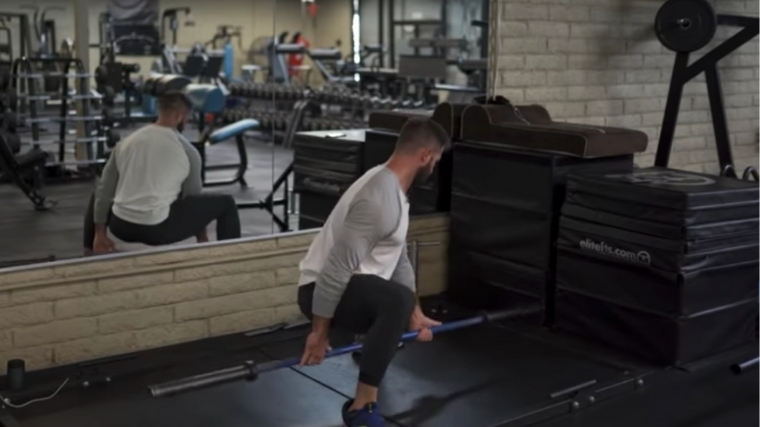
Once you are solid in your stance, squat down over the bar and grab it using a mixed grip. You want your hands to be equal distance apart. Again, this is worth practicing with an empty barbell before loading the barbell. Keep your knees out and chest up as you ascent.
Form Tip: You may want to elevate the bar on blocks, particularly if you are working with an empty bar or if you don’t have access to bumper plates. Getting all the way to the floor with the empty bar will be a mobility challenge for some lifters.
Step 3 — Lift the Bar

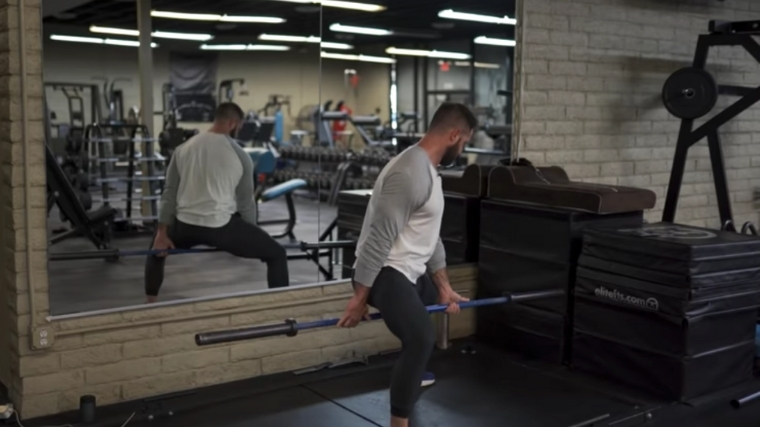
Drive down into the ground through your feet and stand tall, bringing the bar straight up between your legs. Drive your knees out at all times. To lower yourself down again, descend in a slow controlled manner until your thighs are just below parallel or until you reach a depth that challenges your hip mobility while still allowing you to maintain great technique.
After completing your reps on one side, change your setup so that the rear leg is now the front leg and switch your grip. Complete your reps on that side. The bar doesn’t need to touch the ground but if it does, allow the bar to settle before doing your next rep. Avoid using the touch-and-go technique.
Form Tip: If you have shorter arms, you may not reach full extension at the top of the movement. Avoid hinging forwards at the waist to compensate. This forward hinging is characteristic of the Jefferson deadlift, which is also a great exercise, just not what you’re doing here.
Benefits of the Jefferson Squat
Below is a summary of the benefits of the Jefferson squat. The Jefferson squat combines the benefits of heavy bilateral leg training with the benefits of asymmetrical loading to provide a truly unique combination of benefits.
[Read More: The Best Ab Exercises & Workouts, According to a CPT]
Improved Core Stabilization
The abdominal muscles, particularly the obliques, need to work extremely hard to brace against the asymmetrical forces of the barbell and maintain the position of the torso. If you are not braced, the barbell will start to rotate, pulling you out of position. The Jefferson squat provides immediate feedback on the integrity and quality of your abdominal brace.
Works Multiple Planes of Movement
The unique position and loading pattern of the Jefferson squat provides a rare opportunity to develop strength in all three planes of movement — the sagittal, frontal, and transverse planes. Although the body moves predominantly in the sagittal plane — in front or behind us — the perpendicular placement of the barbell relative to the body applies force in both the frontal (side to side) and transverse (up and down) planes. Most bilateral barbell exercises are sagittal plane movements. The Jefferson squat is an exception. Building strength in all three planes of movement helps to bolster strength and performance.
More Quad and Glute Strength
Although both legs are planted firmly on the ground, the front leg does most of the work. As a single leg supported exercise done with a vertical torso, the Jefferson squat develops the knee and hip extensors, aka the quads and glutes, of the front leg.
[RELATED: Best Leg Exercises]
Increased Adductor Strength
Any wide stance exercise will hit the adductors — an important and often underdeveloped muscle group that has huge implications for squat strength and athletic performance. Developing the adductors with movements like the Jefferson squat can help increase squat performance, change of direction ability, and other important performance markers.
Muscles Worked by the Jefferson Squat
Below is a list of the various muscle groups that are developed by Jefferson squats. Like any squat or deadlift variation, the muscles of the thighs are the prime movers, with many other muscle groups involved as stabilizers or as secondary contributors.
Quadriceps, Glutes, and Hamstrings
The Jefferson squat involves large amounts of flexion and extension of the knees and hips. The quadriceps work to extend or straighten the knee as you stand up from the bottom position. The glutes and hamstrings similarly work to extend the hips. Because the front leg muscles are primarily involved, they are subject to large amounts of work, even at relatively low loads. The glutes and other external rotators of the hip are involved in driving the knees out.
Adductors
The adductors are the muscles of the inner thigh. These muscles adduct, bring the legs towards the midline, and are also involved in hip extension. Any wide stance exercise such as a sumo deadlift or the Jefferson squat will hit the adductors. Adductor strength is often a limiting factor to squat performance, so preferentially strengthening the adductors is a smart decision for anyone with big squat goals.
Obliques and Transverse Abdominis
All of the muscles of the abdominal wall help maintain a solid brace while performing the Jefferson squat. The obliques and transverse abdominis are particularly involved in maintaining the forward position of the torso, resisting the rotational pull of the bar.
Who Should Do the Jefferson Squat
Many different types of athletes and lifters can benefit from the Jefferson squat. Because most people don’t do this exercise, building them into your program can possibly give you a competitive advantage.
Powerlifters
The Jefferson squat provides many benefits of single-leg exercise, traditional squatting, and a sumo deadlift. This makes it a great choice as an assistance exercise in a powerlifting program. Developing anti-rotational and core strength while working with a barbell has the potential for building stability in a way that transfers readily to the main lifts (the deadlift, back squat, and bench press). Plus, the selective strengthening of the adductors has the potential to improve your squat strength dramatically.
Bodybuilders
As an asymmetrical, bilateral exercise, the Jefferson squat allows for relatively heavy loads that predominantly target the front leg. This makes it a great option for driving hypertrophy of the primary muscles involved, namely the quads and glutes. Kai Greene — a professional bodybuilder with three second-place finishes at the Mr. Olympia — is a well-known advocate of the Jefferson squat. They seem to have served him pretty well.
[Related: What You Need to Know About Muscle Recovery]
Sport Athletes
The asymmetrical forces in the Jefferson squat can transfer to improved performance on the field of play. The obliques and adductors, highly involved in the Jefferson squat, are some of the primary muscles involved in changing direction, like cutting or evading a defender. Strengthening these muscles in the weight room with the Jefferson squat can improve sports performance. The Jefferson squat also creates an opportunity to develop multiplanar leg strength without the systemic load and associated recovery cost of heavy squatting and deadlifting.
General Population
Everyday gym-goers can also take advantage of the Jefferson squat. Everyone can benefit from having strong legs and a strong core. And if you’re feeling stuck in your routine, learning a unique movement like the Jefferson squat can inject some variety and help you break through plateaus. People new to training should develop skills with traditional squatting and deadlifting before branching out into a more advanced variation like the Jefferson squat.
Jefferson Squat Sets, Reps, and Programming Recommendations
Below are some general guidelines on how to start building the Jefferson squat into your program. Treat these guidelines as a reference point. Depending on your program and training goals, you may need to make adjustments. Always complete a thorough warm-up before doing your Jefferson squats, and lift lighter, particularly while the movement is new.
To Learn and Improve Technique
The best way to learn a movement is to do a lot of practice while staying clear of fatigue or failure. This means more sets of low reps at moderately heavy loads, as weight is an effective teaching tool. Start with three to five sets of five to eight reps each leg, resting two minutes between sets. Depending on your lifting experience, you could spend one to three months in this stage while developing a solid movement pattern.
To Build Muscle
When it comes to hypertrophy, higher volumes and moderate or light loads usually work best. Perform three to six sets of eight to 15 repetitions each leg, resting two minutes between sets. You can also use a slower tempo to increase time under tension, a key factor in creating muscle growth.
To Increase Strength
The Jefferson squat is best programmed as an accessory exercise, so although it can be used to increase strength, there’s no sense in testing your one-rep max in this lift. Four to six sets of five or six reps is a good approach for strength development. Rest for two minutes between sets. Focus on driving your feet down into the ground and lifting the bar with speed and maximum intent.
Jefferson Squat Variations
Below are variations and alternatives to the Jefferson squat for lifters looking for some variety or to help make the Jefferson squat work with your set-up or mobility constraints.
[RELATED: Best Mobility Exercises]
Jefferson Rack Pull or Block Pull
Pulling the barbell from a rack or blocks reduces the range of motion — which means you can lift more from a higher starting position. This variation is a good option for taller lifters or those with mobility limitations. It’s better to work with great technique through your available range of motion than it is to force yourself through compensations to get down to the floor. This variation also allows you to lift heavier weights than if you were pulling from the floor, making it a great option for strength-focused lifters, too.
[Related: Best Weightlifting Belts for Squats, Deadlifts, and More]
Jefferson Deadlift
Like the Jefferson squat, the Jefferson deadlift involves more of a hip hinge and a less vertical torso. This shifts the emphasis of the working muscles from the quads to the posterior chain, namely the hamstrings and glutes. The Jefferson deadlift is its own exercise, and lifters may choose to have both in their program or work on one for a few mesocycles before moving to the other variation.
[Related: Best Weightlifting Shoes for Squats, CrossFit, Flat Feet, and More]
Jefferson Squat with Dumbbells or Kettlebells
For those who don’t have access to a barbell or who are new to the movement, doing a Jefferson squat with dumbbells or kettlebells is a great way to get most of the movement’s benefits with a much easier set-up. Because you don’t have to stabilize the long, perpendicular barbell, you don’t get the same anti-rotation and core stability benefits, but the force applied to the lower body is very similar. Starting with a dumbbell or kettlebell variation for a few workouts can help set you up for success when you graduate to the barbell.
[Related: Best Pre-Workout Supplements for Strength, Cardio, and More]
Jefferson Squat Alternatives
Below are three Jefferson squat alternatives that offer coaches and athletes similar muscle development and performance benefits.
Belt Squat
Like the Jefferson squat, the belt squat minimizes loading on the spine (even more so than the Jefferson squat), and forces a lifter to stay in an upright position. You can do this to target the quadriceps, glutes, and adductors, and often increase hip mobility in the process if you go deep enough.
[Related: Breaking Down Famous Squat Programs for Weightlifters]
Full Range of Motion Back Squat
If you are looking for maximal quadriceps, glutes, and adductor development, look no further than a full range of motion back squat. If you are someone who squats low enough that the calves are smooshed into the back of the hamstrings at the bottom of the squat, rest assured you are getting all the muscle-building benefits of the Jefferson squat.
[Related: Best Whey Protein Powders for Vegans, Weight Loss, and More]
Zercher Squat
The Zercher squat is a squat style that can build upper back strength, thoracic spine integrity, and increase quadriceps and glute development. Like the Jefferson squat, the load placement (in this case the load is in front of the lifter) minimizes strain on the lower back and forces the lifter to stay more vertical.
[Related: Best Squat Racks for Small Spaces, Versatility, and More]
FAQs
When I should I do Jefferson squats?
Jefferson squats are an assistance exercise. They are best done after your main lifts on a lower-body focused training session.
How many sets and reps of the Jefferson squat should I do?
It depends on your goal, but here is a quick guide.
- To improve technique: Do three to five sets of five to eight reps each leg.
- To increase strength: Four to six sets of five or six reps each leg.
- To build muscle: Three to six sets of eight to 15 repetitions each leg
Do I need to touch the bar to the ground for each rep?
No. If you can get down to the ground with great technique, go for it. Taller lifters and those with mobility limitations may not be able to. Others may not have bumper plates and are using smaller diameter plates. If you are touching the bar to the ground, allow the bar to settle between each rep.
Is there any reason why I should avoid the Jefferson squat?
The asymmetrical loading of the trunk in the Jefferson squat could be problematic for those with a history of back pain or injury. Those who don’t have a history of back pain or injury can use the Jefferson squat to increase core strength and build resilience against asymmetrical forces.
References
- McCaw ST, Melrose DR. Stance width and bar load effects on leg muscle activity during the parallel squat. Med Sci Sports Exerc 31: 428–436, 1999.
Featured image: Ryan Humiston’s YouTube Channel