

The push-up is deceptively difficult. A survey of more than 1,400 U.S.-based respondents over the age of 18 conducted by Gymless — an organization devoted to educating the public about the benefits of calisthenics training — found that more than one-third of the respondents didn’t believe they could complete five regular push-ups consecutively.
If you fall into that bucket, or you just want to get a bit better at the push-up (or any of its variations), you’ve come to the right place. At BarBend, we think push-ups are one of the best chest exercises you can do, period. That’s why we’ve put together this four-week, 30-day push-up program for beginners.
The Push-Up Program for Beginners
If you’ve never ventured onto the floor to attempt a push-up, you’re in the right place. This guide will teach you how to perform a push-up, literally from the ground up. Even if you have been proudly pressing out push-up repetitions for decades, it never hurts to revisit the fundamentals and potentially learn how to extract even more value from one of the most foundational movements in fitness.
Rest Days and Equipment: You should take at least one rest day between each training day. Rest is important for post-workout muscle recovery, and if you’re going to be training your muscles with push-ups multiple times a week, taking days off should be a vital part of your strategy. The advised frequency options for your training include:
- Monday, Wednesday, Friday, or
- Tuesday, Thursday, Saturday
The good news for you is that the only equipment you need for this program is enough floor space for your body to fit into.
Rest Times In-Between Sets: You should feel free to rest anywhere from one to two minutes between push-up sets. However, if you believe you can satisfactorily complete all of the reps of every set with less rest time, you should absolutely give it a shot.
[Read More: The Best Lower Chest Exercises You Can Do]
Assisted Modifications: There are multiple ways for you to adjust the difficulty of your push-ups to accommodate your present fitness level and physical capabilities as they improve (see “Push-Up Progressions” below). Whether you’re starting from your knees to eliminate some of the weight and tension from your push-ups, or slowing the pace of your lowering and pressing phases to enhance the movement’s difficulty, there are several equipment-free ways to adapt your push-ups to meet your needs.
The Program
If you already have a chest or triceps training program underway, we suggest putting it on hold while you complete this program. If you’re a more advanced trainee, you can work this program into your existing workout split, but we suggest toning down your upper-body workout so you don’t over train.
[Read More: The Most Effective Workout Splits, Created by Our Experts]
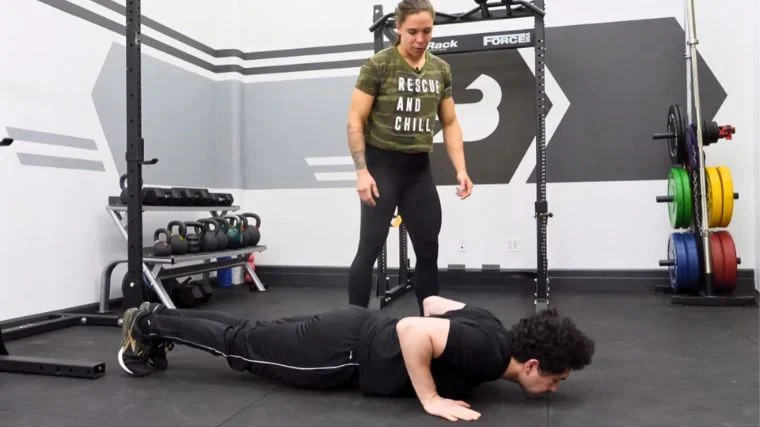
Begin this program by completing as many ordinary push-ups as possible until your form breaks down. It’s quite okay if you can’t perform a push-up initially. After you take the test, enjoy one day of rest, then start on the 4-week program below. After finishing the program, rest another day or two and re-test your max push-ups.
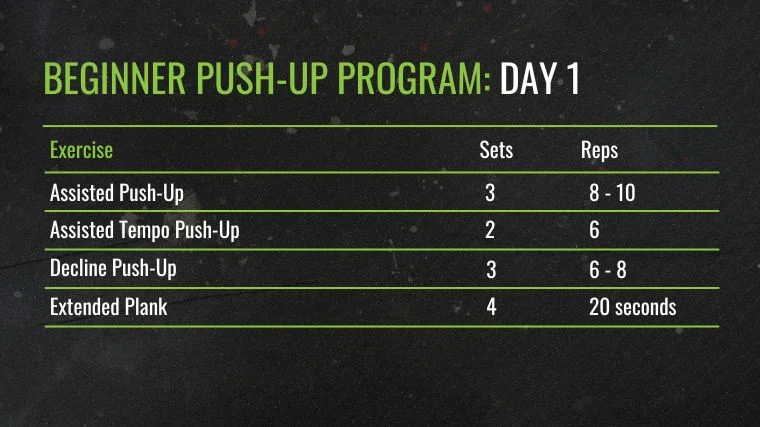
Day 1
[Related: The Best Upper Chest Exercises for Push-Up Strength]
- Assisted Push-Up: 3 x 8-10
- Perform these push-ups with either one or two of your knees on the ground, as described above. Place one or two knees on the ground based on your starting strength and fitness level.
- Assisted Tempo Push-Up: 2 x 6
- Slowly lower your chest to the ground over a 4-second interval. Count to four in your head while lowering, then press back up as normal. If you cannot press yourself back into the starting position using strict push-up form, you may stray from strict form to return to the starting position by any means.
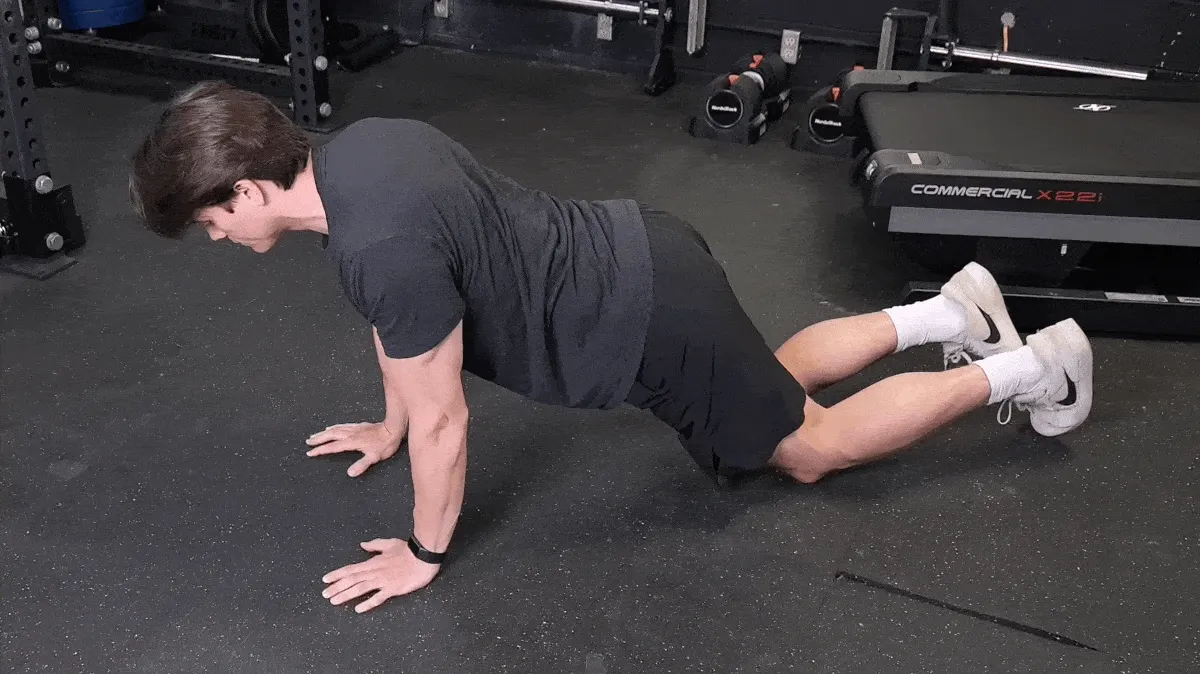
- Decline Push-Up: 3 x 6-8
- Find a bench, staircase, or piece of furniture, and place your hands on it to elevate your hands from the ground while your feet remain on the floor. From this position, begin your push-ups. You should feel like much of the work is being performed by the lower portion of your chest.
- Extended Plank: 4 x 20 seconds
- Assume the customary elevated push-up position — also known as the plank position — and hold yourself in that position for the recommended time. Add five to 10 seconds to each set every week until the end of the program.
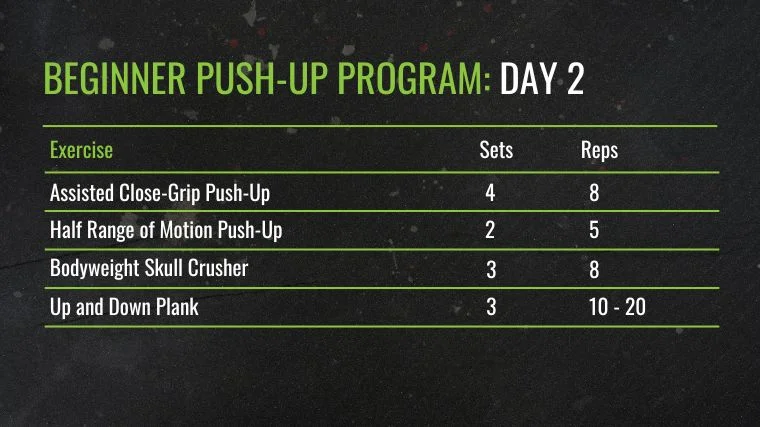
Day 2
[Read More: The Best Shoulder Exercises, + 4 Workouts From a CPT]
- Assisted Close-Grip Push-Up: 4 x 8
- With either one or two knees on the ground, place your hands shoulder-width apart or slightly closer to perform your push-ups with a focus on your triceps, the muscles in the back of your upper arm.
- Half Range of Motion Push-Up: 2 x 5
- From a normal push-up position, bend at the elbows to lower your chest halfway to the ground over three seconds, and then press yourself back to the starting position. You should feel considerable work being performed by your triceps.
- Bodyweight Skull Crusher: 3 x 8
- Place your hands on the back of a couch or against a wall. Your hands can be anywhere from approximately shoulder-width apart to within a thumb’s-length reach of one another. Take a step backward, then bend at the elbows and tilt your body forward while keeping your back straight. Allow your head to gently touch the area of the couch or wall between your hands. Set your hands at a height allowing you to complete 8 reps of the exercise. For a more detailed description, check out this in-depth guide for a bodyweight skull crusher how-to.
- Up and Down Plank: 3 x 10-20 reps
- From an ordinary plank position with your palms on the ground, lower one forearm to the ground, followed by the next, while maintaining a flat-back position. When both forearms are resting on the ground, lift yourself back to the starting position by replacing one of your forearms with the palm of that arm’s hand and elevating back to a full plank position, followed by the next hand. One full cycle of this movement equates to one rep.
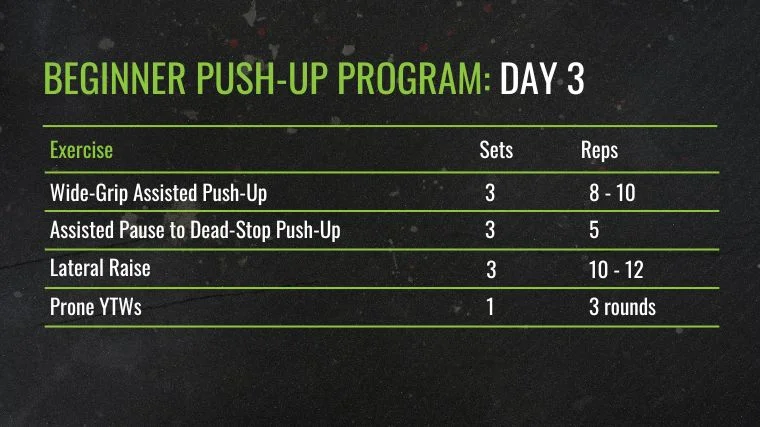
Day 3
[Read More: The 15 Best Triceps Exercises for More Mass]
- Wide-Grip Assisted Push-Up: 3 x 8-10 reps
- Keep one or two knees on the ground. Position your hands roughly one hand’s width wider than your normal push-up setup. Bend at the elbows to perform your push-ups with a wider-than-average hand position.
- Assisted Pause to Dead-Stop Push-Up: 3 x 5 reps
- Keep one or two knees on the ground. Bend at the elbows and take three full seconds to lower your chest until your arms form a 90-degree angle at your elbows. Pause for one second, then lower your chest the rest of the way to the ground for two more seconds. Once your chest makes contact with the ground, press against the floor to return to your starting position.
- Lateral Raise: 3 x 10-12 reps
- You can do ordinary lateral delt raises by grabbing two dumbbells, standing upright, and raising them up and out to the side with your arms straightened. This is primarily a strengthening exercise for your shoulders. If you don’t have access to dumbbells, you can substitute a milk jug, a phone book, resistance bands, a backpack with some weight in it, or any other stable object that can provide your shoulders with sufficient resistance.
- Prone YTWs: 3 Rounds
- Lie flat on the ground with your face down. Extend your arms with your palms down so that your arms and body form a “Y” shape. Raise your arms off the ground and hold them in an elevated position there for a count of five. Return your palms to the ground, and move them into a “T” shape with them straight out from your sides. Raise them off the ground for five seconds, and then return them to the ground. Bend your arms at the elbows to slide your palms closer to your head, and raise your arms from the ground in a “W” configuration for 5 seconds. Perform three full rounds of YTWs.
Push-Up Modifications & Progressions
Before you commence this beginner’s push-up program, you’ll want to have a thorough understanding of two standard push-up progressions that you will be using throughout this four week protocol. These two progressions will enable you to build a foundation of strength and form to advance to more challenging push-up variations.
Assisted Push-Ups
In this instance, you’ll place one or both of your knees on the ground to reduce the amount of body weight you’re moving during each rep. Based on testing results, you press approximately 64 percent of your body weight when you do a regular pushup as opposed to 49 percent of your body weight when you execute push-ups from a kneeling position. (1) This differential of 15 percentage points will make you feel like you are pushing substantially less weight when you do a push-up from your knees.
[Read More: The 8 Best Knee Sleeves You Can Buy (Spring 2023 Update)]
Kneeling push-ups teach you how to execute proper form using a lighter load. They also enable you to quickly adjust the weight you are pressing if it becomes necessary to squeeze out a few final reps at the end with reduced resistance.
- Double Knee: If you’re a true beginner, this is a great option to get you fully acclimated to the process and feel of doing push-ups with a sizable reduction in resistance.
- Single-Knee: This slightly more advanced variation will add more resistance to your push-ups than when you have both knees on the ground. When using this variation, pay careful attention to your hips to ensure they’re squared to the ground.
Tempo and Paused Push-Ups
These suggested push-up progressions — tempo and paused push-ups — are intended to enhance the challenge of your push-up sets. By intentionally slowing your movements down, pausing them outright, or both, you will be increasing the tension on your muscles, and therefore the difficulty of the push-ups.
- Tempo: You will be modifying the lowering and pressing portion of the movement.
- Paused: You will halt your push-ups at a specific position and hold for a time-based goal.
Common Push-Up Mistakes
Take heart: Most of the mistakes you’ll be tempted to make while agonizing through push-up sets will be made out of a desire to make the movement easier. Just remember that push-ups are supposed to be challenging. Steer clear of these common push-up mistakes, though, and you’ll be in business.
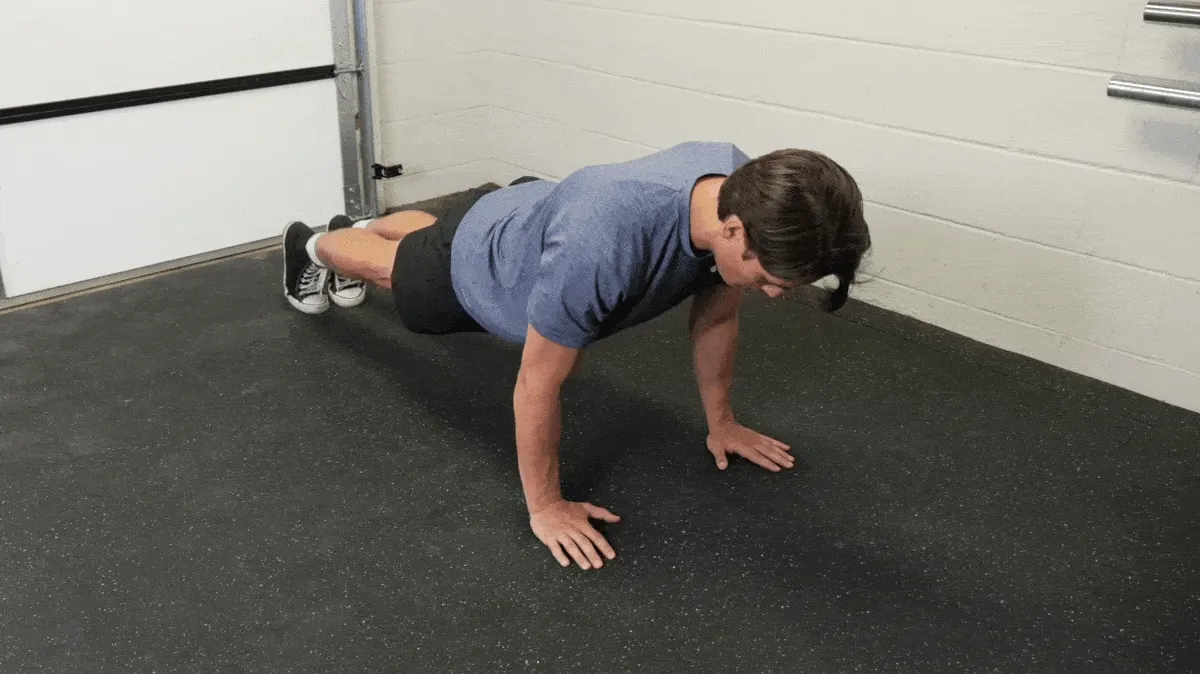
Your Body Isn’t Straight
When push-ups become difficult for you, one of the first areas where you might feel tempted to compromise in form will be your body’s alignment. Bending at the waist and keeping your rear end high in the air will be one way you can reduce the tension on your core.
[Read More: The Best Posture Correctors on the Market]
Fix It: As you prepare yourself for a push-up, actively squeeze your abdominal muscles before you lower yourself to the ground. You’ll find it very difficult not to retain your alignment as long as your core remains engaged.
Your Hand Positioning Is Incorrect
Positioning your hands wider than shoulder-width reduces the tension that push-ups place on your triceps. Likewise, shifting your hands closer together will accentuate the resistance placed on your triceps at the expense of some of the chest-developing shoulder mobility.
Both options are okay in some scenarios, but they are a departure from the well-rounded intentions of the standard push-up that we are attempting to master through this training regimen.
Fix It: Arrange your hands roughly toward the middle of your chest, and slightly wider than shoulder-width apart. That way, your chest, triceps, and also your anterior deltoids will all remain sufficiently engaged throughout the exercise.
You Lack Control
The point between the eccentric phase — or lowering phase of your push-up — and the concentric phase where your muscles are struggling against gravity to drive you upwards, is a critical stage in your ability to build up and strengthen your muscles using the push-up.
If you disengage your muscles from the process and fully relax yourself at the bottom of the movement, you’re stripping the exercise of several of its muscle-building benefits.
[Read More: The Best Online Personal Trainers]
Fix It: Don’t fully relax any of your muscles during the push-up. Even though several of your muscles will be supplying significantly less force during the lowering phase than during the concentric (or lifting) phase, the application of tension throughout your muscles should remain constant.
Pushing Your Way to Proficiency
You can repeat this beginner’s program as many times as you want to advance to the point where every push-up you do — paused reps and all — is the picture of perfection. Once you’ve accomplished this, you’ll have fully unlocked the pure muscle-developing potential of one of the truly universal tools of fitness.
From this point forward, any floor you find yourself standing upon is a gym unto itself. It’s up to you to capitalize on the power-building potential that now awaits you simply by lowering yourself to the ground and choosing to do the work.
Frequently Asked Questions
What muscles do push-ups work?
The push-up is a bodyweight exercise that uses your chest, triceps, and the front part of your deltoid. Your core and glutes also contract isometrically (as in, without moving) during a push-up workout to stabilize your legs and torso.
How many push-ups should I do a day?
The number of push-ups you perform will depend on your fitness level and goals. Training push-ups every day isn’t harmful, and can help you get better at them quickly. However, the more often you work out during a push-up training program, the shorter each individual workout should be. Start with a handful of push-ups every day, between 5 and 20, and work up over time as you’re able.
How do you train to do 100 push-ups in a row?
The best way to get to 100 push-ups in a row is simply to practice more and build your muscle endurance in the process. There are some 100 push-up programs out there, but you’ll eventually reach that goal as long as you practice consistently.
Perform an “AMRAP” set of push-ups once or twice per week to test your limits, but otherwise, most of your push-up workouts should be somewhat conservative in order to allow for proper muscle recovery.
BarBend Expert Gianna Masi has this to say: “There’s a term called “greasing the groove” from Pavel Tsatsouline which is essentially performing the exercise more frequently with fewer reps staying far away from fatigue. For example, every time you walk by the kitchen or bathroom, perform 2-3 push-ups and walk away. You’d be surprised how many total push-ups you can perform in one day using this simple method.”
References
- Ebben, W.B., Wurm, B., VanderZenden, T.L., Spadavecchia, M.L., Durocher, J.J., Bickham, C.T., Petushek, E.J. (2011). Kinetic analysis of several variations of push-ups. Journal of Strength and Conditioning Research, 25(10), 2891-2894.
Feature Image: Flamingo Images / Shutterstock