

The gluteus maximus — that’s your butt, by the way — is the largest muscle in your body. Even if filling out a pair of jeans isn’t at the top of your priority list, we can’t stress it enough: Training your glutes is about more than glamor. A strong backside helps you do everything from running, to strength training, to, well … use your imagination.
That said, glute training isn’t grab-and-go. You need the right glute exercises to help boost your performance (and results). On that front, we’ve got your backside covered. Here are our 15 best glute exercises for strength, muscle mass, plus some expert-crafted workouts to try on your next leg day.
15 Best Glutes Exercises
- Conventional Deadlift
- Back Squat
- Hip Thrust
- Belt Squat
- Romanian Deadlift
- Bulgarian Split Squat
- Sumo Deadlift
- Cable Glute Kickback
- Step-Up
- Goblet Squat
- Good Morning
- Kettlebell Swing
- Split Squat
- Glute Bridge
- Curtsy Lunge
Recent Updates: The exercise selections in this article were revised and updated by BarBend’s Senior Writer Jake Dickson. The update removed several redundancies and included several new movements that better reflect BarBend‘s ongoing commitment to providing the best evidence-based content to its readers. Read more about that process here.
1. Conventional Deadlift
| Equipment Needed | Barbell, weight plates, belt (optional), straps (optional) |
| Muscles Worked | Glutes, lower back, hamstrings, core, traps, quads, forearms |
| Sets & Reps | 1-3 x 3-6 |
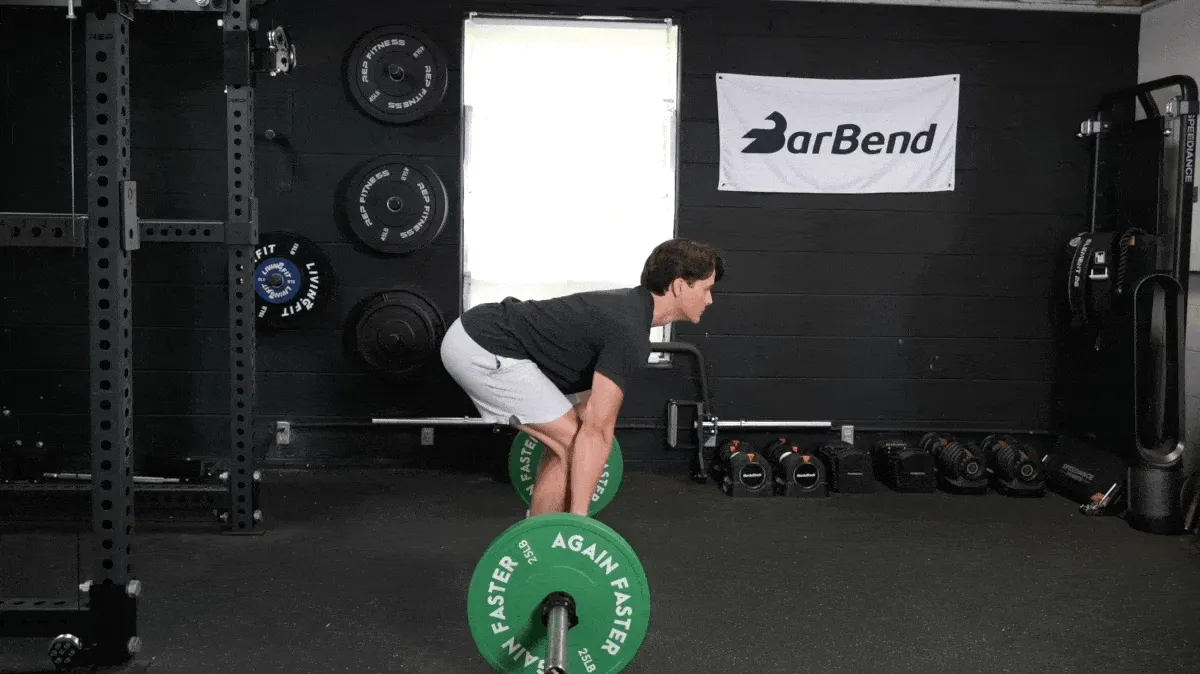
The conventional deadlift — the king of all deadlift variations — is one of the most popular exercises around, and rightfully so. It challenges the muscles around the hip, knee, and ankle. It also taxes the muscles surrounding your wrist, elbow, and shoulder to hold the barbell, but those joints do not contribute directly to the range of motion.
“The conventional deadlift is important for building a strong posterior chain. Lifters can choose the tool of their preference and accessibility,” Masi remarks. “Whether that’s a dumbbell, kettlebell, barbell, or weight stack or machine. There’s a variety of modalities to work this movement pattern.”
How To Do It
- Set up for the deadlift by taking a hip-width stance, hinging at the hips, shooting your butt back, and reaching down to the barbell.
- Grab the bar with a close grip, just outside your shins.
- Flatten your back, pull your chest up, and take a breath in.
- Push into the floor with your legs to break the bar off the ground.
- As the bar passes your knees, thrust your hips forward and squeeze your glutes to come to a standing position.
Modifications
- Make It Easier: Elevate the barbell onto boxes, risers, or plates as needed so you can reach it with a flat back.
- Make It Harder: Stand on a low riser or pair of weight plates, or perform the stiff-leg deadlift instead.
2. Back Squat
| Equipment Needed | Squat rack, barbell, weight plates, belt (optional), weightlifting shoes (optional) |
| Muscles Worked | Quads, glutes, core, lower back |
| Sets & Reps | 2-4 x 3-8 |
[Read More: The 8 Best Knee Sleeves You Can Buy]
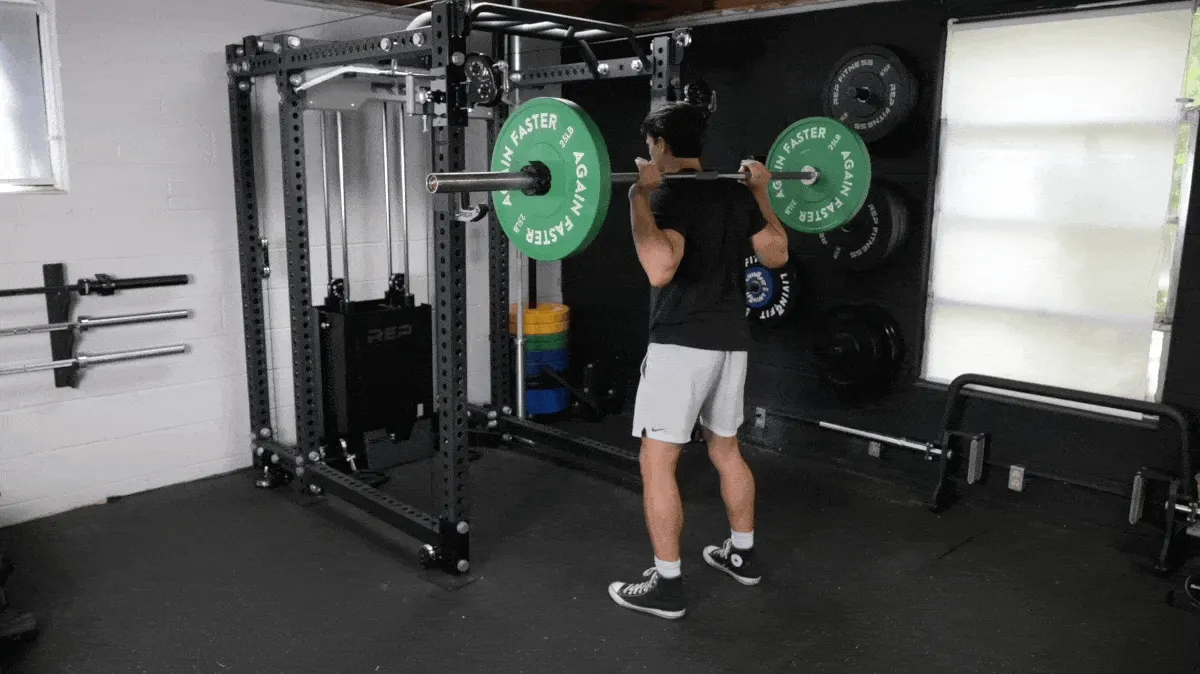
Why Do It: The back squat is a compound exercise that challenges every muscle in the legs, especially the glutes. Its primary use in glute training for powerlifting is to challenge hip extension, driving the lower body up from the bottom position and placing a high amount of tension on the glutes.
The back squat leads to strength and muscle gain and reinforces other exercises like the deadlift, split squat, and lunge. It also recruits the core and improves your posture.
How To Do It
- Unrack a bar from a squat rack by placing it on your upper back with a close grip and taking one or two steps back.
- Take a comfortable stance; place your feet between hip and shoulder-width apart and turn your feet outward to whatever angle feels natural.
- From here, inhale into your belly and feel your weight distribute evenly across your feet.
- Squat by breaking at your knees and hips simultaneously and sitting down as low as you’re able.
- Once you reach the bottom, reverse the motion and stand back up by contracting your quads.
Modifications
- Make It Easier: “Squatting to a box can help you learn the form of the back squat by giving you a target to understand your squat depth and maintain balance,” says Masi.
- Make It Harder: Try a three-second eccentric tempo to really light your glutes up.
3. Hip Thrust
| Equipment Needed | Weight bench or plyo box, barbell, bar pad, weight plates |
| Muscles Worked | Glutes, hamstrings |
| Sets & Reps | 3-4 x 6-15 |
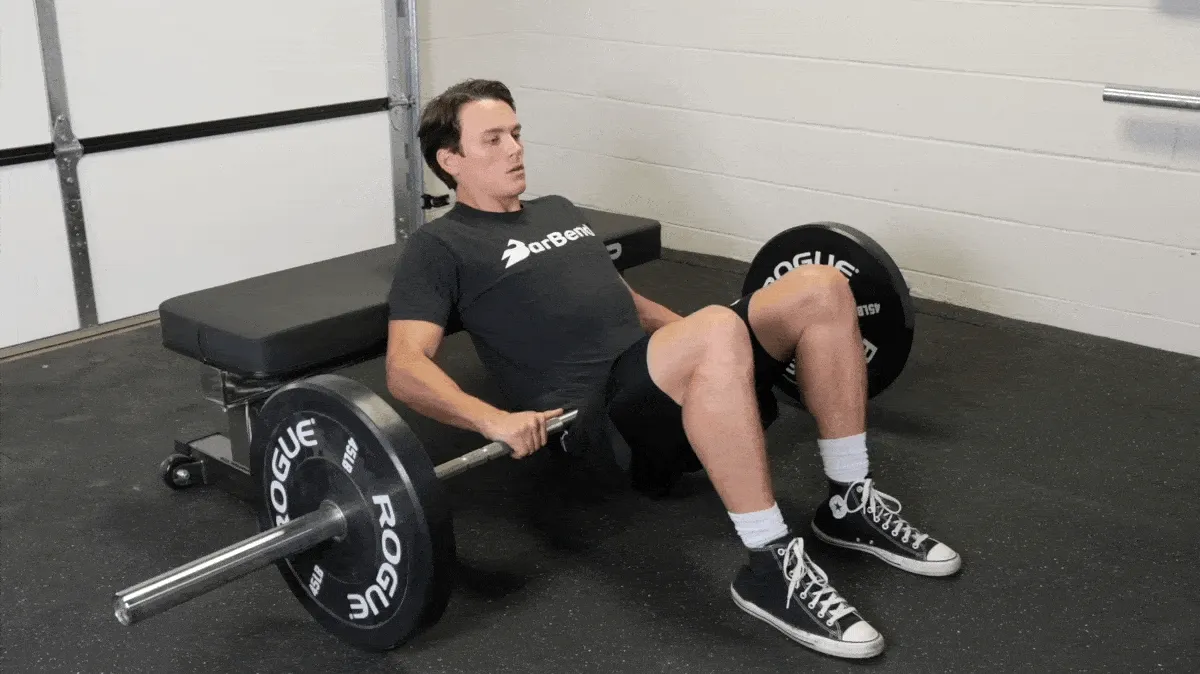
Why Do It: This exercise effectively loads the glutes in their shortened position without loading the spine. What separates the glute bridge from the hip thrust is the range of motion.
“Hip thrusts are highly effective for isolating the glutes. They allow for significant muscle activation without placing excessive strain on the lower back, making them ideal for targeting glute strength and size,” says Masi. “I’d recommend hip thrusts in some capacity for those wanting to improve their total squat and deadlift numbers.”
How To Do It
- Sit with your upper back against a weight bench and a loaded barbell in front of you. Roll the bar back until it brushes up your hips.
- Bend your knees and plant your feet on the floor to seal the bar into your hip crease. Grab the bar with a wide grip.
- Initiate the thrust by pushing your hips upward until your body forms a straight line from your kneecaps to your shoulders.
Modifications
- Make It Easier: Try hip thrusts with a dumbbell laid in your lap rather than a barbell.
- Make It Harder: Do B-stance hip thrusts, staggering your feet and shifting your weight onto one leg at a time.
4. Belt Squat
| Equipment Needed | Belt squat machine |
| Muscles Worked | Quads, glutes |
| Sets & Reps | 2-3 x 8-10 |
[Read More: The Big Guide to Muscle Hypertrophy]
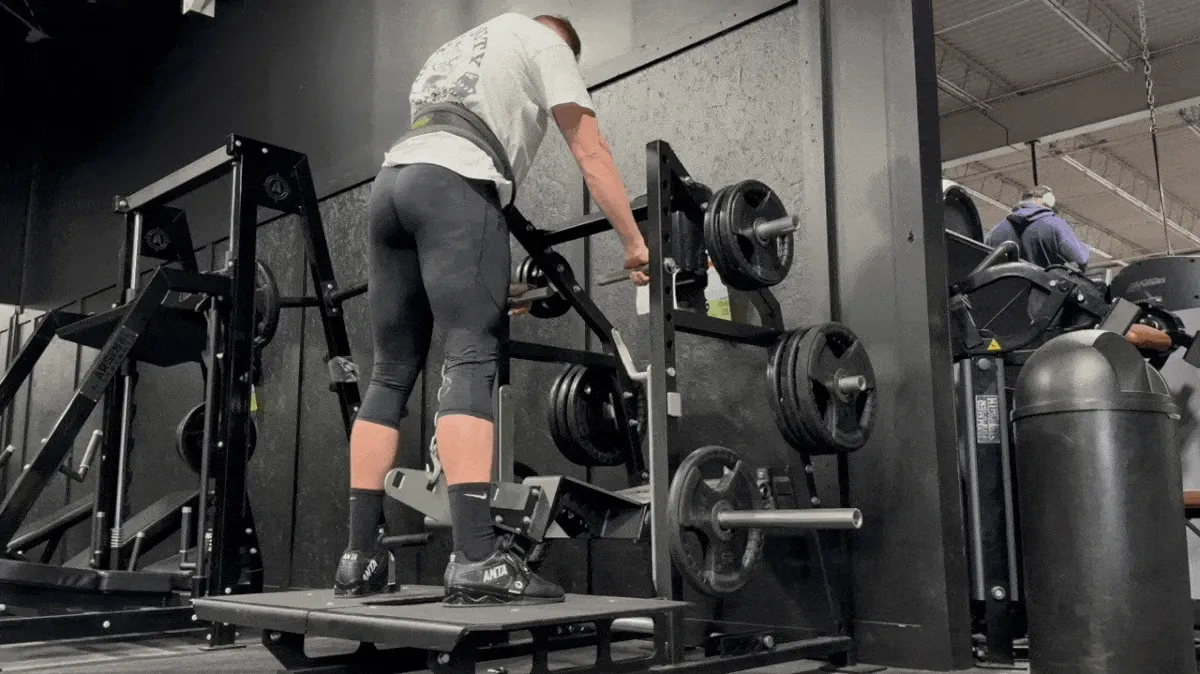
Why Do It: The positioning of the load in the hip belt squat allows for a more vertical spine, taking some of the load off the low back, and increased training volume without more wear and tear since the weight is pulling your hips down rather than pressing on your torso.
How To Do It
- Stand on the platform and fasten the belt around your hips.
- Place your feet to the left and right of the pulley in the platform and place your hands on the handles in front of you.
- Engage the pulley system and find your balance. Take a breath into your belly.
- Sit straight down, allowing the pulley to guide your movement.
- Squat as low as you comfortably can and then push back up to a standing position.
Modifications
- Make It Easier: Try standing on weight plates if you’re having trouble squatting down without the pulley system touching the floor.
- Make It Harder: Pause at the bottom of each repetition, or do one-and-a-half reps.
5. Romanian Deadlift
| Equipment Needed | Barbell, weight plates, belt (optional), straps (optional) |
| Muscles Worked | Glutes, hamstrings, lower back, forearms, traps |
| Sets & Reps | 3 x 6-12 |
[Related More: Romanian Deadlift Vs. Deadlift — Which Is Better for Your Program?]
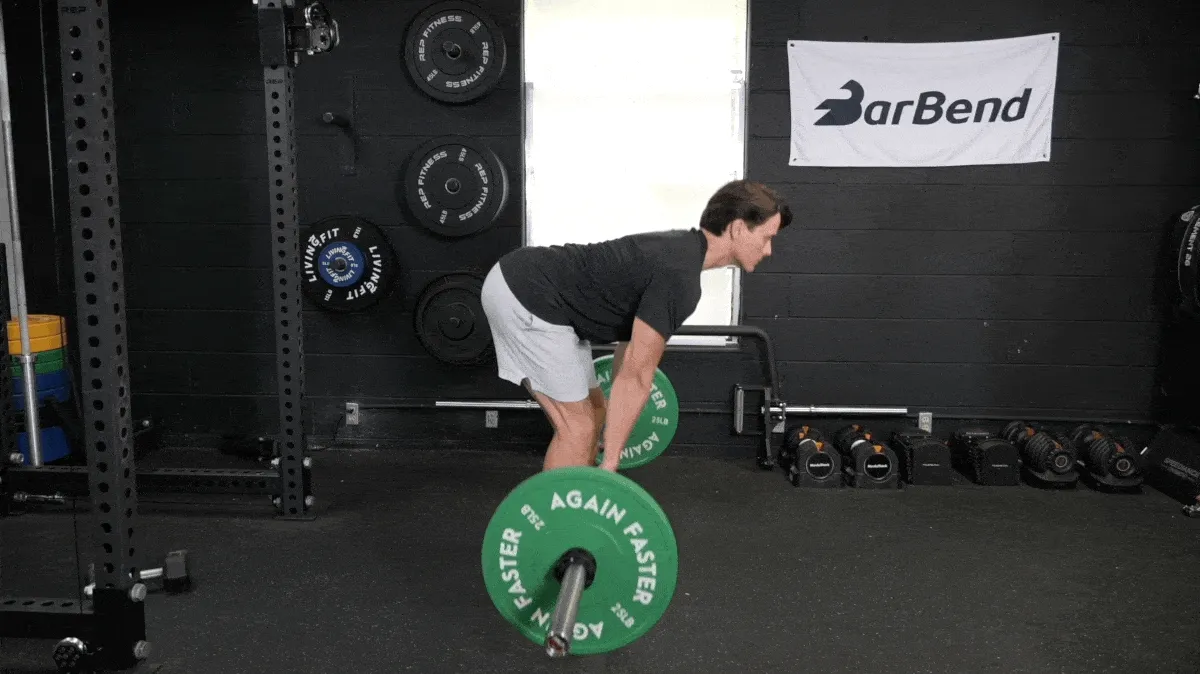
Why Do It: The Romanian deadlift is, essentially, a top-down version of the conventional deadlift. By starting from a standing position and performing a hip hinge until the bar reaches your knees, you apply a lot of mechanical tension to your glutes that you don’t get from regular deadlifts.
How To Do It
- Bend over to pick up a lightly loaded barbell and assume a close hip-width stance.
- Hinge at the hips, pushing your pelvis backward until you feel a strong stretch in your posterior chain. Let the barbell glide down your thighs.
- Thrust your hips forward to return to a standing position.
Modifications
- Make It Easier: You can stand with a weight bench between your legs to limit your range of motion while you work on your hip hinge technique.
- Make It Harder: Hold the bar with a wide snatch grip for some extra upper back training.
6. Bulgarian Split Squat
| Equipment Needed | Barbell in squat rack, plyo box, weight bench, or other surface for your back leg, plus dumbbells (optional), kettlebells (optional) |
| Muscles Worked | Quads, glutes, core |
| Sets & Reps | glutes, core |
Why Do It: The Bulgarian split squat isolates one leg at a time, allowing a weaker leg to catch up in size and strength. The rear foot elevation allows you to sink down into hip flexion more, placing more muscular tension on the glute of the front leg.
“Bulgarian split squats are excellent for isolating the glutes and improving ankle stability (balance). The elevated back foot allows for a deeper range of motion, increasing the effectiveness of the exercise for glute development,” Masi notes. “These should be completed after the main compound movements (squats, deadlifts) of the day.”
How To Do It
- Place your non-working leg onto a knee-height bench or box about two feet behind you.
- Balance yourself on your working leg with a weight in each hand.
- From here, sink your hips down and back, allowing your working leg knee to bend and travel forward as needed.
- Reverse the motion by pushing into the floor until your leg is straight.
Modifications
- Make It Easier: Stabilize your body by bracing your free hand against a stable surface for balance.
- Make It Harder: Try pausing at the bottom of each rep, or slowing down your movement tempo.
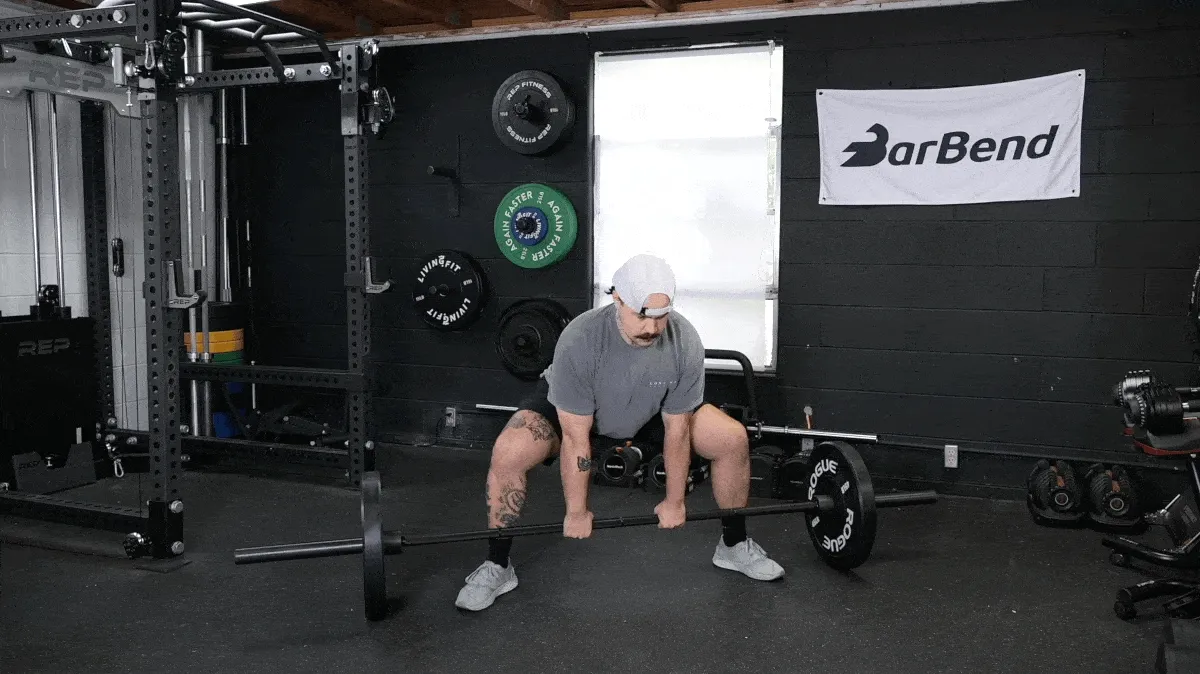
7. Sumo Deadlift
| Equipment Needed | Barbell, weight plates, lifting belt (optional), straps (optional) |
| Muscles Worked | Glutes, quads, hip adductors, lower back, core |
| Sets & Reps | 3-4 x 5-8 |
Why Do It: The sumo deadlift is a widely used exercise with many benefits, especially when it comes to adding strength and size to the lower body. The ultra-wide stance places the hips into external rotation, placing tension on the adductor and glute muscles — most notably the smaller glute medius and minimus. Most people can maintain a more upright torso with the sumo deadlift as well, which is beneficial if you want to minimize loading on your lumbar spine.
How To Do It
- Address a loaded barbell by taking a very wide, toes-turned-out stance. Point your feet towards the weight plates and open your hips.
- From here, break at the hips and sink down until you can grab the bar with both hands.
- Brace for the pull by inhaling air into your stomach, pushing your knees out to the sides, and pulling your chest up.
- Initiate the movement by pushing into the floor with your legs and standing up until you can lock your hips out.
Modifications
- Make It Easier: You can do sumo deadlifts with dumbbells or kettlebells, starting from the top and working your way down, to improve your flexibility over time.
- Make It Harder: Try deficit sumo deadlifts, standing on weight plates.
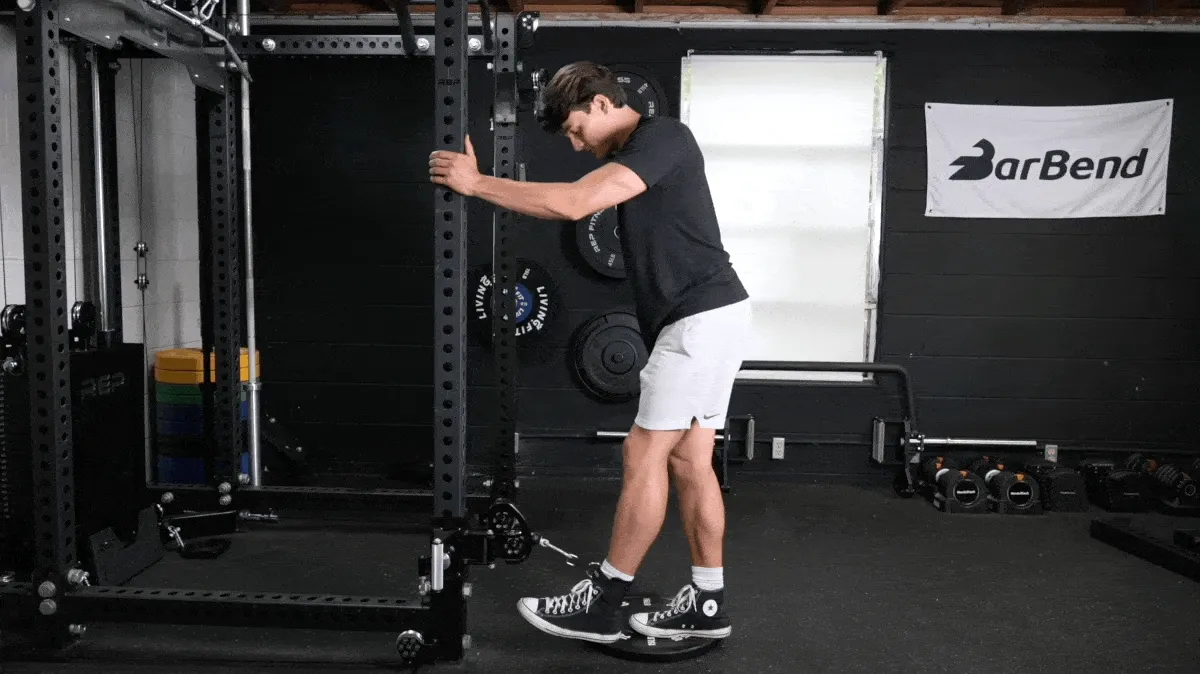
8. Cable Glute Kickback
| Equipment Needed | Cable station, ankle strap |
| Muscles Worked | Glutes, hamstrings |
| Sets & Reps | 3 x 15 |
Why Do It: Glute kickbacks are devilishly effective at growing your glutes because they isolate the muscle; a quality you can’t often find without turning to machines or cables. In this variation, your setup and technique are crucial to the success of the exercise and placing maximal tension where it needs to be. If you can get the angle right, the glute kickback offers unparalleled isolation to your behind through its entire contractile range of motion. Kickbacks make for top-tier finishers at the end of a workout.
How To Do It
- Place a strap attached to the cable around the ankle. Keep your back in a neutral position with your abs engaged.
- Tilt your body forward and kick your leg behind you while maintaining a slight knee bend.
- Raise your leg until you fully contract your working glute while relaxing your non-working leg.
Modifications
- Make It Easier: You can do this move with just your bodyweight to help engrain good form in the beginning.
- Make It Harder: Stand with your non-working leg on an elevated surface to increase range of motion.
9. Step-Up
| Equipment Needed | Weight bench or plyometric box, dumbbells (optional), kettlebells (optional), barbell (optional) |
| Muscles Worked | Quads, glutes, abdominals, hip adductors |
| Sets & Reps | 2 x 15 |
Why Do It: If you aren’t keen on lunges or split squats but want to train your glutes unilaterally, you can grab a plyo box or weight bench and smash some step-ups. Due to the alignment of this exercise, you can place a lot of muscular tension on the glute max without external load. This exercise has many benefits and can be performed with little to no equipment.
“Step-ups are versatile and effective for unilateral glute training. Adjusting the height of the step can modify the intensity, and this movement can be used as an aerobic or conditioning component of your programming,” says Masi.
How To Do It
- Start with one foot close to the edge of a knee-height step-up platform or bench, ensuring the whole foot is in contact with the surface, with the other foot hanging off.
- Drop the foot to the ground, controlling your body weight with the opposite leg.
- Tap the heel of the foot to the ground and drive through the step with the working leg to return back to the starting position.
Modifications
- Make It Easier: Lower the height of the surface you step to until it’s accessible for you.
- Make It Harder: To significantly enhance difficulty, try doing a small vertical hop with your working leg as you stand up, but only if you aren’t using weight.
10. Goblet Squat
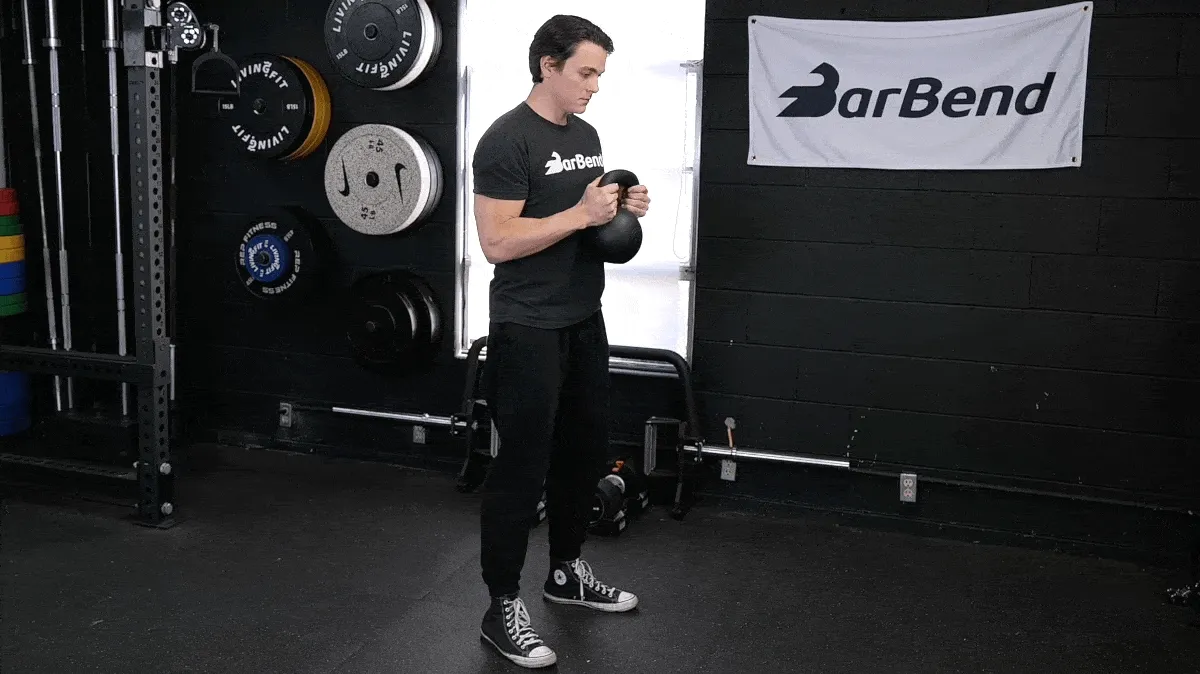
| Equipment Needed | Dumbbell or kettlebell |
| Muscles Worked | Quads, glutes, core, upper back |
| Sets & Reps | 4 x 12-15 |
[Read More: 2 Front Loaded Squat Variations Every Lifter Needs More Of]
Why Do It: This front-loaded squat variation ensures that the lifter stays upright and is done with either dumbbells or kettlebells, making it manageable and more beginner-friendly. Goblet squats can be added to a larger group of exercises for more leg muscle and endurance for more advanced trainees. But the benefits for beginners are nearly endless; it’s easy to perform, encourages good posture, and serves as a great handshake to squatting in general.
How To Do It
- Stand with your feet around shoulder width apart with a dumbbell or kettlebell and hold the weight directly under your chin with your elbows tucked in.
- Brace your core, tense your back, and ensure that you feel stable.
- Keep your chest up and squat down until both of your legs bend to around 90 degrees. Stand back up by driving through the floor.
Modifications
- Make It Easier: You can squat to a box to help limit your range of motion and improve balance if needed.
- Make It Harder: Try pausing in the bottom position.
11. Good Morning
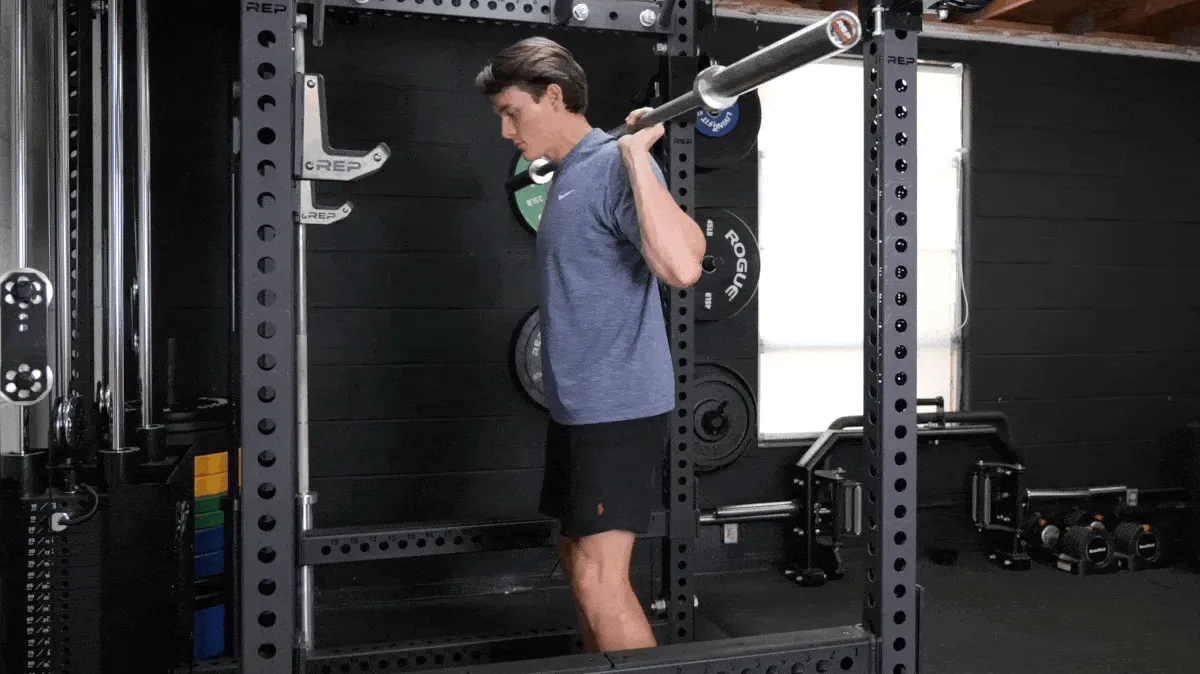
| Equipment Needed | Barbell, weight plates (optional), squat stand or power rack |
| Muscles Worked | Lower back, glutes, hamstrings |
| Sets & Reps | 3 x 10-12 |
[Read More: Better Glutes, Better Pulls: Glute Training for Powerlifting]
Why Do It: Hip hinge movements like the Romanian deadlift are diabolically effective at building your glutes. However, oftentimes, you must use heavy weights to get the most value out of those movements. This isn’t the case for the good morning exercise. By placing the barbell on your back (instead of in your hands), the resistance ends much further away from your glutes — making the reps much harder. This provides a two-for-one benefit — light weights feel heavy and stimulating while also teaching you how to hinge properly with a braced core.
How To Do It
- Unrack a barbell from a squat stand or power rack as if you were going to perform a standard back squat.
- Take a close, hip-width stance, then slowly shoot your hips back behind you and descend into a low bow.
- Your torso should end up nearly parallel to the floor before you reverse the motion and squeeze your glutes to return to a standing position.
Modifications
- Make It Easier: Clutch a sandbag or kettlebell to your chest rather than using a barbell.
- Make It Harder: Pause in the bottom position.
12. Kettlebell Swing
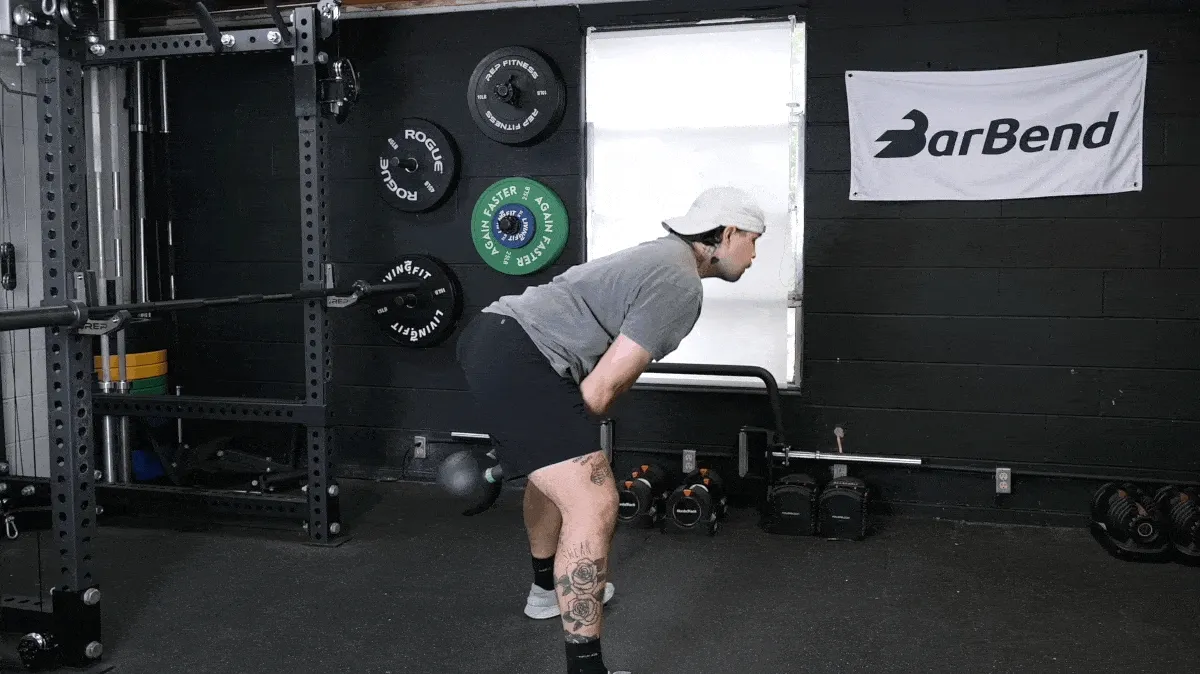
| Equipment Needed | Kettlebell |
| Muscles Worked | Glutes, hamstrings, lower back, core |
| Sets & Reps | 4 x 15 |
Why Do It: Kettlebell swings pull you into a hinged position and require you to generate heaps of explosive power through your hips to finish the rep. This teaches you to flex your glutes rapidly, forcing blood into the muscle and accumulating tons of metabolic stress. The kettlebell swing works well as a conditioning tool or for active recovery.
How To Do It
- Set up with a kettlebell between your feet with a shoulder-width stance or slightly wider.
- Hinge down to grab the kettlebell and sweep it back between your legs, and then rapidly thrust your hips forward.
- The momentum should naturally elevate the kettlebell upward to around belly button height. Allow the bell to fall naturally and kick your hips backward to recycle into the next repetition.
- String your reps together smoothly and you’re off to the races.
Modifications
- Make It Easier: Do Russian kettlebell swings, which limit the range of motion of the kettlebell to roughly belly button height.
- Make It Harder: Reduce your transition time as much as possible.
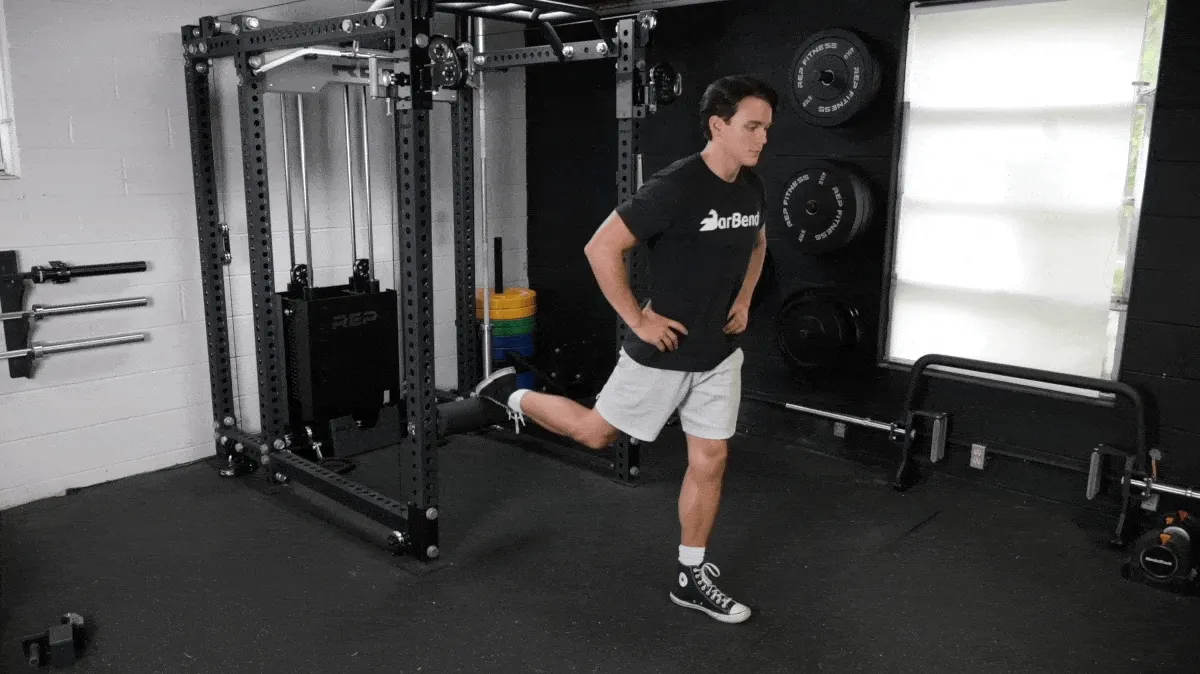
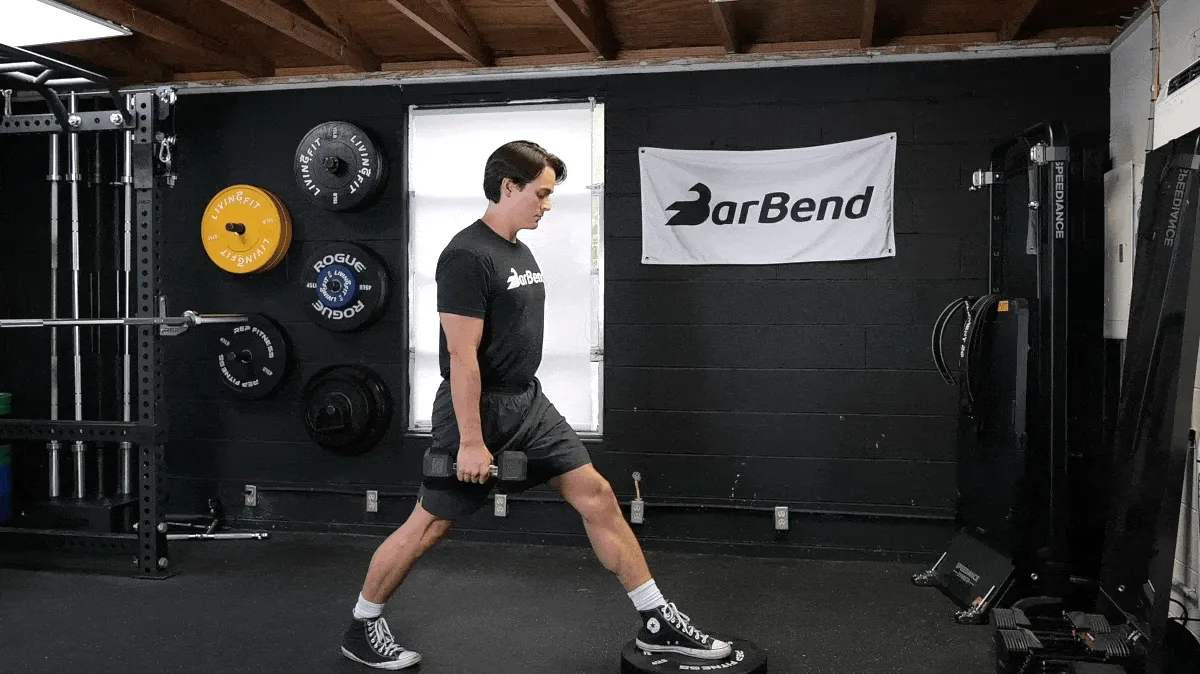
13. Split Squat
| Equipment Needed | Dumbbells (optional), kettlebells (optional) |
| Muscles Worked | Quads, glutes, abdominals |
| Sets & Reps | 3 x 10 |
Why Do It: Split squats serve as a great introduction to single-leg training. They work your glutes individually, and even light weights (or none at all) will feel challenging. Split squats are also easy to customize — adding a low weight plate as shown above will stretch your glutes a bit more.
How To Do It
- Stagger your stance, placing your dominant leg about two feet in front of you. Your back foot should be up, touching the ground only with your toes.
- Square your hips, ensuring they’re pointed forward, and lean heavily into your front leg, placing most of your weight on it.
- Drop your hips down and forward as low as you can before your back knee touches the floor.
Modifications
- Make It Easier: Hold onto something stable with your free hand to reduce the demand on your balance.
- Make It Harder: Stand with your working leg on an elevated surface to increase range of motion.
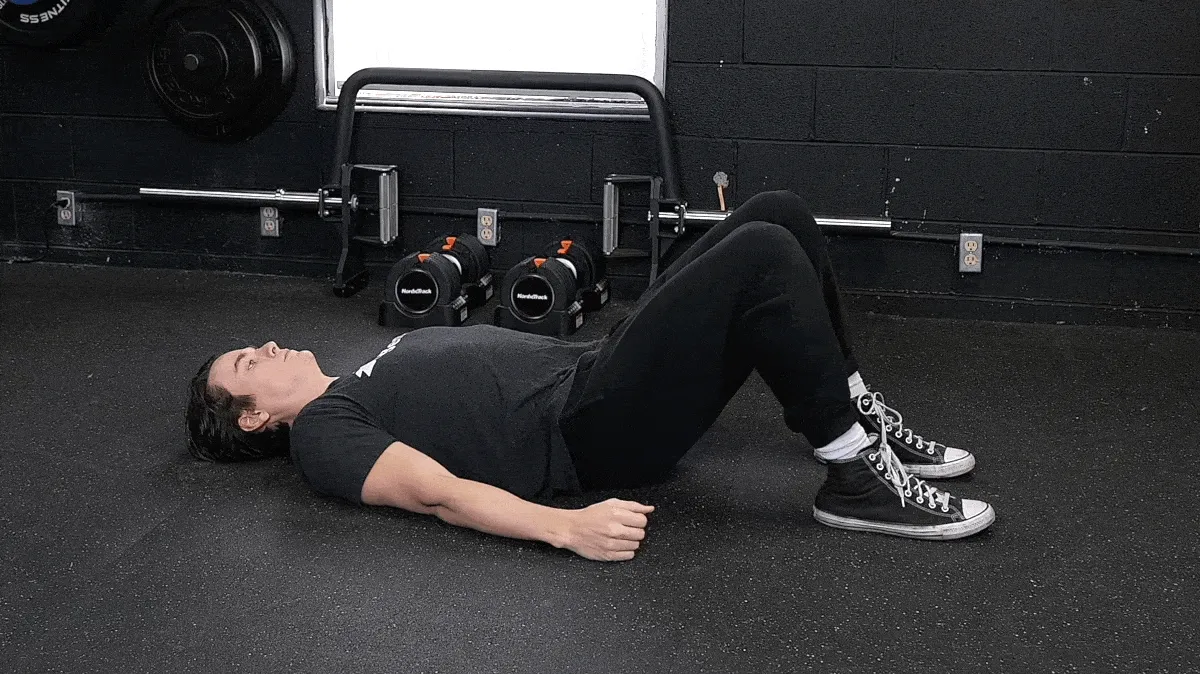
14. Glute Bridge
| Equipment Needed | Exercise mat (optional), dumbbell (optional), kettlebell (optional) |
| Muscles Worked | Glutes |
| Sets & Reps | 3 x 15 |
[Read More: 5 Glute Bridge Benefits]
Why Do It: Your glutes perform hip extension; straightening out your legs and torso. This movement pattern isn’t always easy to figure out, and the glute bridge serves as a great teaching tool to help you learn how to use your butt muscles in harder exercises.
How To Do It
- Lie on the floor on your back and bend your knees so your feet plant flat on the floor. Relax your arms by your sides.
- Lift your hips off the floor by contracting your glutes.
- Push your hips up toward the ceiling until your body forms a straight line from kneecap to shoulder.
Modifications
- Make It Easier: Try placing your hands on your hips to help guide your motion.
- Make It Harder: Try doing them one leg at a time.
15. Curtsy Lunge
| Equipment Needed | Dumbbells (optional), barbell (optional) |
| Muscles Worked | Quads, glutes, hip adductors, hip abductors, core |
| Sets & Reps | 2 x 10-12 |
Why Do It: Your body isn’t designed to only move forward and backward. Side-to-side and twisting motions occur in the real world — and your glutes need to be prepared to handle those demands. This move also earns points for convenience, it’s a great glute exercise to do at home if you don’t want to head to the gym.
How To Do It
- Stand upright with your feet under your hips.
- Take a step backward with your working leg, but cross it over and behind you; if you’re using your left leg, step back and to the right.
- As you step back, bend both knees and sink into a lunge position.
- Reverse the motion, pushing hard into the floor to engage your glutes.
Modifications
- Make It Easier: Hold onto something stable with your free hand if necessary for balance.
- Make It Harder: Try the deficit curtsy lunge, placing your non-working leg on an elevated surface like a weight plate.
Five Glute Workouts To Try
Glute training has become prominent in the fitness world, but many mainstream exercises and workouts are inherently flawed. Building a rock-solid booty takes a bit more finesse than yet another set of unweighted kickbacks.
Glutes Warm-Up
One of the most effective warm-ups for any muscle group will be the exercises you perform in that day’s training session. For example, if you’re performing back squats, you can warm up by performing light reps and increasing intensity as you proceed toward your working sets.
Here’s a sample warm-up you can use on your next glute-focused workout:
- 5-10 minutes on the incline treadmill, stair climber, or elliptical
- 2 sets of 15-20 banded side shuffles, unweighted step-ups, or bridges
- 1-2 sets of your first compound exercise with the empty bar or light dumbbells
[Related: Prime Your Glutes Using These 12 Warm-Up Exercises]
At-Home Glute Workout
Glute exercises with weights will give you the most bang for your buck. However, you may not have a fully-furnished home gym and might need to resort to some bodyweight glute exercises from time to time. Try these glute exercises at home for your workout:
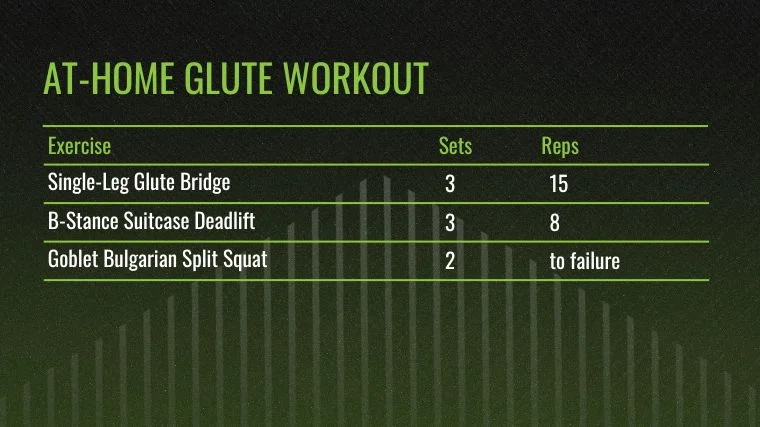
- Single-Leg Glute Bridge: 3 x 15
- B-Stance Suitcase Deadlift: 3 x 8
- Goblet Bulgarian Split Squat: 2 sets to failure
Glute Workout for Beginners
Bilateral bridges, hinges, and squatting patterns are the bread and butter of developing the glutes. In order to get there, early focus should be placed on mastering technique, preventing unilateral differences in skill or strength, and improving hip stability. Since these exercises will become staples for any number of glute workouts, building a strong foundation is critical.
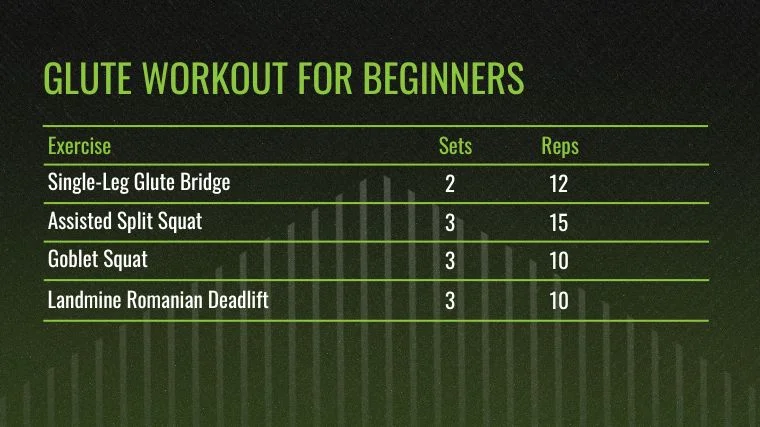
- Single-Leg Glute Bridge: 2 x 12
- Assisted Split Squat: 3 x 15
- Goblet Squat: 3 x 10
- Landmine Romanian Deadlift: 3 x 10
Glute Workout for Strength
Working with free weights like the barbell or dumbbells is the best way to combine strength, skill, and function. Choosing a barbell or dumbbell version of the squat or hinge to primarily focus on while rotating through other methods of challenging the remaining patterns is a great tool for training with long-term progress in mind.
In simple terms; if you want to build strength, you need to perform glute exercises with weights. Compound exercises are preferable here.
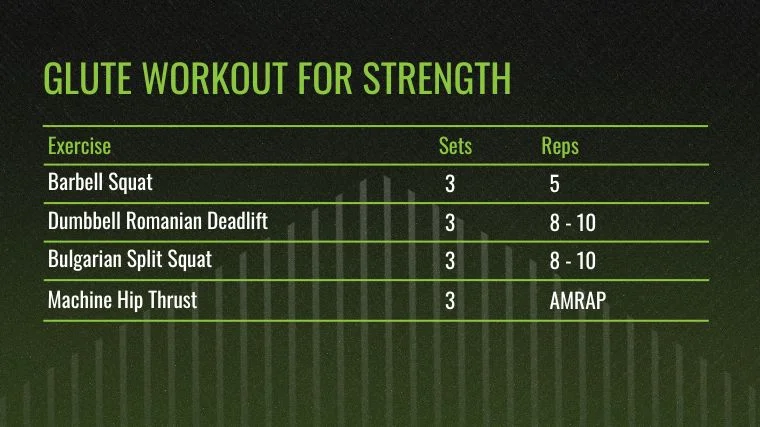
- Barbell Squat: 3 x 5
- Dumbbell Romanian Deadlift: 3 x 8-10
- Bulgarian Split Squat: 3 x 8-10
- Machine Hip Thrust: 3 x AMRAP
Glute Workout for Hypertrophy
Using a leg press to train the squatting pattern, lifting straps for grip on dumbbell or barbell moves, and using machines for burnout are great ways to maximize results over the course of a workout. A mix of all modalities – barbells, dumbbells, and machines — is useful and can be rotated to keep training fun and stimulating.
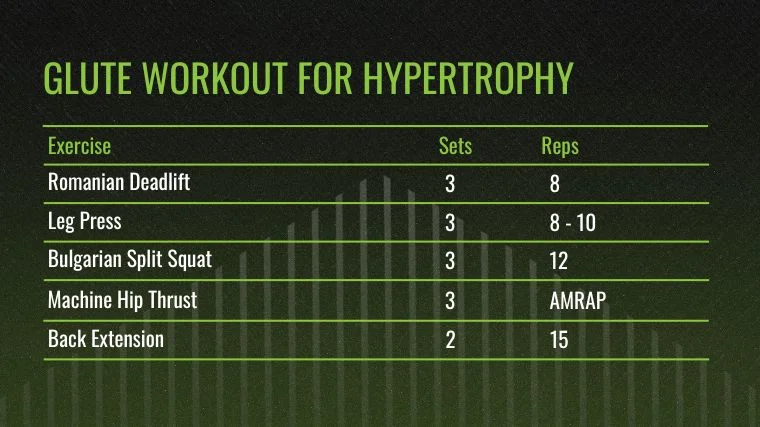
- Romanian Deadlift: 3 x 8
- Leg Press: 3 x 8-10
- Bulgarian Split Squat: 3 x 12
- Machine Hip Thrust: 3 x AMRAP
- Back Extension: 2 x 15
Glute Workout for Endurance
Long walks, hiking, or standing for extended periods of time can all challenge the endurance of the glutes. Choosing exercises that mimic and overload those patterns can reinforce proper mechanics when these real-life challenges occur, and also help build a solid foundation of glute development in the process.
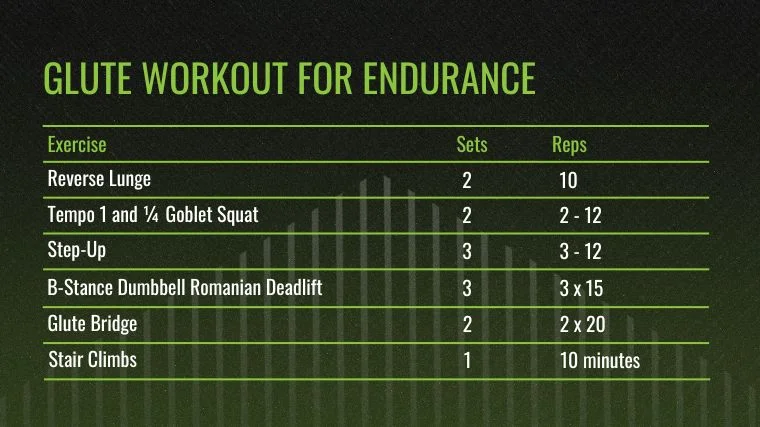
- Reverse Lunge: 2 x 10
- Tempo 1 and ¼ Goblet Squat: 2 x 12
- Step-Up: 3 x 12
- B-Stance Dumbbell Romanian Deadlift: 3 x 15
- Glute Bridge: 2 x 20
- Stair Climbs: 10 mins
Benefits of Training Glutes
We won’t dance around it: Big butts are in. Training your glutes will help you fill out your favorite jeans, but the perk package doesn’t stop there.
A Bigger, Rounder Backside
The right glute training routine can help you grow, shape, and tone your butt. Your glutes are a muscle like any other, and muscles respond to strength training by getting bigger.
Don’t worry; you aren’t going to wake up one day with a backside that’ll make Kim Kardashian blush. Building muscle takes time. That said, over the course of a few weeks or months, you can expect your favorite pants to start fitting a bit better.
Better Sports Performance
Your glutes aren’t a “show” muscle; they can really “go” the distance, especially if you’re an athlete. Your gluteal muscles perform a motion called hip extension.
You see athletes perform hip extension in nearly all sports — track athletes breaking off the blocks when they sprint, weightlifters coming to the top of a snatch or clean, or offensive linemen driving into each other when the QB yells, “Hike!”
Put simply, if you play sports professionally or even recreationally, training your glutes in the weight room will improve your results on the field.
[Related: Optimal Glute Training for Powerlifting]
Injury Prevention & Management
Your glutes affect your pelvis and hip joints, which are sometimes prone to acute or chronic injuries suffered during exercise or even an accident at home. Luckily, getting your butt into the gym — and then training it — can help manage lower-body ailments like hip pain or instability. (1)
Glutes Anatomy
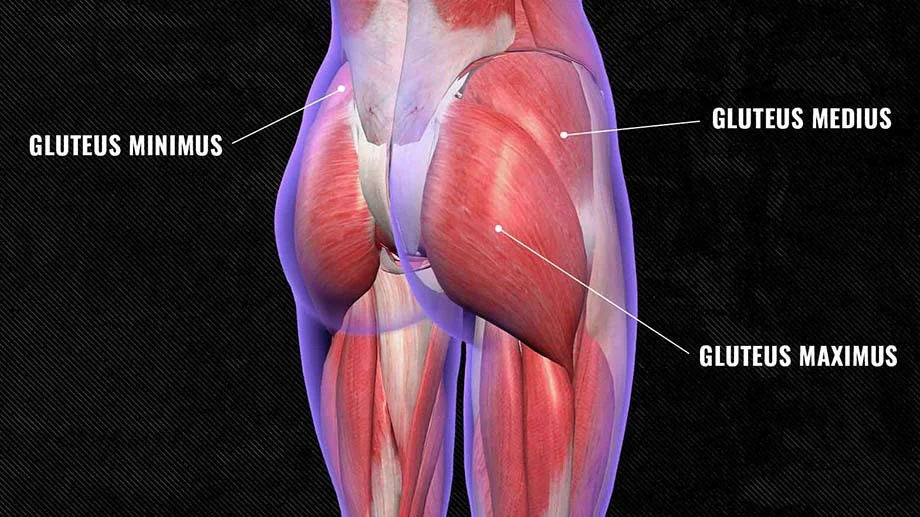
Your glutes are the largest single muscle in your lower body, and they’re also the most powerful. That said, there’s a lot of booty-related misinformation out there — “upper glute exercises”, “lower glutes”, and so on. These regions aren’t specific muscles that you can target individually. Here’s how your glutes actually work:
- Gluteus Maximus: The largest and most superficial (close to the skin) of the glute muscles. This region of the muscle does the most work when you perform glute exercises with weights that emphasize hip extension.
- Gluteus Medius: This muscle is found high on your hip and to the side. Your glute medius is a stability-focused muscle that helps control the movement of your thigh bone in your hip socket.
- Gluteus Minimus: This tiny, deep muscle in your hip isn’t something you can effectively target in the gym with most exercises. It assists your other glute muscles and helps stabilize the pelvis, preventing it from tilting side to side.
Frequently Asked Questions
How many glute exercises should you do per workout?
The answer depends on your experience and goals. But generally speaking, two to three glute movements per workout should do the trick. Try to incorporate one hinge exercise (such as a Romanian deadlift) and one squat exercise (such as a back squat or lunge) per workout.
What are the best glute exercises?
There’s no single “best” glute movement; you should pick movements that are comfortable for you and that you can progress on. That said, the hip thrust, Romanian deadlift, and Bulgarian split squat are commonly considered to be among the most effective glute workouts for mass out there.
References
- Stastny P, Tufano JJ, Golas A, Petr M. Strengthening the Gluteus Medius Using Various Bodyweight and Resistance Exercises. Strength Cond J. 2016 Jun;38(3):91-101. doi: 10.1519/SSC.0000000000000221. Epub 2016 Jun 3. PMID: 27340373; PMCID: PMC4890828.
Featured Image: Jasminko Ibrakovic / Shutterstock