
The conventional deadlift is a staple in a lot of strength athlete’s training programs. And whether you’re an athlete, coach, or beginner, nailing and teaching proper deadlift mechanics for this lift is vital to the longevity of one’s back health.
To the untrained eye, the conventional deadlift is a relatively simple movement. You bend down, grab the weight, and pick it up. But there are many characteristics that make a great deadlift, such as a good hip hinge, strong core (as a whole), and stable upper back. This article will assess and look at three major components of the deadlift.
- Scapular Retraction and Upper Back Stability
- Proper Hip Hinge
- Core and Lower Back Stability/Strength
To cover these three areas, physical Therapists Stephen Horney and Karl Eichenfeldt at iPT Integrated Health Science in New York City, will walk us through three easy-to-use tests to improve, coach, and test your conventional deadlift readiness.
Whether you’re coaching someone, trying deadlifts for the first time, or simply want to improve your conventional form, then the three tests in the video may help you out.
1. Dynamic Scapular Retraction Test
Things You’ll Need
- Wall or Flat Surface to Sit Against
What to Look For
An athlete’s ability to maintain a neutral spine through scapular retraction.
How to Test
To start, the athlete will sit against the wall with a neutral spine and bring their elbows up parallel to the floor, as if they’re making a field goal sign.
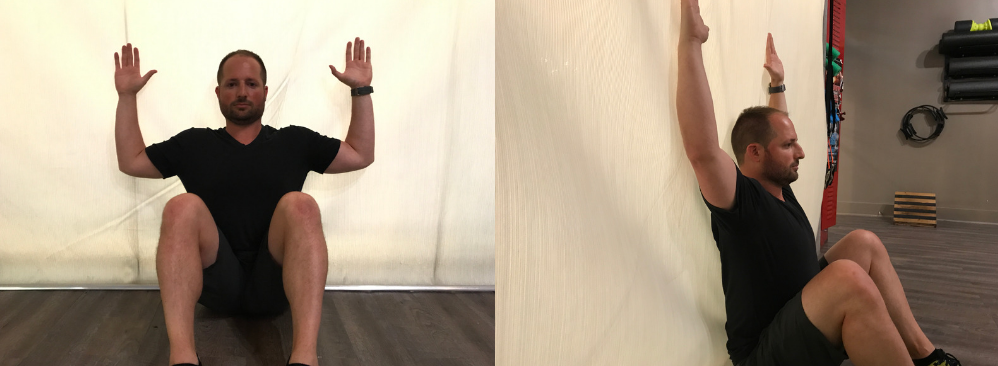
The athlete will slide their arms up the wall until their hands nearly meet (or are straight upwards), and then bring them back down. If the athlete is arching their back, bringing their head forward, or lifting their elbows off the wall, then chances are they’re lacking the ability to properly retract the scapula with a neutral spine.
This can be an issue when deadlifting at the top of the movement. Often the inability to maintain scapular retraction throughout a deadlift will leave an athlete with a rounded upper back. The lats could also be the problem if an athlete finds this happening a lot. Below is an example of a failed test.
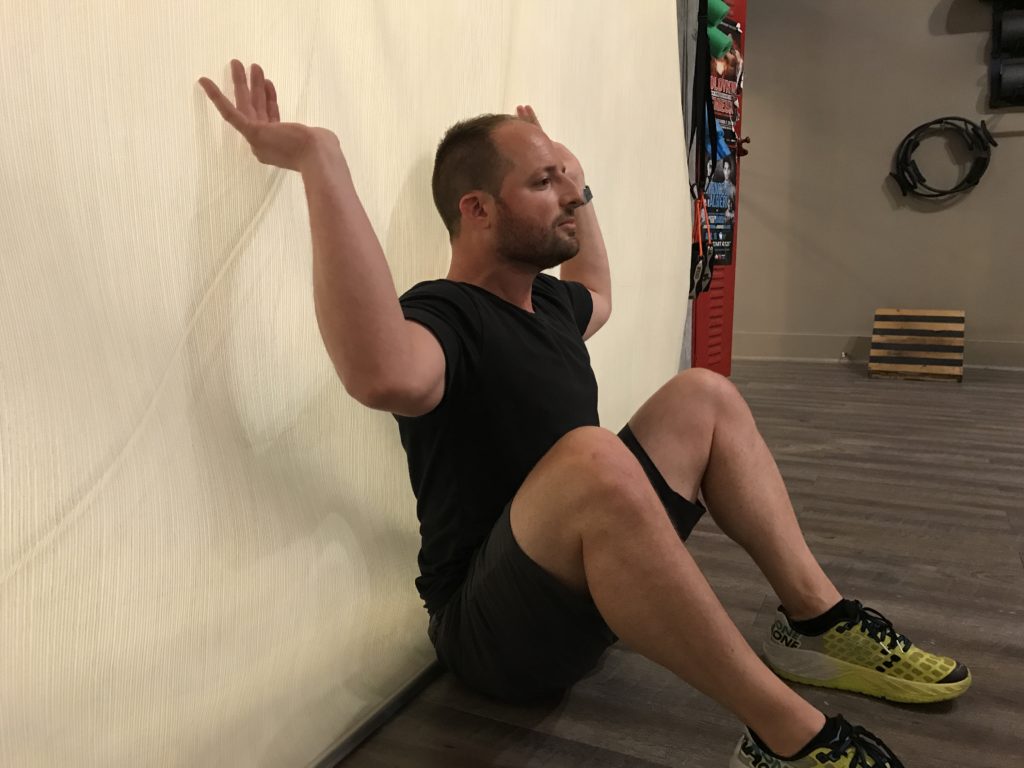
If an athlete finds themselves failing this test, then Horney and Eichenfeldt recommend performing this movement slowly a few times pre-workout. It’s not only a great mobility test, but it can be a useful dynamic stretch as well.
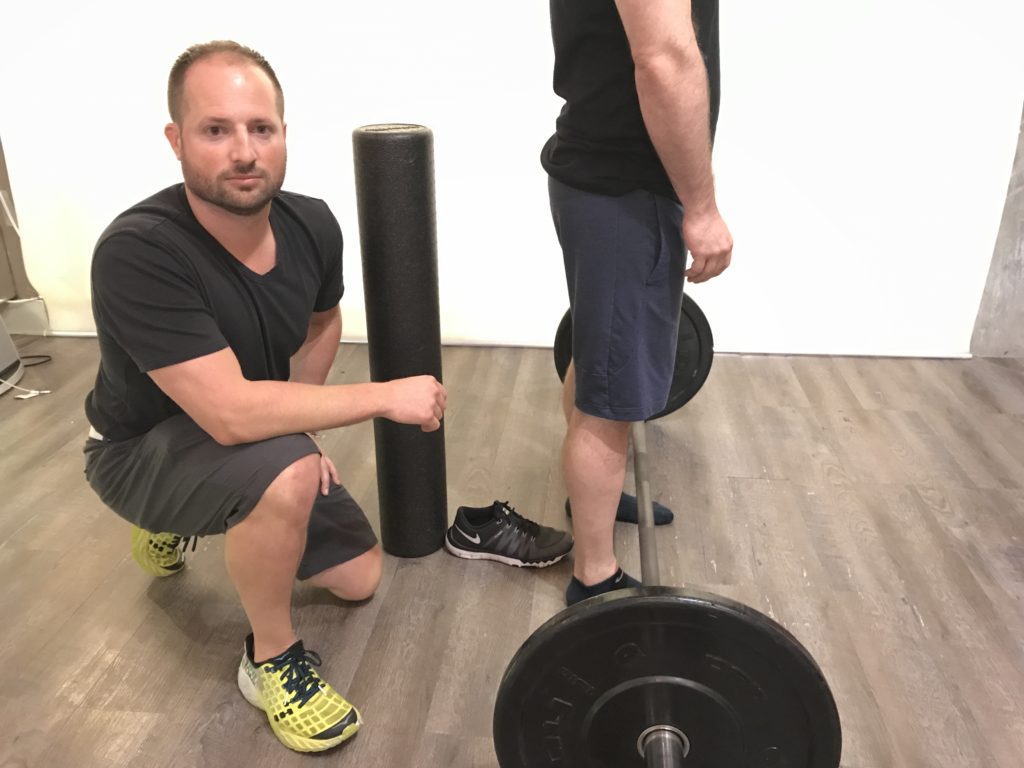
2. Shoe Length Hip Hinge Test
Things You’ll Need
- Foam Roller
- Shoe
- Loaded Barbell
What to Look For
For this test, you’re going to assess proper hip hinge mechanics in a conventional deadlift setup. Common issues athletes tend to have is a sit that’s too low, or an upright setup (high hips). This test can be useful for assessing your hinge ability, but also finding your optimal setup position.
If an athlete has trouble hinging correctly, then stress can be displaced into the lower back, or their movement patterning may be thrown off (ex: hips rising too fast).
How to Test
To begin, an athlete will take off their shoes and set up a loaded barbell with regular plates, as if they’re going to lift the weight. They’ll stand with the mid-foot under the barbell and place a shoe directly off their heel. Once they’ve done this, they’ll grab a foam roller and set it up at the end of the shoe (the side furthest away from the barbell).
From here, they’ll grip the bar, hinge at the hip, and set their back, as if they’re getting ready to pull the weight. Horney and Eichenfeldt have found that a large majority of athletes will hit, or knock over the roller when hinging correctly in their conventional setup.
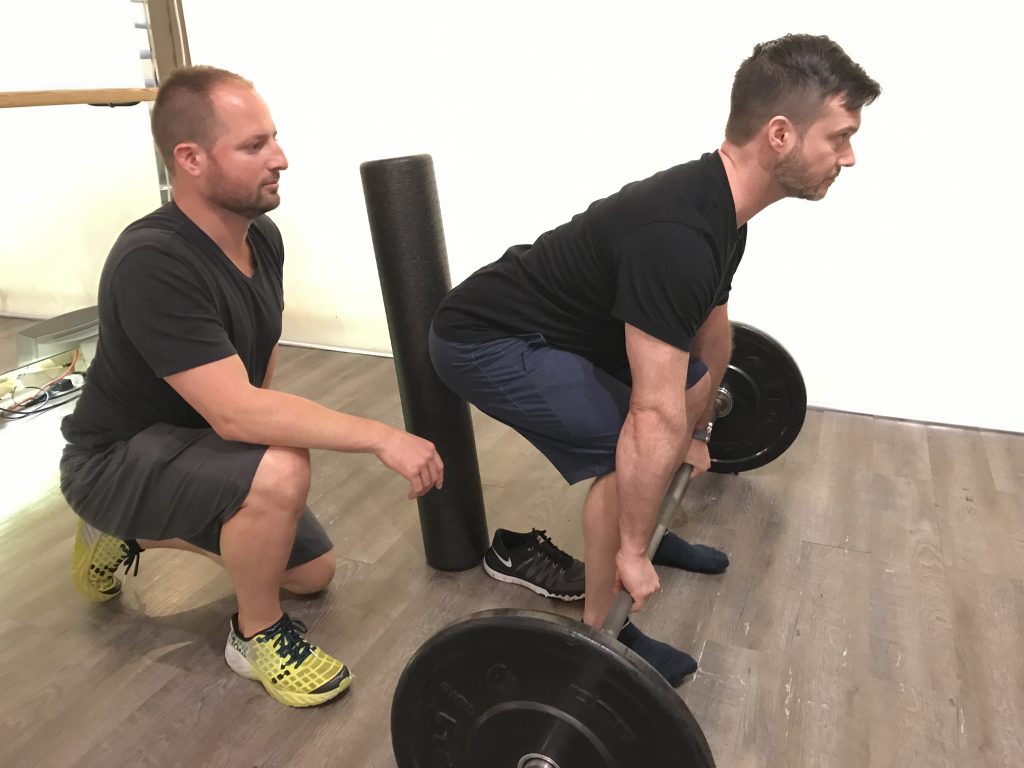
While there are a few outliers due to anthropometric differences, mid-foot tends to be the best universal hip hinge setting. Taller athletes (6′ 1″+) may find lining the bar off the pinky toe works best.
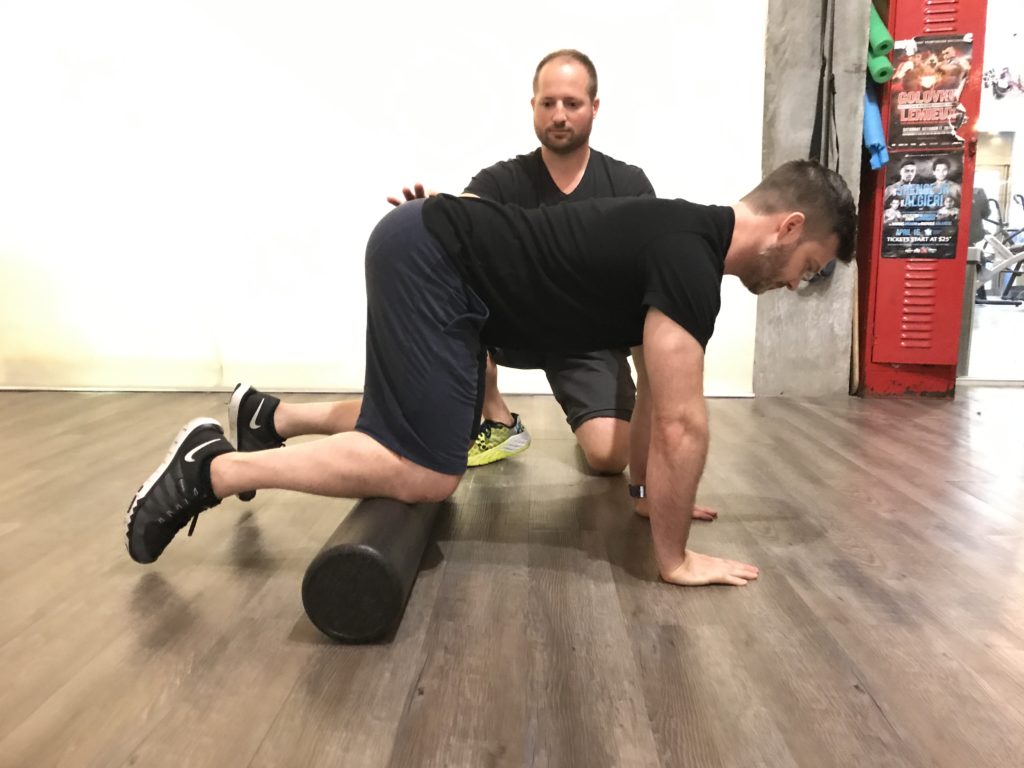
3. All Four Foam Roller Core Test
Things You’ll Need
- Foam Roller
- Mirror or Friend/Coach to Observe
What to Look For
Another issue athletes can struggle with – especially when first learning conventional deadlifts – is maintaining a strong core, and rigid lumbar. This foam roller test is designed to assess an athlete’s ability to maintain the hollow, rigid posture needed to lift weight without excessive flexion at the torso.
How to Test
To start this test, an athlete will position themselves on all fours (table top position, knees under hips) maintaining a neutral spine with a foam roller sitting at the top of the shins.
Once an athlete is set, they’ll begin to shift their weight slightly forward and roll their knees toward the back of their wrists. As the athlete rolls forward, they’ll try to maintain a neutral spine the whole time.
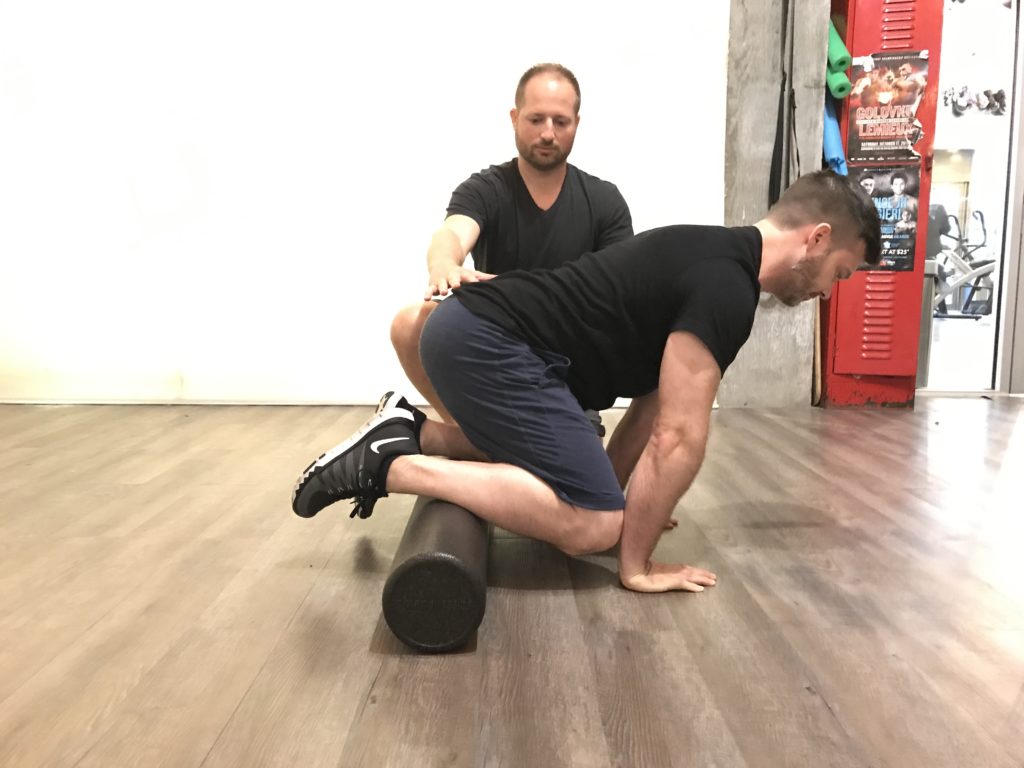
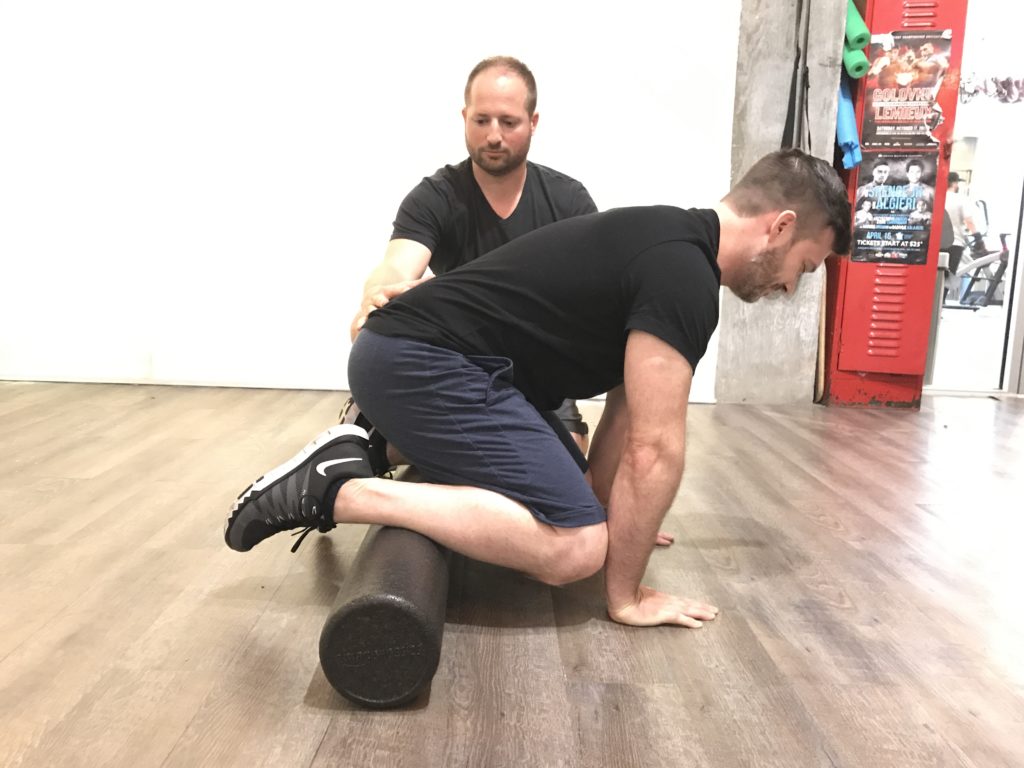
A failed test will leave the athlete with a rounded mid-back, or posterior pelvic tilt (pelvis rounding under the body). These can be signs of poor back mobility, and a weak core.
The picture below is an example of what a rounded pelvis will look like in a failed test. It’s a subtle difference, which is why Horney and Eichenfeldt recommend doing this in a mirror, or with a partner.
Wrapping Up
No matter where you are in your strength training career, there are always areas you can improve. Simple tests like these are great ways to teach others and remind yourself of the basic mechanics that encompass the conventional deadlift.