
There is a lot of content out there about foam rollers and the best ways to use them for almost to aid every part of the body. Be it upper or lower, from glutes to calves, for active and sedentary people alike, a foam roller provides benefits such as better recovery, improved mobility, or keeping muscle tension at bay.
Foam rollers are not relegated to only being used when warming up and cooling down. There are a lot of ways to use a foam roller during your workout to spice up common exercises, challenging stabilizer muscles, and increase overall time under tension to build up strength.
Below you’ll find full body workouts with a focus on upper body, lower body, and core using your bodyweight and a foam roller. The exercises found in these workouts are very much interchangeable, so if you’re feeling creative, mix and match as you see fit to keep your workouts interesting and challenging.
Without any further adieu, let’s start with an upper body workout.
Upper Body Focus
This workout is going to mostly target the chest, shoulders, and arms. The core will take on a lot of work as well as much of the routine is done in a plank position.
[Related: Learn how to breathe properly while performing a plank.]
The Workout
4 rounds of:
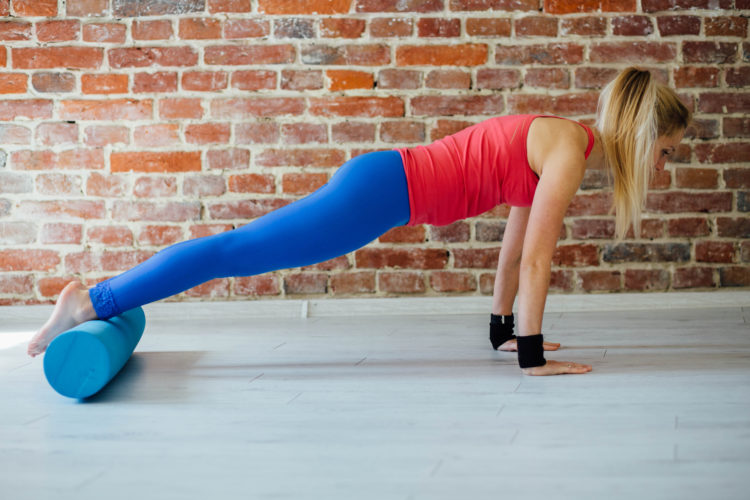
- 8 push-ups with the foam roller under your ankles.
- 10 foam roller skull crushers.
- 6 foam roller flyes.
Foam Roller Push-Ups
These push-ups might feel different than standard push-ups. While on your knees, place a foam roller under your ankles (so the front of your ankles are resting on the foam roller). Then slowly walk your hands out so you are in a push-up position. From there, perform a push-up in a slow and controlled fashion.
Balancing your ankles on the foam roller will tax your shoulders significantly more to stabilize you. In turn, that makes the eccentric part of the push-up more difficult. That’s the goal and why you should not rush through the reps. During the concentric motion back to the top, as you drive through the base of your palm, imagine trying to drive your hands towards each other rather than straight down. If done correctly, you should feel a stronger contraction in your chest.
Foam Roller Skull Crushers
Trainer Jay T. Maryniak demonstrates solid form on the foam roller skull crushers in this post below from his Instagram page:
https://www.instagram.com/p/B-K6hgglD5S/
Maryniak is using a small foam roller here, likely to help maintain proper positioning; elbows do not flare and the wrists remain in alignment with the shoulders. A large foam roller will do just fine, just be conscious that your positioning doesn’t inch wider and wider between reps. Here is Maryniak doing the same movement with a longer foam roller. You’ll notice that his arms are in a slightly wider stance but still in good alignment with his shoulders.
https://www.instagram.com/p/Bex6iFPlbr7/
Maryniak is adding a mountain climbers and oblique crunches on each side in addition to the skull crushers in level 2 and level 3 respectively in the video above. Don’t feel like you need to do anything beyond level 1 when first performing this move. It may not be as easy to balance as Maryniak is making it look. But if you want the added difficulty and can hdandle it, we certainly won’t stop you.
You’ll notice his body stays entirely still when he shifts from his hands to his forearms and back. He is able to maintain that steadiness by curling the hips forward to better engage his core. The eccentric movement here is not very long. It goes from the hands to about halfway up the forearm. That is all you need. If you roll closer to the elbows, the move becomes more of an ab rollout (you’ll know if you roll too far if your triceps lose the tension and/or your shoulders and elbows move out of alignment).
[Sitting for most of the day? Check out these foam roller exercises to improve posture.]
Foam Roller Flyes
For these you’ll need a couple of paper plates, a pair of core sliders, or anything that you can place under your hands that can comfortably slide on the floor you’re training on. Assume the same position as the foam roller push-ups (foam roller under the ankles) and then place your hands on the paper plates.
From there, bend your elbows slightly and slide your hands out laterally without breaking your plank. Then drive your hands back to the starting position and you’ll feel a strong contraction in the chest. That is one rep. Your elbows should have a comfortable bend throughout the entire motion; keeping them straight will apply a lot of pressure on them that should be avoided.
This motion is similar to a dumbbell fly on a bench except the inverted position requires additional stability. If the balance demands for these are too difficult starting out, remove the foam roller and get a feel for performing the flyes with only the plates. When you’re ready, add the foam roller back in. During the concentric motion (driving the hands back to starting position), imagine trying to bring the outer bottom corners of your palms together. This will help keep the tension in your chest and keep your shoulders from hiking.
Lower Body Focus
The focus for this foam roller workout will indeed be the quads, hamstrings, and glutes, but not necessarily on breaking a heavy sweat. The following movements are primarily isometric that focus on muscle activation. They require full attention to execute properly. If your form is pristine, you will likely feel the effects of this workout the next day.
The Workout
2 rounds of:
- 20 foam roller lateral lunges (each leg)
- 20 foam roller wall sits w/5 second pause
- 10 foam roller single leg glute bridges (each leg)
Foam Roller Lateral Lunges
The video below from Joel Seedman’s Instagram page does a great job demonstrating how to use a foam roller to do a foam roller lateral lunge. Take a look and then we’ll break some of the details:
https://www.instagram.com/p/B-SUEP3jaVV/
If you don’t have weights, that’s okay, you don’t need them. If you would like to add some weight, grab a gallon of milk or something similar available to you with some heft.
The first thing in the form to take note of here is how the foot on the foam roller stays square. Both feet point in the same direction the entire movement. This will keep your hips square so all the weight can drive through the heel of the foot not on the foam roller.
The benefit of a foam roller over a sliding disc or plate is that the foot can naturally roll with it. The caption covers it best:
…the round surface area of the roller allows the foot to gradually pronate into a natural position allowing more natural internal rotation of the hip.
Foam Roller Wall Squats
Stand with a foam roller resting between the base of your lower back and a wall. Lower yourself until your legs are at a 90 degree angle and the foam roller is against your mid back. Hold that position for 5 seconds before returning to the starting position.
The foam roller will demand constant tension to keep it from falling. During a normal wall sit without a foam roller, leaning forward can relieve some of that tension. As you lower down and rise up from the wall sits, keep it slow and controlled.
Foam Roller Single Leg Glute Bridge
If you have ever done a glute bridge before, the form will be largely similar when including a foam roller. Lay on the floor with a foam roller underneath your foot. The foam roller and your foot should be parallel. Extend your other leg out straight sticking out your heel, not your toes. Now focus on engaging your glute and drive your hips to the ceiling. Slowly lower yourself back down and you have completed one rep.
For more advanced athletes, prop yourself up on a step stool or a couch. By elevating your base, it will remove the ability for your arms to help you stabilize. You can see an example of this from Joel Seedman’s Instagram post below:
https://www.instagram.com/p/BfOmfMvHjHt/
As soon as my athletes learn to activate their feet and ankles during glute bridges and hip thrusters…It’s as if this is the missing link in getting them to truly activate their glutes…I’ve found foam roller bridges and hip thrusters particularly effective for fixing these issues.
Core Focus
When using a foam roller to work your core, the volume of exercises is high and they all have a lot of variations. The following workout is not going to pull any punches so if you have to make subtle tweaks, don’t hesitate.
The Workout
3 rounds of
- 5 foam roller rotating mountain climbers (each leg)
- 15 foam roller toe touches
- 5 foam roller rotating mountain climbers (each leg)
- 15 foam roller crossover crunches (each side)
- 5 foam roller rotating mountain climbers (each leg)
- 15 foam roller leg lifts
- 5 foam roller rotating mountain climbers (each leg)
- 10 foam roller alternating knee taps (each leg)
- 10 foam roller roll-ups
To get a visual of foam roller rotating mountain climbers, take a look at the first movement in this post below from Jay Maryniak:
https://www.instagram.com/p/BiXkGKLAtgv/
While holding a plank position with your hands on a foam roller, twist your core and drive your right knee to your left elbow. Return to the starting position and drive your left knee to your right elbow. Completing a rotation on each side is one rep.
We’ll walk through how to do each of the other exercises individually, but this Instagram post below from FitforFlex featuring Caity Maclennan shows good demonstrations for each of them that you can use for reference:
https://www.instagram.com/p/BxzX9w3DAsY/
Foam Roller Toe Touches
While laying on your back, elevate your legs and balance a foam roller between them and your arms. The foam roller should be perpendicular to your torso. Without letting the foam roller fall, perform a crunch to touch your toes. You’ll roll your forearms up the foam roller as you do this. Then lower back down to the starting position.
The foam roller will compel constant activation from your core to maintain the pressure between your arms and your legs. Doing so prevents taking rest periods between reps.
Foam Roller Crossover Crunches
Elevate your legs and balance a foam roller parallel to your torso between your left foot and left hand. The foam roller should be supported by only your left foot and left hand, but your right foot should stay at the same elevation as the left. Your legs and supporting arm should remain straight through the whole movement and should maintain constant tension on the foam roller.
From there, place your hand behind your head for support and perform a crunch with the intention of touching your elbow to the foam roller. Each crunch is one rep.
Foam Roller Leg Lifts
These are likely the most common movement of the workout. While laying on the floor, place a foam roller that is perpendicular to your torso between your feet. Then engage your core so that only your lower back is touching the floor and raise your legs to 90 degrees. Lower your legs back down as far as possible without touching the floor. Repeat until all reps are completed.
Foam Roller Alternating Knee Taps
With your hands by your ears, balance a foam roller that is perpendicular to your body between your elbows and your knees. While maintaining constant tension on the foam roller, extend one leg out straight (this will leave only one knee to support the foam roller), then return that leg and extend the other one.
During each rep, only one leg will be able to support the foam roller with the elbows which will keep your core activated the entire movement.
Foam Roller Roll-Ups
These will most likely need to be done in a slow and controlled fashion because they require balance, but they will also offer a nice release between reps.
Lay parallel on top of a foam roller, keeping your knees bent and your feet on the floor. Imagine there is a string attached to the top of your forehead drawing you toward the opposite corner of the ceiling. Engaging your core (not your neck), roll yourself up the foam roller just shy of sitting upright. Then lower yourself down.
Wrapping Up
Another benefit of using a foam roller for your workout is that once it is complete, it’ll be handy to use during your cool down. These workouts really tax your stabilizers and steer the focus towards activating the targeted muscle groups. Take on each workout steadily and keep your form strong.
Feature image from Jay T. Maryniak’s Instagram page: @jtm_fit