
The Farmer’s Walk, a common strongman event, has grown in popularity amongst athletes, general fitness enthusiasts, and anyone wanting to get stronger. The benefits of farmer’s walks are numerous: improved grip strength, single leg balance and loading, abdominal activation, upper back and trap strength to name a few. Those things have been covered in articles in the past, so we will be focusing on the technical breakdown of how to properly execute the farmer’s walk. These coaching cues are geared toward the novice to intermediate crowd.
For all of the cues and tips listed below I will be using a traditional farmer’s walk handle (plate loaded at the ends, handles approximately 16” off the ground). I give more detail on each step after the “How To” section below.
Set up/Footwork
1. Stand between the handles with your feet approximately hip width apart, and just slightly behind the center of the handles. Adjustments can/should be made based on personal preference as well as equipment being used.
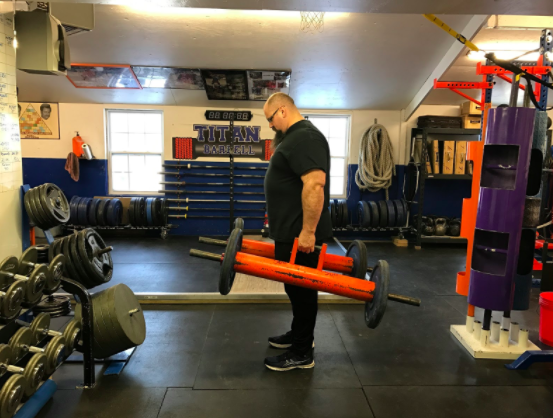
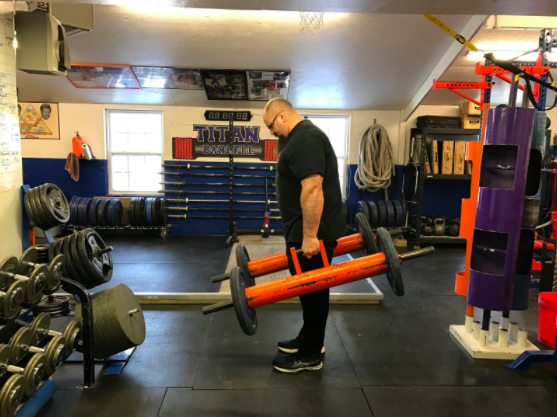
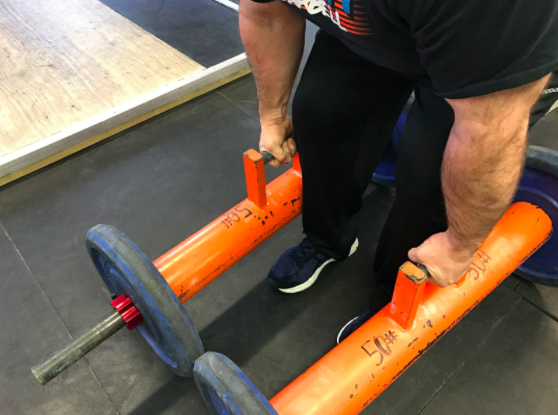
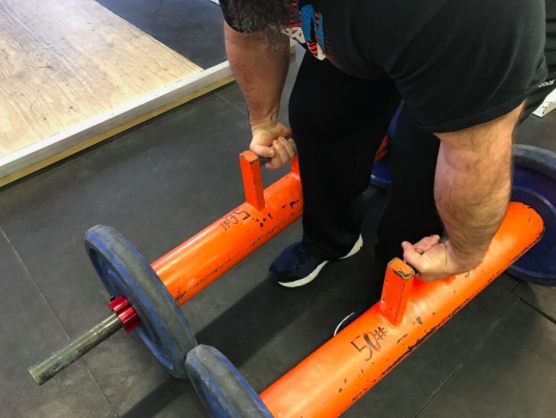
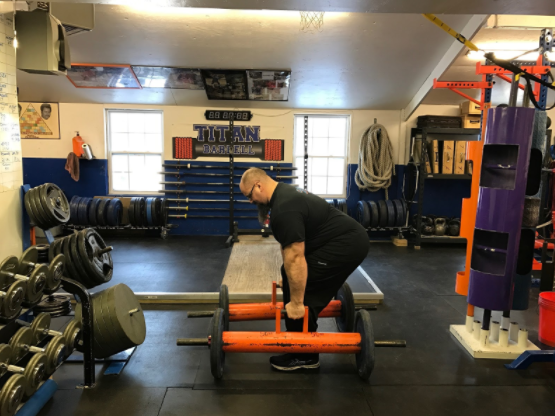 2. Grab the center to just slightly behind the center of the handles and squeeze as hard as possible. If you grab too far forward the front of the handles will pop up and you will feel like you are fighting against the weight the whole time (first photo). If you grab too far back the front end of the farmer’s handles will dig into the ground, most likely causing you to drop (second photo). For beginners I suggest a grip that keeps the handles parallel to the ground (third photo).
3. Grip type will be a personal preference as well. I personally like a “reverse hook grip” where I grab the handles normally but take my thumb and lock in over the top of my index finger (first photo). This will help create a strong connection at the point where your grip will be tested the most. You can also experiment with “over gripping” (sometimes called monkey grip) the handle, where you actually turn your wrists in so when you lift up the handles pull into your palms even more (second photo).
4. Once your grip is set take a breath into your stomach and lower back. Engage your lats by pulling your shoulders back to your hips and pull your hips down until you feel you have created the maximum amount of tension. If you are having trouble with this step try repeating a few times by setting your breath, lats, and hips, then releasing and repeating until you find the position most comfortable to you.
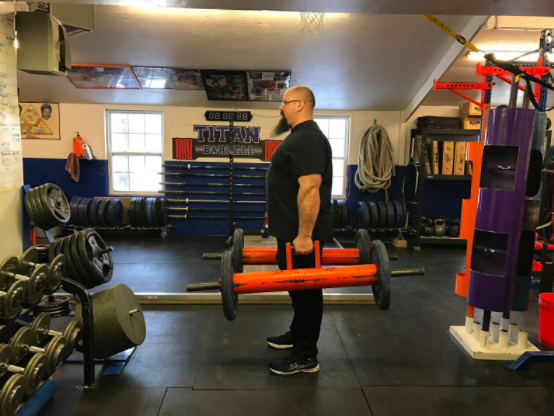
5. Drive your heels through the ground, squeeze your glutes and keep your shoulders back until you are standing tall then start walking. You may see an advanced athlete/trainee start to walk before they have fully stood up. I would advise against using that technique unless you are extremely comfortable doing it for a couple of reasons.
First, if the weight is heavy enough it will put more strain on your lower back (think deadlifting leaned out on your tiptoes). Second, the likelihood that the front of the handles will drop into the ground goes up dramatically.
Third, the weight can start to swing forward and back, making it harder to hold onto. Again not to say this technique can’t be mastered over time, but if you are new to farmer’s walk wait until you are more comfortable overall.
6. You may choose to start with a staggered stance (sprinter stance) if the weight is light enough, however with enough weight in hand you will most likely feel more comfortable with an even stance to start.
7. You are going to always step heel to toe, not up on the balls of your feet like a sprinter. The length of your stride after picking up the farmers should be approximately heel to toe, then as you progress down the course you can open up your stride (still striking in a heel to toe manner). Again yes if the weight is light enough and you are comfortable moving fast with that weight then start off with larger strides.
8. Try to think about your stride length like this:
Too small of steps – – – – – – – – – – – – – – – – – – – – –
Good Start – – – – – – – – – – – – – –
Too large of steps – – – – – – – –
9. Again it’s important to note this suggestions are for the novice to intermediate trainee, with a lighter weight more advanced athletes may choose to take larger steps.
10. Best farmers walk start for novice to beginner trainees.
11. Overall body position while moving down the course is tall but with a slight lean to help propel yourself and the weight forward.
Turning with the Farmer’s Walk Handles
If you are in a contest or your training space is small enough where you have to turn with the handles here are a couple of tips to help.
1. Going into a left hand turn (approximately 5 feet before) take your left hand and turn it hard to the right. At the same time take your right hand and turn it slightly to the left to help “lock in” the weight. The reason this step is so important is to avoid momentum twisting the farmers in front of you causing it impede your steps or even drop the handles.
2. While you are doing that with your hands you footwork should be approximately 4-5 35-45 degrees steps. Taking too large of a turn slows you down due to the added distance, and too tight of a turn causes your footwork to slow down both adding more time.
3. While going into the turn you are going to want to slow down approximately 10-20% of your top end speed, but as soon as you are pointed straight back up the course you have to speed back up.
Implementation
Example of how I incorporate farmers into my general strength training clients programs. Week 1 start with a light enough weight so you can complete all of the sets without dropping.
-
- Week 1: 4-6x100ft. 60-90sec. rest
- Week 2: 4-6x80ft. 60-90sec. rest (add a little weight from week 1)
- Week 3: 4-6x60ft. 60-90sec. rest (add a little weight from week 2)
- Week 4: 4-6x40ft. 60-90sec. rest (add a little weight from week 3)
- Week 5: 4x100ft. 90-120 sec. rest (add a little weight from week 1)
- Week 6: 4x80ft. 90-120 sec. rest (add a little weight from week 2)
- Week 7: 4x60ft. 90-120 sec. rest (add a little weight from week 3)
- Week 8: 4x40ft. 90-120 sec. rest (add a little weight from week 4)
- Week 9: 2-3x100ft. 2-3 min. rest (add a little weight from week 5)
- Week 10: 2-3x80ft. 2-3 min. rest (add a little weight from week 6)
- Week 11: 2-3x60ft. 2-3 min. rest (add a little weight from week 7)
- Week 12: 2-3x40ft. 2-3 min. rest (add a little weight from week 8)
Here is an example of one of the contest preps I have used with some of my athletes.
- Week 1: 16x50ft. @50% of max(or contest wt.), 30sec. rest
- Week 2: 14x50ft. @55% of max(or contest wt.), 30sec. rest
- Week 3: 12x50ft. @60% of max(or contest wt.), 30sec. Rest
- Week 4: 10x50ft. @65% of max(or contest wt.), 30sec. Rest
- Week 5: 8x50ft. @70% of max(or contest wt.), 45-60sec. Rest
- Week 6: 6x50ft. @75% of max(or contest wt.), 45-60sec. Rest
- Week 7: 5x50ft. @80% of max(or contest wt.), 90-120sec. Rest
- Week 8: 4x50ft. @85% of max(or contest wt.), 90-120sec. Rest
- Week 9: 3x50ft. @90% of max(or contest wt.), 2-3 min. Rest
- Week 10: 2x50ft. @95% of max(or contest wt.), 3-5min. Rest
- Week 11: 4x50ft. @65% of max(or contest wt.), 30-45sec. Rest
- Week 12: 1-2x50ft. @100% of max(or contest wt.), 3-5min. Rest
Hopefully these tips will help improve your farmers walk and help you see the benefit from incorporating this great exercise. Remember: your form may change slightly over time as you gain more experience and find out what works best for you.
Editors note: This article is an op-ed. The views expressed herein are the authors and don’t necessarily reflect the views of BarBend. Claims, assertions, opinions, and quotes have been sourced exclusively by the author.