One of my favorite things to do after a powerlifting meet is dive back into the wide world of kettlebells.
The kinds of power-based, heavy ballistic moves that I love to do with kettlebells don’t often fit into the training in the 9-12 weeks leading up to a competition, when you’ve got to focus on form and strength and not much else. Anything that takes away from your recovery during that period isn’t going to help your program. But after a meet, when you slip into the off-season? You can go wild.
With kettlebells, of course.
Editor’s note: This article is an op-ed. The views expressed herein and in the video are the author’s and don’t necessarily reflect the views of BarBend. Claims, assertions, opinions, and quotes have been sourced exclusively by the author.
Benefits of Off-Season Kettlebell Training
While you’re in season, you might not be worried so much about work capacity — but as you build your body back up after competition, it’s definitely in your best interest to increase your body’s ability to work harder and longer, but recover faster.
Enhancing your work capacity during the off-season can help you come back even stronger when you lock back into meet prep mode, because your body will be able to handle higher intensities (AKA, heavier loads) for longer periods of time with minimized recovery.
By training at a higher volume — and with more ballistic, conditioning-based movements like the kinds that kettlebells are excellent at facilitating — you’re able to hugely improve your work capacity, baseline strength and conditioning levels, and your body’s ability to explode through movements with crisp power. And because kettlebells can do all of this in a low-no impact way, your body is improving without taking a toll on your joints and central nervous system.
By taking some time off from barbells, you’re also encouraging your body to iron out any muscular imbalances you might inadvertently develop while training your big three barbell lifts. Working with kettlebells will help you identify where your muscular development might be a little uneven, and force you to correct these imbalances by moving one weight per hand. Off-season is a perfect time to correct these imbalances (and trust me, you want to — injuries abound when you continue barbell lifts with imbalances for too long!).
[Related: A low-impact, HIIT, 15-minute kettlebell workout]
Here are the moves.

Double Kettlebell Thruster
While training for a meet, it’s alright to forego overhead pressing — if your goal is to maximize your benching gains, spending crucial time recovering from heavy overhead pressing can be rough on your body. But once the meet is over, focusing on your shoulders will help add variety to your routine while making sure that your shoulders — often put into strained positions with benching — can get the emphasis they need.
With the kettlebell thruster, your emphasis isn’t overloading your shoulders, though you are getting them used to being back in the proverbial game. Your focus, instead, is on continuing to lock in your squat pattern while improving your conditioning and reintroducing yourself to overhead work.
For this move, double rack kettlebells near your collarbones, careful not to flare your elbows or let the weight pull your wrists back. Keeping your wrists neutral throughout the movement (“motorcycle” them forward if necessary to maintain their straightness, or just lower the weight a bit), sink into a deep squat (really focus on hitting depth here). Use the momentum from your squat to press the bells over your head, and — keeping your core tight and your elbows close to your body — bring the bells right back down to rack position in a controlled, disciplined way. Rinse and repeat, making sure to breathe throughout the movement.
Training Recommendation
4 sets of 8-12, 45-second rest between sets.
[Related: A complete guide to kettlebell thrusters]
https://www.instagram.com/p/BQlZykPhy6E
Double Kettlebell Jerk
The double kettlebell jerk is a great way to overload your overhead pressing during the off-season while giving your shoulders the freedom afforded by moving each arm separately (rather than locking them into a specific bar path with a barbell). It’s common to develop muscular imbalances while benching, so making sure you’re using this big lift to build balanced shoulder strength and power will go a long way toward improving your upper back and shoulders (which will help on all your big three lifts).
Clean moderately heavy bells into rack position, setting and bracing your core with your feet about hip-width apart. Keep your knees soft and initiate the movement with a small bounce to channel some momentum from your lower body to help press the bells straight up. Hold for a moment at the top, maintaining steady control of the weight, before — again with steady control — pulling the weights back down to rack position, “catching” the bells by keeping soft knees. Use that soft bounce to bring momentum to the next rep.
Training Recommendation
4 sets of 3-6, 60-second rest between sets.
Double Kettlebell Swing
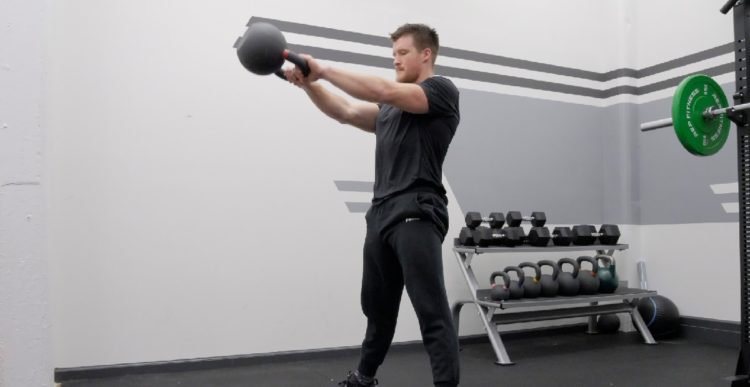
Helping you develop stronger glutes and hamstrings while training your hip hinge pattern and grip strength, double kettlebell swings will give you tangible increases in strength, power, and conditioning. Just make sure you’re never hyperextending your back at the top of the lift, and keep soft elbows throughout.
This move is pretty similar to the double-handed kettlebell swing (one bell, both hands on the handle), except you’ll probably want a slightly wider stance since you’ll be reaching behind you with two bells instead of one. You’ll also be starting with your palms facing each other instead of facing your body, so your thumbs will be pointing toward the ceiling at the top of the swing. Set your stance so that the outsides of your forearms make contact with your inner thighs at the bottom of the swing, to clear your mind of any fear of thwacking yourself with the bells.
Keep your feet set (toes slightly apart), your spine neutral, and make sure you exhale with every hip snap. You can build up to using pretty heavy weights here, but make sure you’re very comfortable with the movement first. As the weights get heavier, you might have some balancing issues, but you can adjust for these by cueing your toes into the ground with each swing.
Training Recommendation
4 sets of 30 seconds, 45-second rest between sets.
[Related: 4 benefits of double handed kettlebell swings]
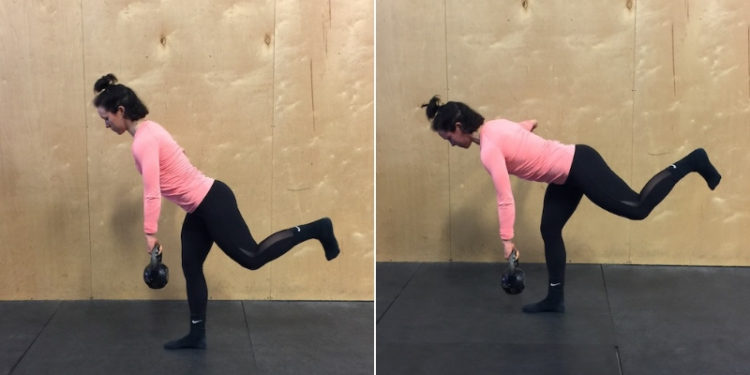
Single-Leg Kettlebell RDL
You’ll be working your hip hinge again here, but instead of emphasizing momentum and explosiveness, you’re going to focus here on moving the weight with slow, stable control. When you’re first learning the movement, use a light weight — your hamstrings need to be both strong and flexible here, which is a difficult balance to achieve, and pushing it is a great way to get yourself injured — and hold the weight in whichever hand feels more stable for you.
In other words, for some folks, it feels more stable to hold the weight in their right hand when their right foot is planted on the ground, but for others, it feels more stable to hold the weight in their left hand when their right foot is planted. Start with whatever feels more stable for you, and you can progress the movement by switching it when you’re feeling ready.
Remember first and foremost that this is a hip hinge, so make sure your hips are staying in alignment rather than hiking off to the side when you raise your back foot and hinge forward. Let the bell reach just below your knee, stopping around your shins before hinging your way back up. Your knees should be soft throughout the movement, and even though you’ll be trying to keep your balance, don’t forget to breathe.
Training Recommendation
4 sets of 8-12 (per side), 45-second rest between each set.
[Related: A complete guide to the single leg RDL]
https://www.instagram.com/p/BGm0BmHkN0F/
Kettlebell Clean And Press
Here, you’ll be training both your explosive power and your upper body at once. Set up with your feet a little closer than hip-width apart, brace your core, and — keeping your elbows tight into your body, tracing up your rib cage — use the momentum from a hinging squat (think the movement pattern from a hex bar deadlift) to snap the bell up to rack position.
As your hand is transitioning from your knuckles facing the floor to facing the ceiling, think about keeping the bell stable while snapping your arm quickly and efficiently under it to “catch” the bell on your forearm. By imagining catching the bell, instead of imagining “flipping” the bell over to your forearm, you stand a much better chance of avoiding the dreaded forearm flop.
Once you’ve successfully thwarted the forearm flop, use the momentum from your clean to press the bell up from rack position into an overhead press. With careful control, after a very brief pause at the top (to reinforce stability), lower the bell back into rack position, rinse, and repeat.
Training Recommendation
4 sets of 30 seconds (per side), no rest between sides, 60-second rest between each full set.
[Related: The differences between the kettlebell clean & jerk and clean & press]

Kettlebell Clean
This will be the clean and press but… without the press. That means you can go much heavier, since you’ll be stopping in rack position instead of continuing the move with a press. That said, proper set up is just as important here as it is for the clean and press. Set up with the bell aligned with your midfoot, with the handle twisted so that, when you grab on, your thumb is facing behind you. Grip the bell offset from the middle, with the pad between your thumb and index finger cradled against the curve of the handle. This will facilitate a much easier transition to rack position than gripping the handle right in the center. Between each rep, reposition the bell on the ground for maximum muscle recruitment and explosive power development.
Training Recommendation
4 sets of 30 seconds (per side), no rest between sides, 60-second rest between each full set.
Kettlebell Snatch
Only attempt this complex (but super awesome) lift if you’ve got pretty darn good shoulder flexibility and have an excellent grasp on the kettlebell swing, clean, and windmill. Start, of course, with light weight (but finding a moderate weight will actually make the lift easier because the bell will have a more natural “snap” to it if it’s a little heavier).
Start with a one-handed swing and transition the swing into a high-pull when you reach about chest level. Push through the high pull to shift your arm from a horizontal to a vertical position, avoiding the forearm flop by treating the motion as a smooth transition determined by your arm position, rather than trying to “flip” the bell over your hand. Without turning the movement into a press, use the momentum from your high-pull to snatch the bell overhead.
Instead of bringing the bell down with slow control, you get to go a little wild here — you also get to “flip” the bell, without risk to your forearm. Once you’ve reached the top of the lift, flip the bell over your hand and swing it all the way back down. Use that swing to generate another, back into a high pull, back into a snatch… on and on (the fun never ends).
[Related: The definitive guide to the kettlebell snatch]
Training Recommendation
4 sets of 30 seconds (per side), no rest between sides, 60-second rest between each full set.
Get Kettlebell-ing
If you want to make the most of your powerlifting off-season, kettlebells are your new best friend. Whether your goals are to iron out muscular imbalances, improve your conditioning, boost your work capacity with low-no impact lifts, or a combination of all of the above, kettlebells have got your back. And when you get back in season, your big three lifts will thank you.
Featured image via Srdjan Randjelovic/Shutterstock


