
Shin angle in the deadlift often gets overlooked, but it’s incredibly important for success.
The deadlift, like every other compound lift, is the culmination of multiple joint angles working with one another to create success. But it’s a tricky topic; there really isn’t a one-size-fits-all equation when it comes to blanket form recommendations for the deadlift. When we look closely at how athletes move, it’s clear that everyone will be slightly individual with their ranges of motion, positions, and how they move.
But there are principles that everyone’s joints should loosely follow.
Shin angle in the deadlift is the product of:
- how the bar is positioned over the feet
- the angle in which the hips are set, and
- how much bend (flexion) is present at the knees before pulling weight.
These three aspects, in addition to our body’s anthropometrics (limb lengths), will create the shin angle that is present in every deadlift.
It’s generally understood that we need vertical shin angles for strong deadlifts, but what does vertical actually mean in this context? Do the shins need to be perfectly vertical in relationship to the ground, or will there be some leeway between different athletes?
https://www.instagram.com/p/B3qOhhEg22r/
What We Really Mean By “Vertical Shins”
There’s no debate that a vertical shin angle is a must for strong deadlifts, but we’re really using the word “vertical” for want of a better word. Perhaps “vertical-ish.” Shins shouldn’t necessarily be perfectly bolt upright. So let’s take a moment to define what vertical means in this context.
Vertical, when it comes to the shins in the deadlift, should define an optimal range of motion that represents what’s ideal for an athlete’s mechanics. Vertical, in this sense, does not simply mean perfectly perpendicular line with the floor.
If everyone tried to make their shins directly perpendicular with the floor, then hip and torso leverages would completely be neglected, which we know would be inefficient when it comes to optimizing individual strengths.
The fact is that some lifters can get away with directly vertical shins, and that’s why it can beneficial to define vertical as a range of motion.
Generally speaking, a good range of motion for shin angles in the deadlift can range anywhere between 70-90 degrees, as long as the bar is sitting over the mid-foot.
These ranges will be dictated by things like femur and torso length, individual strengths, form, and height.
Check out the example below highlighting advantageous and disadvantageous shin angles.
- Green is advantageous shin angles for a variety of athletes.
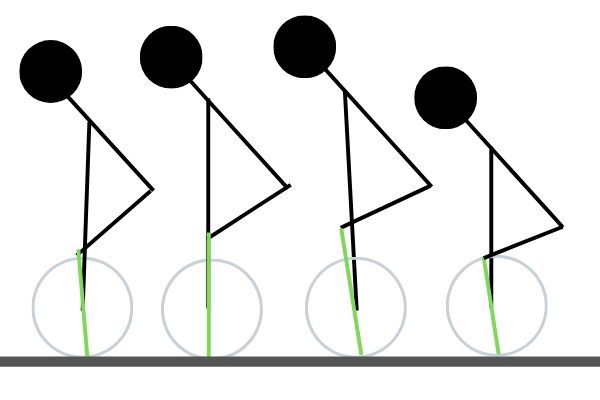
In the example above, there are four different athletes with different limb lengths, heights, and setups. All of the setups above could be technically defined mechanically correct — check out each athlete’s differences below.
- Athlete One: Shorter height, but longer femurs and shins, and shorter torso.
- Athlete Two: Taller height, longer shins and shorter femurs, and shorter torso.
- Athlete Three: Taller Height, longer femurs and shins, and longer torso.
- Athlete Four: Shorter height, but longer shins and shorter femurs, and longer torso.
The differences in the four athlete’s shin angles above all relate to each athlete attempting to optimize their hip leverages. Great deadlifts are the product of creating the most torque possible at the hips with an athlete’s:
- Deadlift prime movers (hamstrings and glutes)
- Anthropometrics (limb lengths, height, shape etc.)
- Personal strengths and weaknesses
All of the characteristics above help shape how athletes set and execute deadlifts. This is also why two deadlifts never look perfectly the same.
If we want to take the above information a step further, and investigate the “why” behind why different shin angles can work, then we can look at the biomechanics of the deadlift. For starters, the deadlift is a class three lever, which resembles the below.
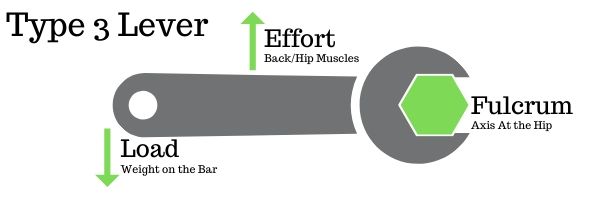
Think about the hips as if they’re rotating on an axis that is going directly through them — this axis is the fulcrum for the deadlift. I like to imagine this on the body as if there’s a bar going through each side of the hip, inserting directly into and out of each hip socket. The fulcrum is the point in which a lever rests, supports, and rotates around.
In the illustration above and for the deadlift, the load is the weight on the bar and the effort is the back and hip muscles moving that weight up and around the fulcrum.
Shin angle becomes relevant here because it can play a role in shortening an athlete’s “moment arm.” The moment arm is the distance between the force/load and the fulcrum. In the deadlift specifically, this is the distance between the hip and load/bar path in which the deadlift moves.
Let’s look at an example below.
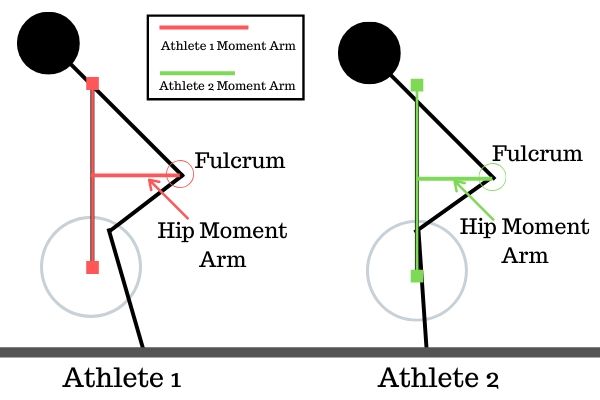
Athlete 1 has a greater moment arm due to the bar floating away from the hips (fulcrum). This then results in an increased shin flexion and a back that is prone to losing rigidity. Athlete 2’s moment arm is significantly shorter and the bar stays around/over the mid-foot, which results in a more vertical shin and load that is closer to the hips.
For the deadlift, athletes want to limit their moment arms. An increase in moment arm length will result in two things that can impede performance:
- A longer moment arm is going to increase the range of motion the load needs to travel.
- A longer moment arm puts the deadlift’s prime movers into poor positions to create the most torque possible.
In athlete 1’s position, the hamstrings and glutes will not be able to extend to their fullest potential and create torque around the fulcrum point (hips). On top of limiting the hamstring and glutes, a longer moment arm, and this poor shin position, can also result in the quads losing potential to create power with a strong extension at the top of the deadlift. For example, if the shins are too forward and an athlete is on their toes, then the quads cannot fully push through the ground to help generate power.
This concept is why coaches, trainers, and athletes make a huge point to drill down a bar path that is roughly perpendicular with the floor, so the barbell starts in one position and returns in that same position.
Think of shin angle shift as playing a role in a chain of commands: if the shins shift to a poor position, then the hips will also usually shift to a poor position, along with the torso, and so forth — this is why shin angle matters so much.
Is One Shin Angle Better Than Another?
Again, as long as the athlete feels the strongest and safest in their respective deadlift positions, shin angles will vary slightly and should be individual to accommodate for an athlete’s mechanics. One shin angle doesn’t top another unless said shin angle is putting an athlete into a poor position.
What should be avoided, or at least monitored, are shins that are positioned too far back (the left drawing below), or too far forward similar to a squat (the right drawing below). Shin angles that represent the images below are not optimizing hip leverages for efficient pulls.
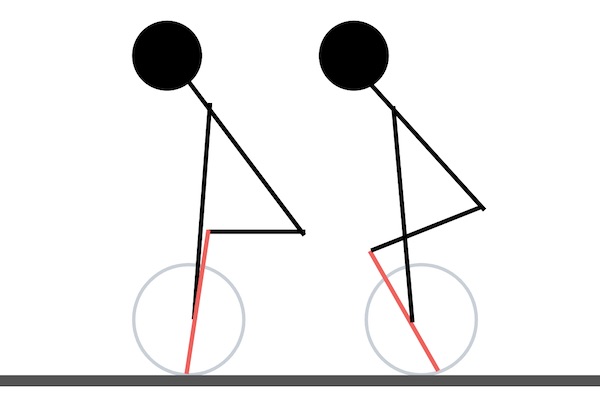
Think about it this way: the prime movers in the deadlift are the glutes and hamstrings, and the athletes above are not utilizing them to their fullest to move weight around the fulcrum at the hip.
Both of these shin angles will put the hips in a suboptimal position to move weight, and take the deadlift’s prime movers nearly out of the equation.
How to Find Your Ideal Shin Angle
Okay, so you want to check your shin angle, how do you do so? The best way to do so is to work with a coach or trainer and have them watch you move, but if that isn’t an option, then there are a couple self-check methods I like to use.
1. Watch the Bar During the Setup
An easy way to ensure you’re not excessively moving the shins forward is to pay attention to any bar movement pre-deadlift. When getting set for your next set of deadlifts, watch what happens to the bar. Are you accidentally pushing the bar forward when trying to get into position? If so, you might be pushing the knees forward, which is lengthening the space between the hips and the bar.
Try this:
- Place a foam roller at the very end of a barbell lightly touching it on the side facing away from you.
- Now, get into your normal starting position.
- When getting set, watch the foam roller.
- If the foam roller is moving forward, then there’s a good chance your setup and shin angle should be revisited.
2. Video the Deadlift From the Side
Video is a powerful tool for assessing form. To check shin angle, video yourself from the side on your next deadlift day and watch how the shins are positioned. A good option is to download a coaching app that allows you to draws lines on the video like the Coach’s Eye app.
3. Use This Thought Experiment
Pretend there are two pillars on either side of the barbell with roughly a 6″- 8″ space between them, and imagine lines on each side of the barbell. A great deadlift will have the barbell remain within these fake pillars throughout the full movement — a bar path that’s as straight up and down as possible. If the barbell is floating outside of them, then that could be an indication that shin angle and hip hinge should be revisited.
Author’s Note: It’s important to remember that if the shins are poorly positioned, then the hips might be, too. That being said, it’s always a good idea to assess and change form fixes in pieces. Start with the shins and check for issues, then work your way to the hips!
Wrapping Up
When it comes to executing great deadlifts, shins angle is an important aspect to consider for success. If you feel like deadlifts are constantly floating away from you, or like you’re not maximizing your individual leverages, then it might be time to revisit your shin angle.