The overhead press is a compound upper body movement that develops serious strength and mass. Powerlifters, strongman athletes, weightlifters, and general fitness-goers alike will benefit from including the overhead press within strength and accessory programs. Proper technique, set up, and overhead mobility is key for long-term growth and development in the press; with limitations in any of those areas resulting in stalled strength and potential injury.
In this article we will review five (5) of the most common overhead press mistakes and how to fix them.
- 5 Common Overhead Press Mistakes
- Why These Mistakes Happen
- How to Fix Your Overhead Press Mistake
Mastering the Overhead Press
The overhead press is a foundational strength movement for the upper body. Powerlifters, strongman athletes, weightlifters, and fitness athletes alike must master this lift to improve shoulder and general pressing strength, improve overhead stability, and perform sport specific movements and lifts. While some of the mistakes below are easy fixes, lifters must first be sure to review and understand the concepts of the overhead press to best attack their mistakes.
1. Incorrect Grip Width
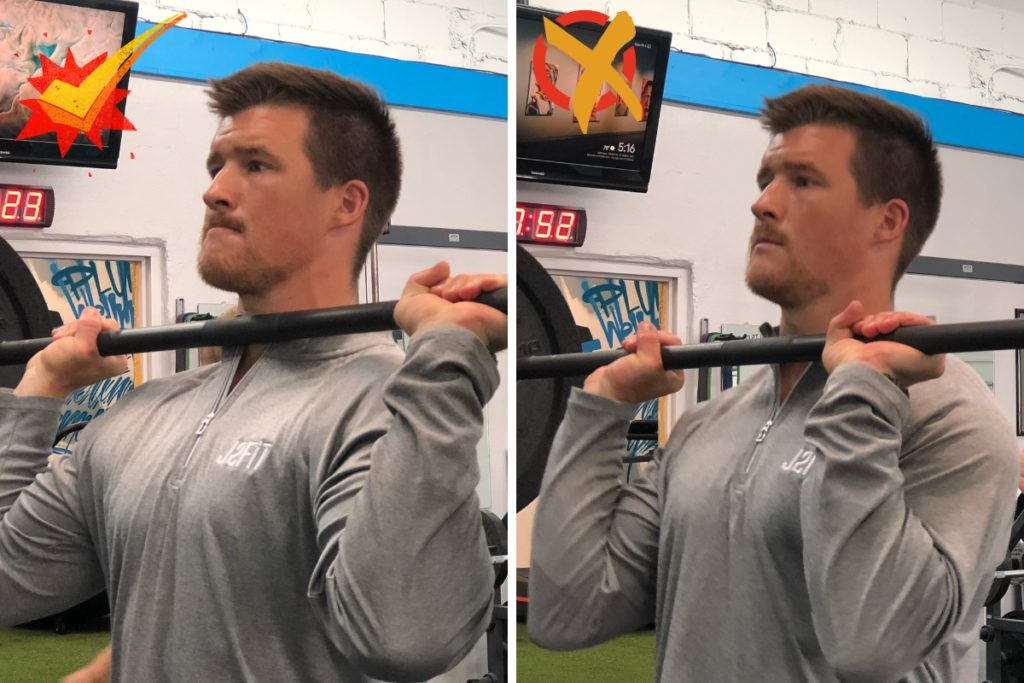
The set up is one of the most critical aspects of a strong and stable overhead press. Lack of rigidity in the core, legs, and upper body can impair overall success in the press. When assuming a strong set up position, you must forcefully grip the barbell, making sure your hands are in the ideal position to send the weight directly overhead and to allow other components to stay locked in throughout the press.
[Read More: The Best Adjustable Dumbbells for Your Home Gym]
Why This Happens?
Most of the time, a lifter will simply grab a bar at a given width without thinking too much about it. This is a common mistake with an easy fix. If you have limited shoulder mobility, you may find it harder to take a wide grip while maintaining a tight fist clench on the bar.
How to Fix It?
Generally speaking, the grip should be set slightly wider than shoulder width.
The key here is to maintain vertical forearms with the elbows inline with the wrist to minimize flaring of the elbows in the press. Like the bench press, we want to stack the wrist, bar, and elbow in line to maximize pressing strength and minimize any unwanted stress on the joints.
2. Wrists Are Too Bent
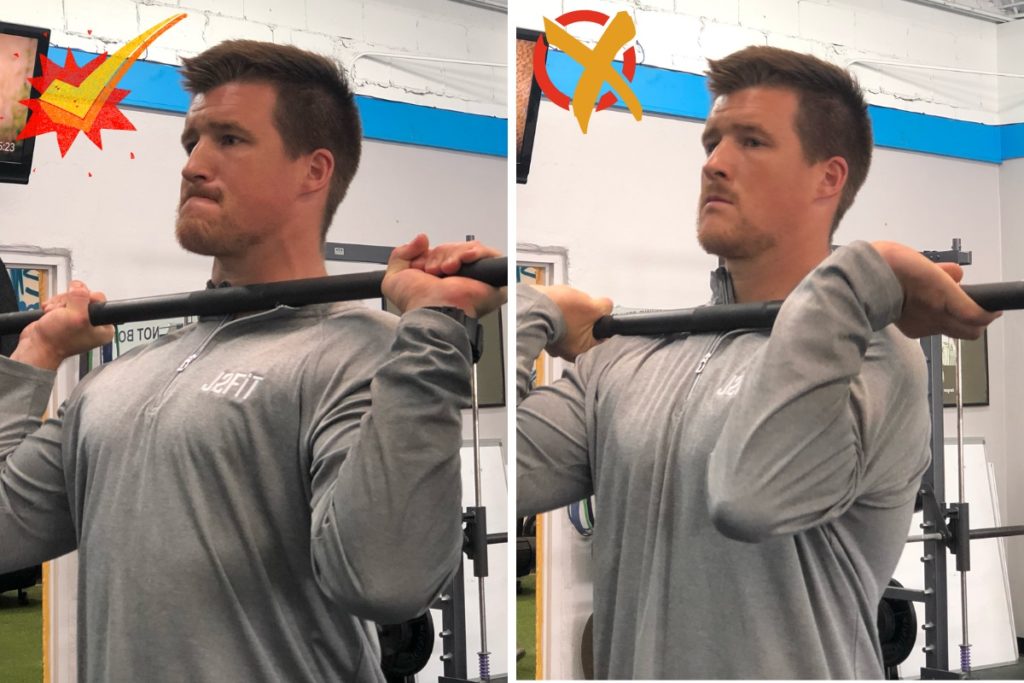
When grabbing the bar, you want to ensure you have a full, firm grip on the barbell. Squeezing the barbell activates the forearms, biceps, and back muscles; helping to increase motor unit recruitment necessary for the overhead press. Additionally, making sure to keep the wrist stacked will force the lifter to place the elbows slightly forwards, creating a stable shelf for the barbell to sit on rather than slide down onto the upper chest (the barbell should be on the front of the deltoids, as close to the neck as possible).
Why This Happens?
Many lifters will allow their wrists to hyper-extend backwards, often masking poor elbow positioning and lack of rigidity in the press. This could be due to lack of being taught proper positioning, or simply due to laziness in the set up. Sometimes however, shoulder mobility and triceps or lat flexibility can be an issue, so be sure to address those during warm ups to improve front rack position.
How to Fix It?
To start, you need to address any mobility issues you may have in the set up.
Tight triceps, wrists, and shoulders can limit your ability to get yourself into position. Start by performing the below front rack mobility exercises. From there, you need to grasp the bar with the intention to move heavy weight (even if you are doing rep work). This means bracing correctly, placing the bar high on the body, and placing your elbows slightly in front of the body to create a stable shelf.
3. Elbows Flaring Out
Similar to the bench press, flaring of the elbows suggests lack of back tension and can impact overall pressing performance (and increase shoulder and elbow joint stress). While there will be some flaring of the elbows at the final stages of the lift, the elbows themselves should not be flared out in the front rack or bottom ranges of motion. Lifters want to ensure that the elbows stay angled into the body to allow the shoulders, upper pectoral muscles, and triceps to move the loads.
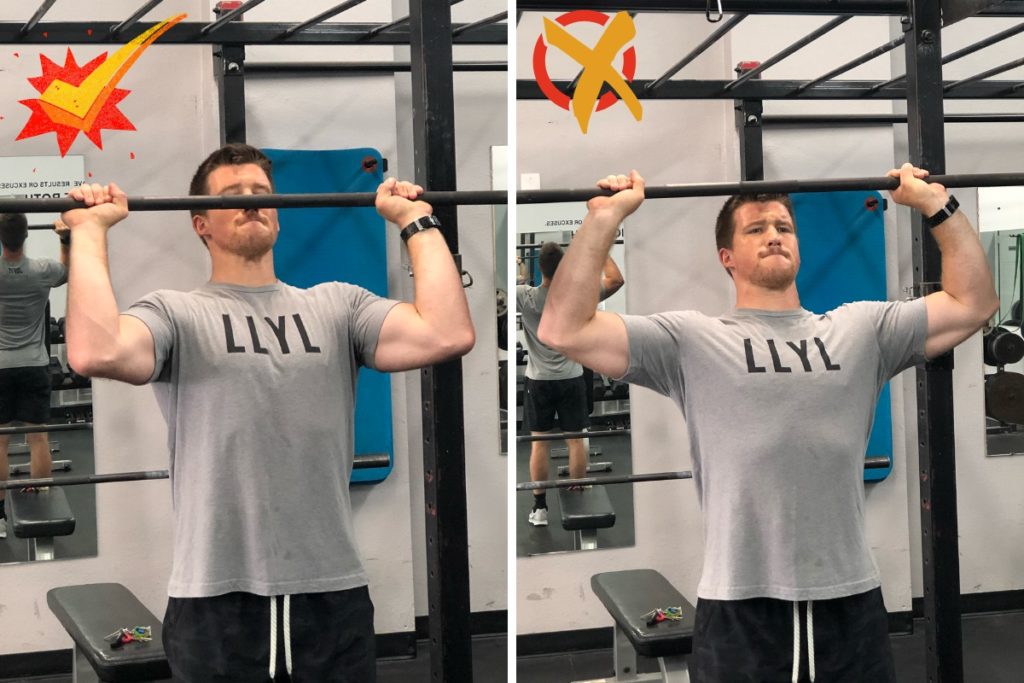
As the elbows flare, the upper pectorals and triceps become much less active in the movement. Additionally, this can lead to unwanted shoulder stress and potential injury.
Why This Happens?
Again, this can happen because a lifer was not taught proper form or simply because they have not practiced keeping the elbows under the wrists. If however, you are someone who finds that your elbows flare outwards too soon in the press, this can often be due to lack of triceps strength and upper back stability.
How to Fix It?
To fix this, you need to refine your pressing technique by forcing the elbows to stay into the body during the set up and initial phases of the moment.
As you press the load upwards, you can slightly open the elbows up, however be sure to not allow them to flare completely out to the sides. Performing close grip overhead presses with an emphasis on keeping the elbows lined up under the wrist can target the triceps strength. Additionally, focus on pressing the load upwards as you maintain tension across your upper and middle back. Try performing some of the scapular strengthening movements below to further enhance your stability.
4. Too Much Lower Back Arching
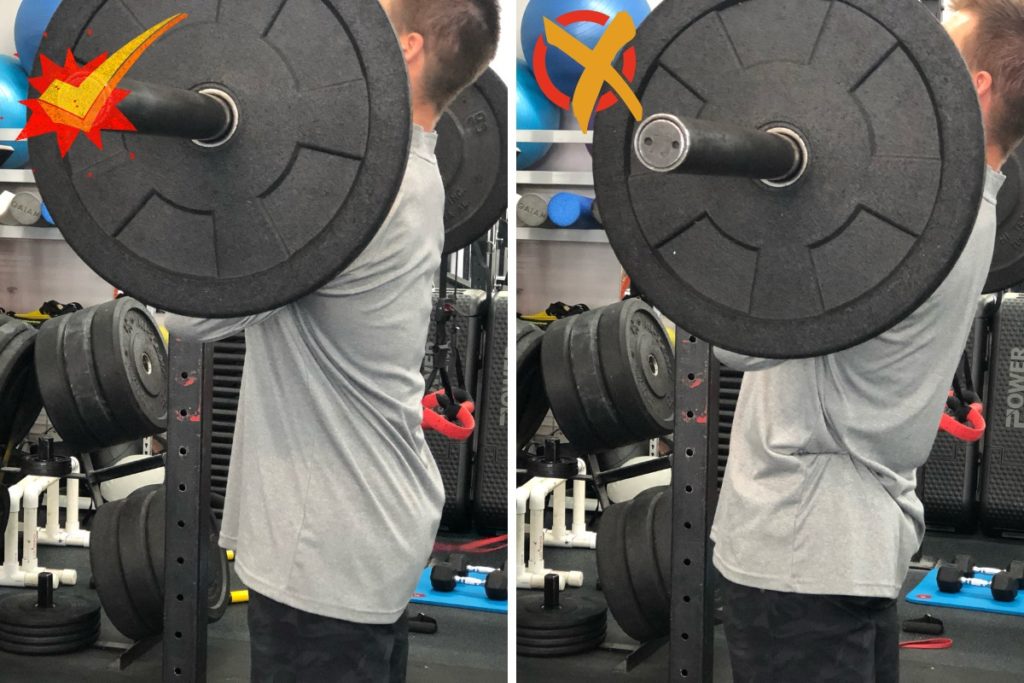
Overly hyperextending the lumbar spine is rarely a good thing. Often, lifters will find themselves excessively arched in the overhead press which can result in injury.
Why This Happens?
Loss of core stability in the overhead press can be due to lack of core strength, inactive glutes, and lack of awareness on what proper spinal alignment feels like under load. Additionally, many lifter will utilize an excessive arch in the lower back as this changes the line of force to be more horizontal.. By leaning back, a lifter can use more of the chest and make the overhead pressing movement more of a standing incline bench press.
How to Fix It?
If you are someone who knows they are doing this, and are performing reps with a hyperextended back, the solution for you is to stop, lighten the load, and put the ego aside.
Integrating basic core stability movements like Pallof presses and repatterning pelvic and spinal positioning can improve core stability and awareness. It may also be helpful to have a friend or coach be near to offer you feedback during your pressing movements if you are aware of this fault occurring during your sets.
[Read More: Best Back Exercises and Back Workouts for More Muscle ]
5. Pressing the Bar Forwards
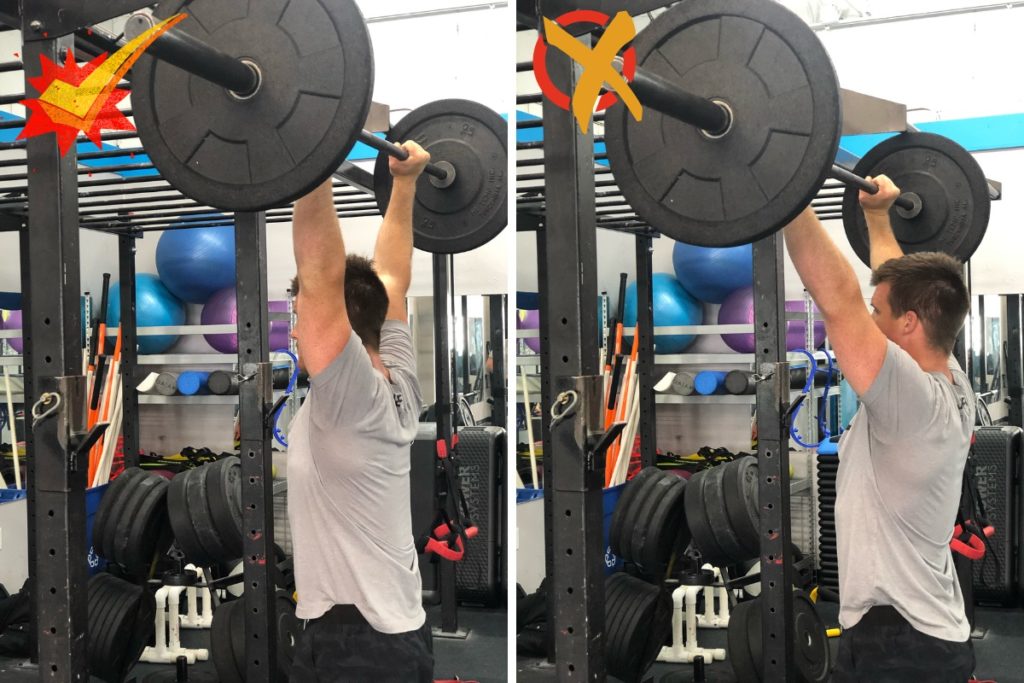
Failure to keep the barbell travelling vertically is one of the bigger mistakes seen in beginners during the overhead press. Any additional forward pressing of the barbell (horizontal displacement) results in the lifter becoming less efficient in the movement and requires greater amounts of strength to realign the barbell into the correct overhead path.
Why This Happens?
Pressing of the barbel forwards in the overhead press can be due to poor set up positioning (mistakes 1, 2 and 3), lack of overhead pressing mechanics, and limited overhead mobility.
How to Fix It?
To address the setup, go back and review mistakes 1, 2, 3. Limited core stability, rigidity in the set up, and placement of the barbell can significantly impact the overall lift.
To address overhead pressing technique, be sure to review and master the steps found in our overhead press guide. Lastly, if you are someone who has shoulder mobility limitations and cannot place the load overhead (hips, shoulders and barbell are aligned vertically), the barbell will often be left out front. Granted, some lifters will compensate and mask this fault by hyperextending the lower back (mistake 4), however that leads to other issues as well.
More Overhead Pressing Articles
Build stronger shoulders, massive triceps, and refine overhead pressing technique and mobility with these training article and tips.