The Squat. Love em or hate em, they are one of the most effective and efficient movements you can do to increase muscle mass, drive anabolic adaptations, and develop serious lower and total body strength. While a sound squat program using periodization is a necessary aspect of training, integrating squat challenges from time-to-time can be a great measuring stick and/or change of pace for many lifters.
In this article, we will go over four squat challenges that when integrated within a formal strength and hypertrophy program, can help increase muscle mass, diagnose squat specific weaknesses, and bring out the inner beast in all of us.
How to Squat
Before you dive into these four epic squat challenges, be sure to review proper squat mechanics and technique to maximize performance and minimize injury.
1.
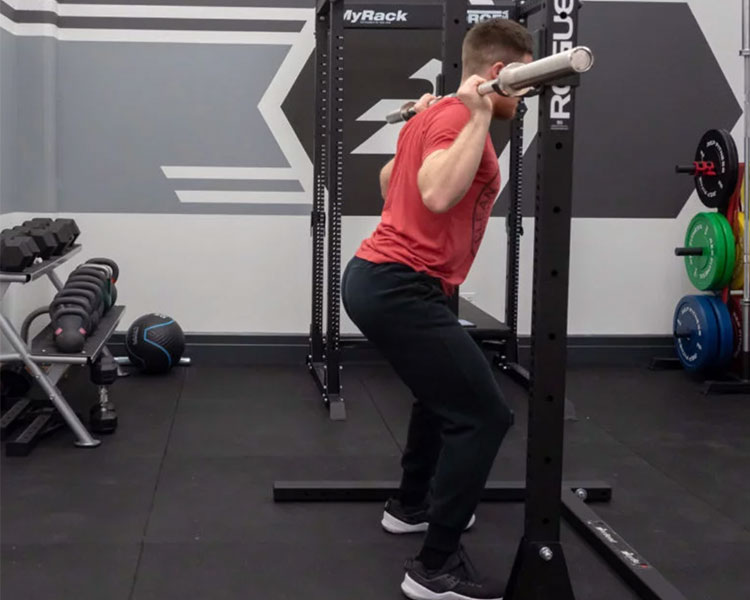
Set Your Base
Start by stepping under a barbell (supported in a rack). This step is key as it is your chance to properly engage the upper back (step 2), set a firm foundation with the core, and mentally prepare for the un-racking of the barbell.
While you will need to step out of the rack to set your feet up for the squat, it is recommended that you place your feet in the squat stance, or slightly narrower, as you want to think about “squatting” the load off the rack hooks, rather than stepping in and out with one foot, etc. This is especially the case as the loads get heavier.
Coach’s Tip: This step is significantly important the heavier the loads are. Not not rush this process.
2.
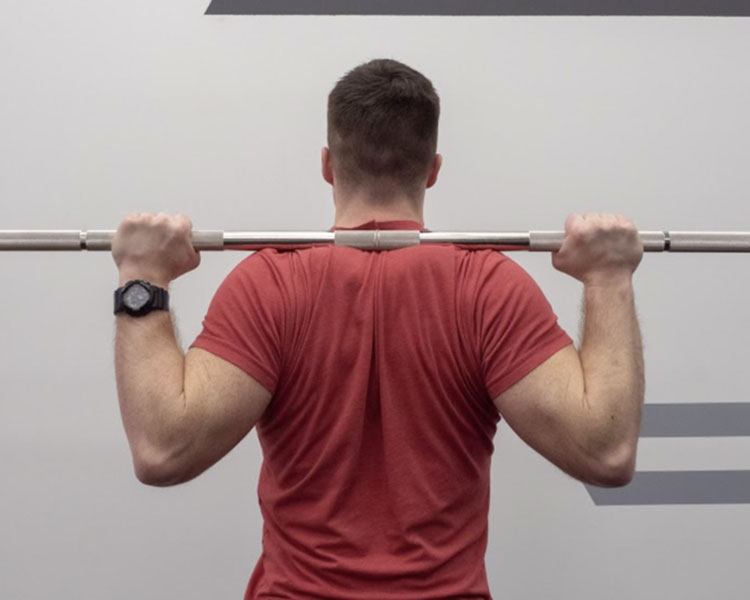
Get a Grip
Grip widths will vary, however the key is that you should be able to take a full grip on the barbell, as this will allow you to maximally contract the upper back/traps/forearms to properly secure the barbell in the high-bar squat position. Note, that the barbell should be placed above the traps, or on them, rather than on the rear delts/lower on the back (like the low-bar squat set up).
When doing this, be sure to actively flex your upper back and traps up into the barbell, which will give you some “padding” for the barbell to rest on. Lastly, be careful not to hyper-extend the back as you do this, as many lifters will lose tension and bracing in the core.
Coach’s Tip: Squeeze the bar and find a secure position. Once you have found it, pull the barbell tight into the body so that you and the barbell are now one, massively dense and stable unit.
3.
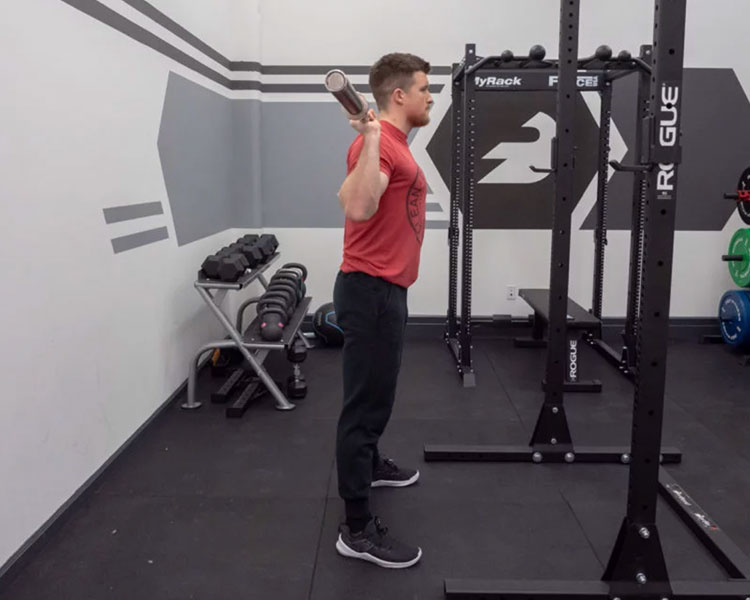
Step Out and Get Stable
When you are ready, step out of the rack, using either a 2 or 3-step approach (as this is often the best way to minimize barbell movement and conserve energy). The feet should be about hip-width apart, with the toes slightly pointed out. The chest should be held high, with the core and obliques contracted.
Be sure not to have too much of a forward lean, as this high-bar variation should allow you to keep your torso up vertical.
Coach’s Tip: This can be challenging and inconsistent for many beginner and intermediate squatters (the pre-squat routine). Be sure to practice the same set up and walkout techniques every time you squat, as this will help it become more automated (one less thing to worry about).
4.
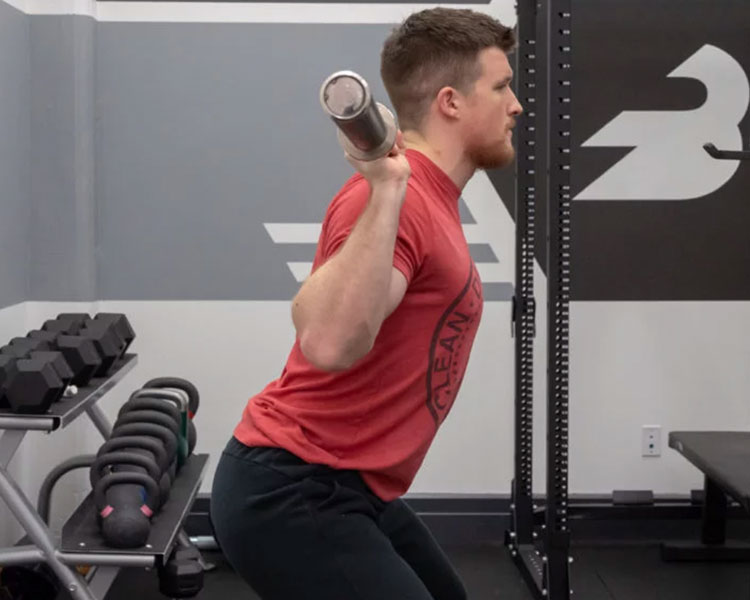
Pull Yourself Down into the Squat
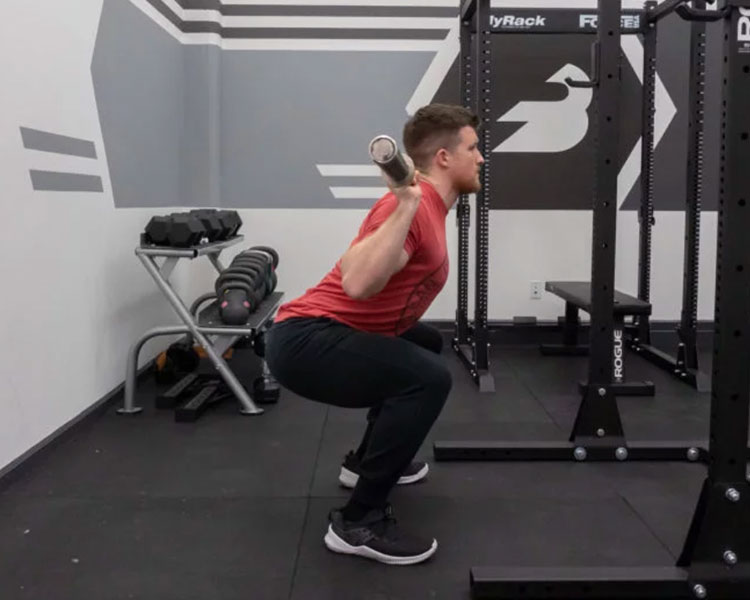
With the feet planted, and pressure evenly distrusted throughout the foot, slightly push the hips back while simultaneously allowing the knees the bend forwards, tracking over the toes. Keep the upper back locked to minimize forward lean or collapse of the thoracic spine.
Think about gripping the floor with the toes and creating space for the belly between the thighs. Often, the cue “knees out” is used, which can be beneficial for some (however it can also cause excessive bowing of the knees). Regardless, think about pulling your torso straight down so that the abdominals and hip flexors assist in the lower of the movement.
Coach’s Tip: Take your time as you lower yourself into the squat, making sure to feel any weight shifting back/forward or tendencies to collapse the torso.
5.
Squat to Depth, and Stand Up
Squat to the desired depth, which for many is at parallel or below. Once you have assumed the desired depth, push your back upwards into the bar while simultaneously pushing the feet aggressively through the floor, making sure to keep weight in the heels (and toes). As you stand, continue to keep the chest high and core locked.
Be sure to keep your spine locked into position, and your heels down on the ground. A general rule of thumb when assessing high-bar squat technique is that the shin angle should be parallel to the spine. If they are to intersect (id you continues those angles) at any point in time, it could indicate excessive forward lean of the torso (horizontal displacement of the barbell, which is not desired).
Coach’s Tip: You should feel your legs (quadriceps) working, as well as the upper back and hips.
1. 20-Rep Back Squat Challenge
This is about as straightforward as it gets, and is a classic back squat hypertrophy program done by bodybuilders back in the day. In the original program, they would perform one, all-out set of 20 back squats with as much weight as they could handle. This is not for the faint of heart.
Challenge Instructions
Build up to a weight you think you can get for 15 repetitions. Don’t overdo your warm-up, but rather warm-up to work up a sweat and feel the legs getting primed for an all-out set. If you are unsure as to how much weight to use, try starting with 60-70% of your back squat max. If after the first time it was too easy, add 5-10lbs the next time around.
20-Rep Back Squat Challenge
- Perform one set of 20 repetitions with as much weight as you can safely handle.
- Do not rack the barbell until all 20 repetitions are completed.
- Try to minimize the amount of resting time between repetitions, however this will likely happen.
For example,
Say your back squat max is 405lbs.
Start by performing a set of 10 reps with an empty barbell. Perform 5 repetitions with 135-185-225lbs, with 60-90 seconds of rest in between sets. At this point, you should have a good gauge as to what you think you can get for 15 repetitions. 60% of your max is roughly 275lbs, so you could load that up and start with 5 repetitions.
If you know that will be doable for 15-20 reps, rack the weight and add some more to the bar for your actual 20-rep all-out set. If you are unsure, stick with 275lbs and get 20 reps, adding more weight to the barbell next week.
Progressions and Regressions
Use the below progressions and regressions to modify the intensity of this challenge.
- To progress this, simply add more weight to the bar. This is a pretty straightforward challenge. That said, this is probably the most grueling challenge on the list since it is 100% dependent on your ability to push yourself to your maximum.
- To regress this, simply decrease the amount of loading on the bar. If for whatever reason you cannot perform back squats, you can do this with front squats (more quadriceps and anterior core) or even a goblet squats for beginners.
2. Death By Back Squats
This is a tough back squat challenge that can deliver serious muscle growth to the quadriceps, glutes, and core. For this challenge, you will be using a running clock to determine the amount of repetitions you do and the rest you get. In short, the more sets you do, the more repetitions per set and the less rest you get.
Challenge Instructions
For this challenge you will need a barbell loaded with 60% of your max, a clock, and a great deal of mental and muscular stamina. The entire challenge should take 8-12 minutes.
Death By Back Squats
To perform this, load a bar with 60% of your 1-RM. You will perform one repetition in the first minute of the running clock, racking the weight when you are done. At the turn of the second minute, un-rack the weight and perform two reps, then rack the weight.
You will do this every minute by un-racking and racking the weight, performing three repetitions in the third minute, four reps in the fourth minute, and so on until you cannot perform the prescribed amount of repetition in the corresponding minute.
- Perform one repetition in the first minute, two reps in the second minute, three reps in the third minute, and so forth until you cannot complete the prescribed amount of repetitions within the corresponding minute.
- Rack and re-rack the barbell every minute
- Go until you cannot complete the repetition in the minute frame. Shoot to get at least 10 reps into the 10th minute.
Progressions and Regressions
Use the below progressions and regressions to modifying the intensity of this challenge.
- To progress this, simply add more load the bar barbell. It is important to note that this challenge should last 8-12 minutes, which means that if you are using a weight that you cannot complete eight repetitions in the either minute, the load is too heavy. If however, you get past the set of 12 reps in the 12th minute, add weight..
- To regress this, decrease the amount of weight on the barbell. Note, just like the above progression scenario, be sure to use enough weight that it is very challenging, if nearly impossible to get past the 12th minute. If the weight is too light you may be losing out on the strength and muscle building effects of this challenge.
3. TEMPO Pyramid Squat Challenge
Tempo training is a great way to increase time under tension, enhance muscular engagement, and improve positional strength and stability.
Challenge Instructions
This challenge incorporates a few tempo structures to induce muscle growth, increase mind muscle connection, and help establish proper positioning in squats. To do this, you will perform 5 sets of tempo squats, pyramiding down in reps each set from 10-8-6-4-2. The tempos themselves will also vary based on the set.
The goal of this challenge is to build up to a very challenging two-rep tempo squat, using the previous sets to mentally and physically prepare yourself for a one tough set.
How to Read Tempo Schemes
https://www.instagram.com/p/BslfcV8ghic/
To read a tempo scheme, you must first understand the four (4) phases of the squat range of motion. A tempo of 3-1-2-0 reads as follows:
- The first number (3) refers to the eccentric phase, or lowering phase of the squat. In this case you would perform a three second lowering phase.
- The second number (1) refers to the isometric hold, or pause, in which you would perform a one second pause at the bottom of the squat.
- The third number (2) refers to the concentric, or standing up aspect of the squat. In this case you would perform a two second concentric or upwards phase of the squat.
- The fourth number (0) refers to how long you wait in between repetitions to start another rep. In this case, you would stand up, and then go directly into the next repetition without pausing at the top to rest.
TEMPO Pyramid Squat Challenge
Perform 5 sets of tempo squats, adhering to the rep ranges and tempo schemes prescribed. Add weight every set.
- Set 1: Perform ten (10) repetitions under a strict tempo of 5-1-5-0. Start with 30-40% back squat max.
- Set 2: Perform eight (8) repetitions under a strict tempo of 4-1-4-0. Add weight from last set.
- Set 3: Perform six (6) repetitions under a strict tempo of 3-1-3-0. Add weight from last set.
- Set 4: Perform four (4) repetitions under a strict tempo of 2-1-2-0. Add weight from last set.
- Set 5: Perform two (2) repetitions under a strict tempo of 1-1-1-0. Add weight from last set.
Progressions and Regressions
Use the below progressions and regressions to modifying the intensity of this challenge.
- To progress this, increase the load used. You can also perform this with front squat or overhead squats to improve positional strength and squat-specific performance.
- To regress this, decrease the load. If you have issues maintaining positions and proper posture, perform this with bodyweight air squats and increase loads via goblets squats.

4. The 3-Squat Test
This is a fun squat challenge that incorporates three of the primary squatting movements seen in Olympic weightlifting and functional fitness. To do this, the lifter performs one rep maximums for the overhead squat, front squat, and back squat (in that order).
By performing the heavy overhead squat first, you can help prime the front squat in that it will reinforce an upright and vertical torso positioning. As you move into the front squat, the legs will be challenged more due to the higher amounts of loading on the legs relative to overall lower body strength.
Once you move into the last squat test, the back squat, you should be able to assume a stable, low, upright squat position with sufficient leg and back strength left in the tank for a hard set.

1.
Establish Position
Start with the barbell placed overhead, with the grip set wide.
The grip is typically taken with a snatch grip, however this can vary based on the goal, athlete’s mobility, and strength.
The key is that the barbell should be placed over the back of the neck, with the biceps in line with the ears. The wrists should be slightly extended, with the elbows straight and ribs pulled in (neutral spine).

2.
Begin Descent
As you begin to descend, be sure not to extend the lumbar spine, but rather keep the core braced and the hips neutral (as opposed to anterior or posterior tilting of the pelvis).
This squat should be patterned in the same manner a high bar back squat would.

3.
Maintain Control and Position
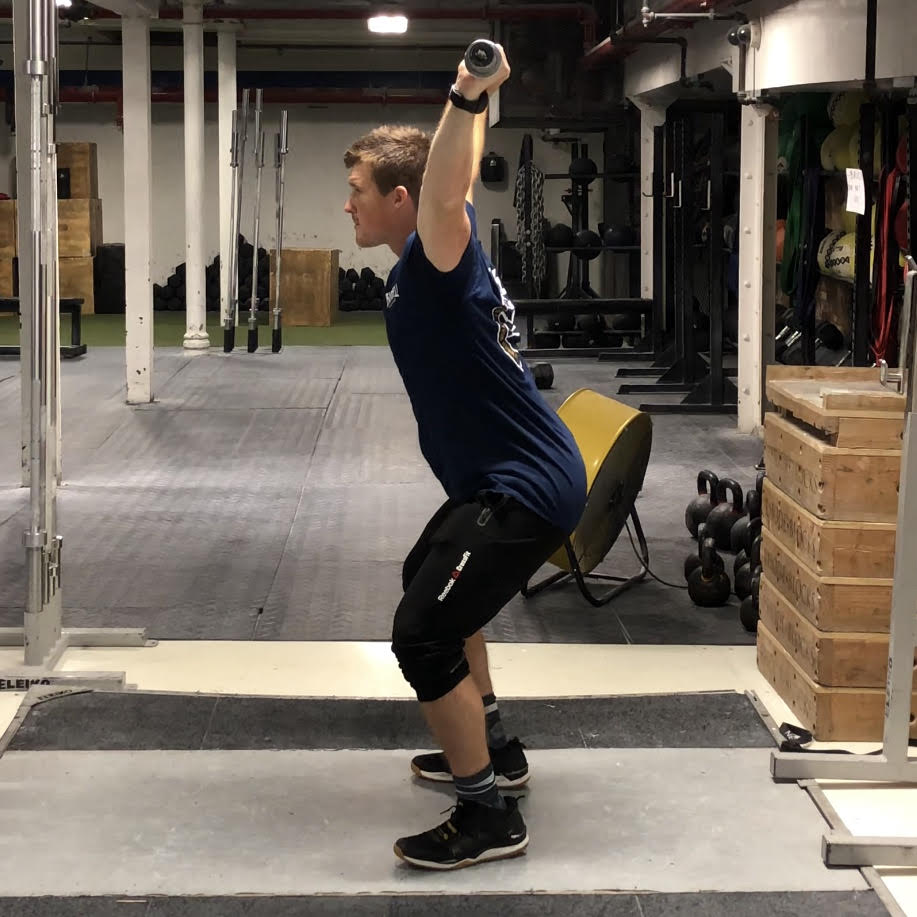
Once you have reached full depth (which can be slightly different for everyone), the hip crease should be slightly below the knees, with the full foot down.
The lifter should keep the core tight and be sure to actively push against the barbell to keep it into the correct positioning overhead (see step one).
4.
Drive Up and Stand
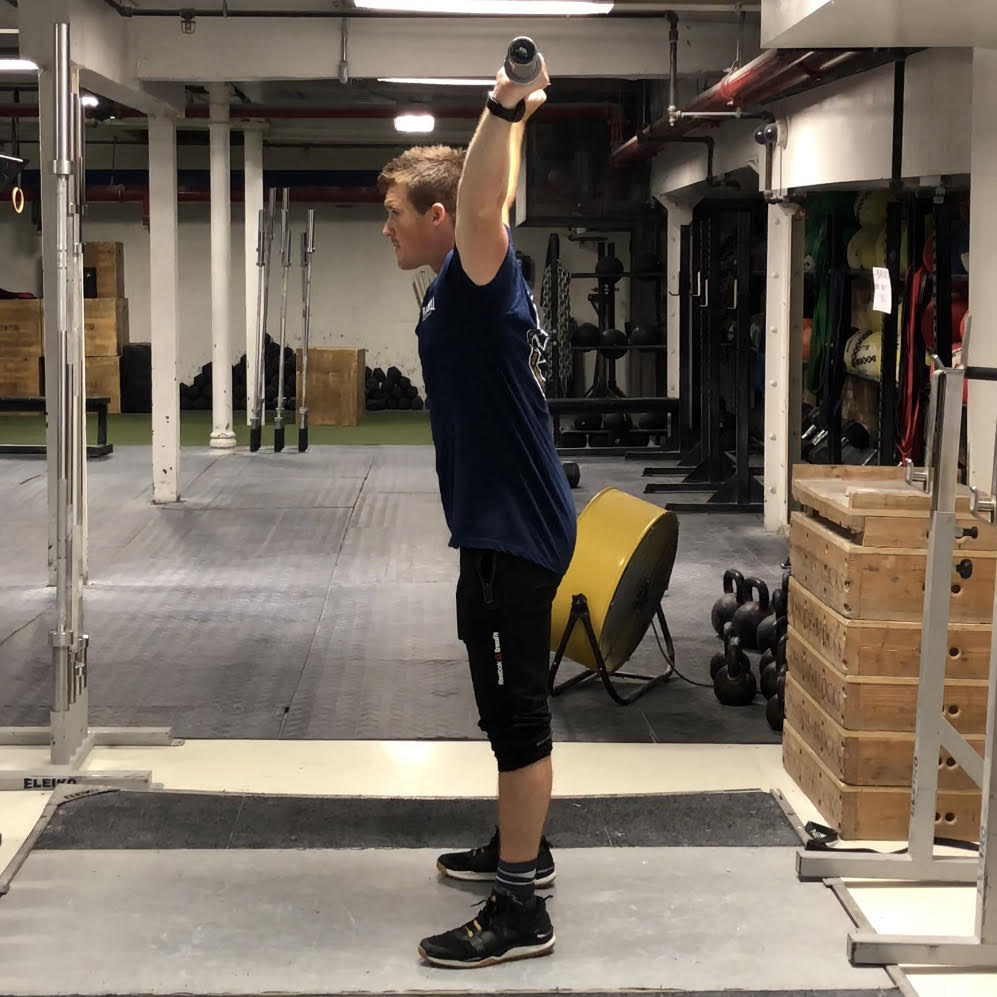
From here, work to keep the barbell overhead and the chest up as you ascend out of the squat.
Be sure to keep the core tight and actively push up against the barbell to aid in standing up from the overhead squat.
5.
Stabilize and Repeat
Once you have fully extended the knees and hips, stabilize the core and shoulders and repeat for repetitions.
Be sure to keep the upper back and shoulders stable by actively pressing upwards through the barbell.
Challenge Instructions
After a thorough warm-up and empty barbell work of all squatting variations, set a clock for 20 minutes and start testing.
The 3-Squat Test
Set a clock for 20 minutes. This will help you stay focused and find a flow. In these 20 minutes, you will need to establish a single rep max for the overhead squat, front squat, and back squat.
- Determine your overhead squat max. Build up in 6-8 minutes, and do not fail.
- Once you have established an overhead squat max, jump right into the front squat max testing. You should not need to drop weight, if only slightly, as the mechanics of the overhead squat mirror the front squat. Take 6-8 minutes to establish a front squat max.
- Once you have established a front squat max you must find your back squat max. You should be able to go into back suat testing using starting with the same load you just front squatted, or heavier.
In general, aim to have your overhead squat roughly 85-90% of your front squat. If you lack overhead strength and stability, this number may be lower, however we typically look to have the overhead squat be 85-90% of your front squat, which equates to roughly 105-110% of your snatch. Your front squat should be 85-90% of your back squat. Use these numbers to then diagnose where your weaknesses may lie.
Progressions and Regressions
Use the below progressions and regressions to modifying the intensity of this challenge.
- To progress this, add more weight. The key should be on testing top end strength.
- To regress this, decrease the weight. If you find your % are off due limitations within a specific squat variation, use this test as a diagnostic tool to go back into your program and address such issues (with mobility, specialized movements, etc)
More Squat Workouts and Guides
Looking for more squat and lower body training guides and workout ideas? Check out the articles below and get training!
Feature image by UfaBizPhoto / Shutterstock