
They say that a rising tide lifts all boats. When it comes to your performance in the weight room, your core is the tide and your squats, pulls, presses, rows, and carries (the list goes on) are the ships. You can improve your performance on all of them at once if you train your core with the hollow hold.
For gymnasts, the hollow hold is integral to the sport itself as a postural skill. However, it’s also a great abdominal-builder in its own right and teaches you proper bracing mechanics at the same time. You don’t need to swing or flip or twirl to make use of the hollow hold.
So, here’s how to do it properly.
- How to Do the Hollow Hold
- Hollow Hold Sets and Reps
- Common Hollow Hold Mistakes
- Hollow Hold Variations
- Hollow Hold Alternatives
- Muscles Worked by the Hollow Hold
- Benefits of the Hollow Hold
- Who Should Do the Hollow Hold
- Frequently Asked Questions
How to Do the Hollow Hold
As a bodyweight-only movement, all you need for the hollow hold is yourself (and some space to work). You might want to grab a yoga mat to lay on, though. If you want to add weight to this exercise, a small dumbbell or kettlebell is also a good option, though it’s certainly not mandatory.
Step 1 — Set Yourself Up
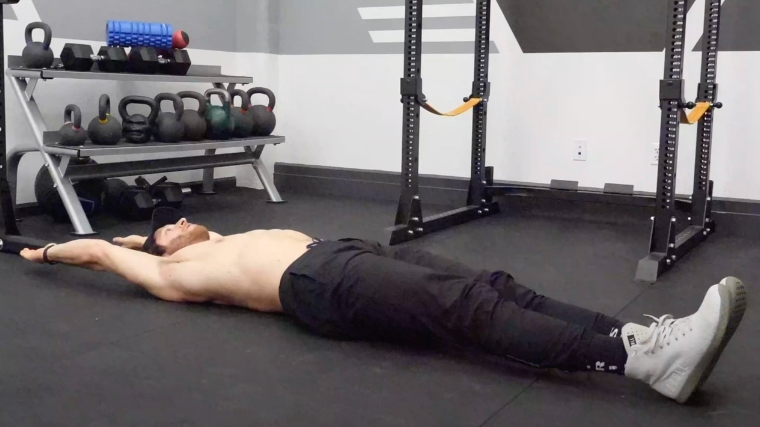
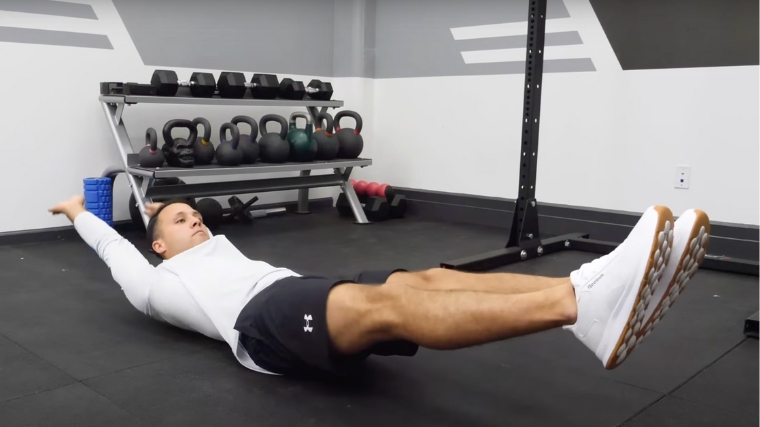
Lie on the floor with your legs straightened and your arms extended behind your head. You can clasp your hands together if you like. Your feet should be together as well. This is your starting position.
Coach’s Tip: If you can’t hold your hands together behind your head with straight elbows, you may need to mobilize your thoracic spine.
Step 2 — Lift and Hold
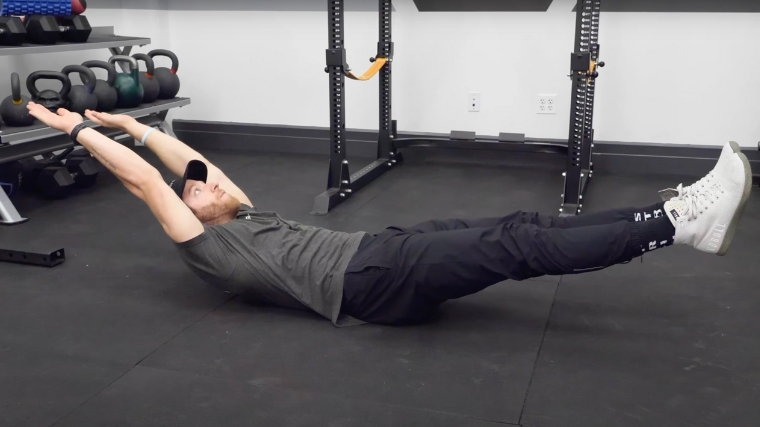
From your starting position, exhale deeply and depress your ribcage. Your lower back should flatten out against the floor and stay flush to the ground the entire time. Once you feel that point of contact, lift your shoulders and legs off the ground. Hold this position for time.
Coach’s Tip: Your lumbar spine and hips should remain in contact with the ground; your body should resemble a crescent.
Hollow Hold Sets and Reps
As a bodyweight-only exercise, the hollow hold isn’t the most versatile movement out there in terms of programming. Progressing this exercise isn’t as simple as adding weight to your barbell. However, you do have several different options:
- As a Beginner: Start with two sets of holds for time up to 30 seconds.
- To Warm Up Your Core: Three rounds of 15-20 seconds at the start of your workout should do wonders.
- For Endurance: Try five rounds of 20-30 seconds, adding five seconds per week.
Common Hollow Hold Mistakes
Despite being a very simplistic exercise from a visual standpoint, it’s still easy to mess up the hollow hold. After all, you may not be used to properly bracing your torso and maintaining that position for an extended period of time. Keep an eye out for these errors so you can sidestep them.
Legs Too Low
To sufficiently challenge your core musculature, you have to lift your legs off the floor when performing the hollow hold. Your knees should be straight and locked if possible as well.
Aim to suspend your legs between 15 and 30 degrees off the ground. If you can’t lift your legs high enough, you might place too much stress onto your hips flexors at the expense of your abs.
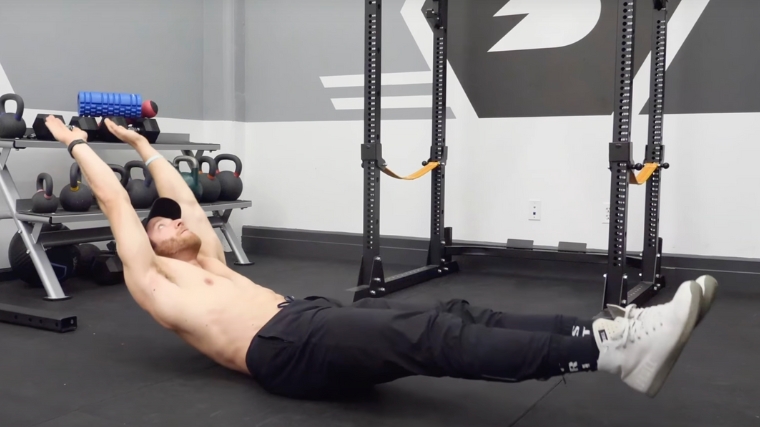
Legs Too High
On the other hand, you shouldn’t lift your legs up so far that they point at the ceiling. This will turn the hollow hold into a leg raise movement, defeating the purpose of the exercise. When your legs point directly at the ceiling, your abs don’t have to work hard at all to maintain a good contraction. Ensure that your legs are no higher than about 30 degrees relative to the floor.
Arching Your Back
The defining feature of the hollow hold is the alignment of your ribcage and pelvis. If these two structures aren’t “squared,” you’re missing out on the bracing practice that the exercise provides.
[Read More: The Best Upper Body Exercises and Workouts]
You can guarantee that your body is in the correct position by making sure that your lower back stays flush to the ground the entire time.
Hollow Hold Variations
As a bodyweight exercise, there isn’t too much you can do to customize the hollow hold. However, that doesn’t mean you have no options at all if you’re looking for a variation on the movement itself. Here are a couple of options to try out:
Flutter Kick
You can add a small element of movement to the hollow hold by performing flutter (or butterfly) kicks while maintaining the hollow body position. This will ramp up the number of calories you burn and require more stability than holding your legs motionless.
Note, though, that you should still take great care to ensure that your lower back remains flattened against the ground the whole time.
Bent-Leg Hollow Hold
It’s possible that a standard hollow position is too difficult for you. If you can’t seem to keep your core locked in while your legs are straight, you can dial down the difficulty by bending your knees.
Holding your knees bent reduces the moment arm. Since your legs aren’t extended as far away from your body, your core doesn’t have to work as hard. This also means you can finely tweak the amount of resistance applied to your abdominal muscles by opening or closing your knee joints.
Hollow Hold Alternatives
If you’ve already got the hollow position down pat and want a more dynamic alternative, or you’re simply burnt out on the exercise and are shopping for a workable alternative, you can try one of these movements instead:
Hanging Leg Raise
You can perform a standard leg raise movement with a hollowed-out core and reap the benefits accordingly. The hanging leg raise will also challenge your hip flexor muscles as you lift and lower your legs.
Make sure that you maintain a locked-in core while performing the leg raise. If you’re using a seat with a back pad, keep your lower back firmly planted against the pad the entire time.
Dead Bug
Dead bugs are a fantastic regression if you can’t quite clinch a good hollow hold yet yourself. The pelvis-ribcage integration remains the same, you’re just lowering the amount of load applied to your trunk by pointing your limbs vertically.
Go for the dead bug if you’re trying to parse out how a proper hollow hold should feel. Once you can move one arm or one leg at a time, progress toward straightening both your legs and arms simultaneously. Before you know it, you’ll have replicated the hollow hold position.
Long Lever Plank
You can flip the script on the hollow position by modifying a standard plank. The long lever plank requires you to plant your elbows out in front of your head, instead of directly under your shoulders.
This lengthens the moment arm and makes it harder to maintain a locked-in core while you hold the plank. This exercise is deceptively difficult; give it a shot once the standard hollow hold is too easy for you.
Ab Rollout
If you’re a core workout wizard and are looking for something truly challenging, try the ab rollout with a hollow-body torso position. The ab wheel is one of the most hardcore pieces of equipment you can use to challenge your core.
If you maintain extended hips and a tucked ribcage, you’ll find it quite difficult to roll the wheel out until your torso touches the floor. For this one, start by rolling only until you feel like you might lose your hollow brace. Try to go a bit further each week.
Muscles Worked by the Hollow Hold
The hollow hold is among the best options out there for teaching you how to properly brace your abs. If you can get it right, it’ll carry over to all your other exercises. To get the most value out of the hollow position, you need to know exactly how it works.
Abdominals
Your rectus abdominis is a vertical sheet of muscle that, in regards to core bracing, connects your ribcage and pelvis. These two structures can move independently; your ribs flex down during crunch exercises, and your pelvis moves during leg raises.
However, your abs also have the role of stabilizing your trunk. They can contract to “square” your ribs by depressing them and, simultaneously, posteriorly tilting your pelvis. Most core exercises only involve movement at one of these crucial points. If you can learn to brace your abs with the hollow hold, that skill then becomes applicable to all other compound movements.
Transverse Abdominis
Underneath your abdominals proper sit your transverse abdominis. You can’t see this muscle visually, but it is part of your deep core and works alongside your abs to stabilize your trunk. Any time you contract your abs, especially while exhaling, you bring your transverse abdominis into action.
Hip Flexors
Your hip flexors, as they’re named, flex your hips. These muscles are located on the front of your upper thigh, where your leg meets your abdomen. Oftentimes, people trying to train their abs can’t help but feel a distinct pinching sensation in the crease of their hips.

[Read More: The Best Ab Exercises & Workouts, According to a CPT]
That’s your hip flexors working overtime on what is supposed to be an ab exercise. While you won’t be able to take them out of the equation entirely during the hollow hold, you can avoid biasing your hip flexors by lifting your legs a bit higher.
Benefits of the Hollow Hold
The hollow hold has a lot to offer you, even if you aren’t a gymnast. From helping to warm up your core to reinforcing the correct bracing patterns during heavy lifting, there are more than enough reasons to give the hollow body position a go.
Teaches Correct Bracing Technique
Properly bracing your trunk is a crucial skill if you work out with free weights. You might think that, if you squeeze your abs or take a big breath in, you’ve adequately braced your core to resist load. However, a good core brace takes a bit more than that.
The hollow hold teaches you to “clamp” your ribcage down and hold your pelvis in a neutral position. This posture creates circumferential pressure in your torso, providing 360-degree stability while you lift.
You Can Do It Anywhere
You can never undersell the value of convenience. An exercise may be worth its weight in gold on paper, but if it is too awkward or impractical to perform, you won’t get much use out of it.
The hollow hold outlives many of its calisthenics counterparts in this regard. Not only is it applicable as a postural drill no matter your level of fitness, you can do it basically anywhere with no equipment needed.
Great for Beginners
Gym newbies and first-time lifters need to build strong foundations to support their lifting careers. If you fall into that camp, getting your bracing game down from day one will serve you well in the long run.
The hollow hold is equal parts abdominal-builder and teaching tool. It informs you of how to properly breathe and control your trunk before bearing any weight — a universally-applicable skill.
Who Should Do the Hollow Hold
If you’re on the fence about the hollow hold, it’s time to pick a side. There are few better movements for you to plug into your next core circuit or bodyweight-only workout. See if you fall into any of these camps and then take the plunge:
Beginners
As a beginner, you don’t need to overcomplicate your ab workouts. The effort of resistance training itself will provide you with a solid dosage of core training without ever having to perform a crunch or sit-up. That said, some direct ab work certainly doesn’t hurt.

In choosing your ab exercises, you should veer towards movements that go beyond just building your six-pack. Use the hollow hold to develop your abs while also teaching good bracing habits.
Bodyweight Enthusiasts
If you prefer to work without weights, power to you. You can get a surprisingly good session in without ever having to touch a dumbbell or barbell. It all comes down to choosing the perfect movements.
Go for the hollow body position during your next core training circuit and you might be surprised at how effective it can be. Whether you hold the position for time or add a bit of external weight, you’ll get a lot of value out of the hollow hold.
Strength Athletes
World-class squats (and Earth-shatteringly heavy deadlifts) start from the ground up. For the strength athlete, this means that your core training, while remedial, can pay dividends when it comes time to tug on a new 1-rep max.
If you don’t know how to lock in your abs before attempting a heavy lift, you’ll limit your power output and may even put yourself in harm’s way. Don’t underestimate the worth of an exercise like the hollow hold if you’re a powerlifter, weightlifter, or strongman athlete.
Lock It In
Strength athletes and regular gymgoers have a lot to learn from gymnasts. Gymnastics may look like hypnotic performance art to the untrained eye, but the sport demands ludicrous levels of core strength, postural control, and grit.
All of which are qualities you can develop by training your abs like a gymnast. Your first stop should be the hollow hold. Once you know how to lock in your core, every exercise you do will start to feel as fluid and weightless as a gymnast at work.
FAQs
Hollow hold got you scratching your head? Here’s a couple of common questions with answers that may light the way for you.
What is the hollow hold position?
In the sport of gymnastics, the hollow hold position (or hollow-body hold) is a specific posture. You “clamp” your ribs down, tuck your butt under you slightly, and squeeze your abs to brace your torso.
This allows gymnasts (and anyone else) to maintain a rigid posture and resist external forces such as gravity or a heavy barbell. Lifters can practice the hollow hold in preparation for heavy free-weight training as well.
Do I need to use weight during the hollow hold?
It depends on your “why”: If you’re doing the hollow hold to learn how to brace your core properly, you don’t need to work with any external weights (such as holding a kettlebell in your hands).
However, if you enjoy the exercise and want to keep it in your repertoire regularly, you need to induce progressive overload in some way. Adding some external resistance is a great option for turning up the difficulty of the hollow hold position.