• Skip to primary navigation
  • Skip to main content
  • Skip to primary sidebar
The BarBend Logo in white.

BarBend

The Online Home for Strength Sports

  • News
    • CrossFit
    • Strongman
    • Bodybuilding
    • Powerlifting
    • Weightlifting
    • HYROX
  • Reviews
    • Recovery
      • Best Cold Plunges
      • Best Saunas
      • Best Mini-Massage Guns
    • Supplements
      • Best Protein
        • Best Vegan Protein Powders
        • Best Whey Isolate Protein Powders
        • Best Mass Gainer
        • Best Protein Bars
      • Best Pre-Workouts
        • Best Pre-Workout for Women
        • Best Pre-Workouts for Men
        • Best Non-Stim Pre-Workouts
        • Strongest Pre-Workouts
      • Best Creatine
      • Best Electrolyte Supplements
      • Best Greens Powder
      • Best Meal Replacements
      • Best Nitric Oxide Supplements
      • Best Fat Burners
      • Individual Supplement Reviews
    • Cardio Equipment
      • Best Treadmills
      • Best Rowing Machines
      • Best Exercise Bikes
      • Best Ellipticals
      • Best Recumbent Bikes
      • Individual Cardio Equipment Reviews
    • Strength Equipment
      • Best Adjustable Dumbbells
      • Best Dumbbells
      • Best Kettlebells
      • Best Barbells
      • Best Squat Racks
      • Best Weight Benches
      • Best Resistance Bands
      • Best Leg Extension Machines
      • Individual Strength Equipment Reviews
    • Apparel
      • Best Weightlifting Shoes
      • Best Cross Training Shoes
      • Best Running Shoes
      • Best Gym Shorts
    • Fitness Tech
      • Best Running Apps
      • Best Fitness Trackers
      • Best Workout Apps
      • Best Smart Scales
    • Support Gear
      • Best Lifting Straps
      • Best Gym Bags
      • Best Lifting Gloves
      • Best Wrist Wraps
  • Nutrition
    • Diets
      • Carb Cycling
      • Vertical Diet
      • Reverse Dieting
      • Carnivore Diet
      • Ketogenic Diet
      • Intermittent Fasting
      • IIFYM Diet
    • Muscle Gain
      • How to Dirty Bulk
      • Go From Cutting to Bulking
      • Eat These Carbs
      • How to Eat for Muscle
    • Fat Loss
      • Macros for Fat Loss
      • Calorie Deficits
      • Natural Fat Burners
      • Cut 2 Pounds Weekly
    • Supplement Guides
      • Pre-Workout
      • Whey Protein
      • Mass Gainers
      • Greens Powders
      • Creatine
      • BCAAs
    • Daily Protein Needs
    • Pre- and Post-Workout Nutrition
    • Foods With Creatine
    • Bulking Tips
  • Training
    • Exercise Guides
      • Deadlift
      • Bench Press
      • Back Squat
      • Overhead Press
      • Lat Pulldown
      • Shoulder Exercises
      • Chest Exercises
      • Ab Exercises
      • Quad Exercises
      • Biceps Exercises
    • Training Guides
      • Beginner’s Guide to the Gym
      • How to Build Muscle
      • Guide to Muscle Hypertrophy
      • How to Train on a Cut
    • Workouts
      • Back Workouts
      • At-Home Workouts
      • Chest & Back Workouts
      • Full-Body Workout
      • HIIT Workouts
      • Bodybuilding Workouts
      • Farmer’s Carry Workouts
    • Programs
      • 5×5 Program
      • Bodybuilding Programs
      • Push-Up Program
      • Pull-Up Program
      • 5/3/1 Program
      • Powerbuilding Program
      • German Volume Training
      • Build Your Own Program
  • Calculators
    • Protein Intake Calculator
    • Macros Calculator
    • BMR Calculator
    • Squat Calculator
    • Calorie Calculator
  • Community Forum
Home » Training Guides » Kinesiology Taping for Hip Pain

Kinesiology Taping for Hip Pain

Written by BarBend Team
Last updated on July 21st, 2023

Hip pain, whether chronic or acute, can be a troublesome problem for strength athletes. Lower body power and strength based movements are often heavily influenced by the hips, and their abilities to support one’s power. A painful hip can influence range of motion, which will impact squats, triple extension, and much more.

One way to potentially counter hip pain is with kinesiology tape and its proprioceptive abilities. To assist us with an easy hip pain taping technique, we reached out to Joe Gambino, PT, DPT, and CSCS at Perfect Stride Physical Therapy, New York City. Check out the video and descriptive taping method below.

Note: All motions shown are for informational purposes only. We highly recommend consulting with a medical professional to treat any injury or lasting tightness/discomfort as a result of athletic activity. The information in this article and video is not meant to prevent or cure any disease or injury. It’s always a good idea to consult with a medical professional or trainer before attempting any new training methodology. If you experience any sharp pain while exercising, discontinue movements immediately.

Why Tape the Hip?

There are multiple reasons a strength athlete might tape the hip. For this taping method we’ll be focusing on the Iliotibial Band (ligament that runs down the side of the leg) and the musculature that surrounds this area. Overuse is one of the main reasons an athlete may experience hip discomfort. Check out the anatomical landmarks we’ll hit in our taping below.

  • Iliotibial Band 
  • Tensor Fascia Latae
  • Sartorius

The taping method below can be used to assist hip movement by providing proprioceptive needs.

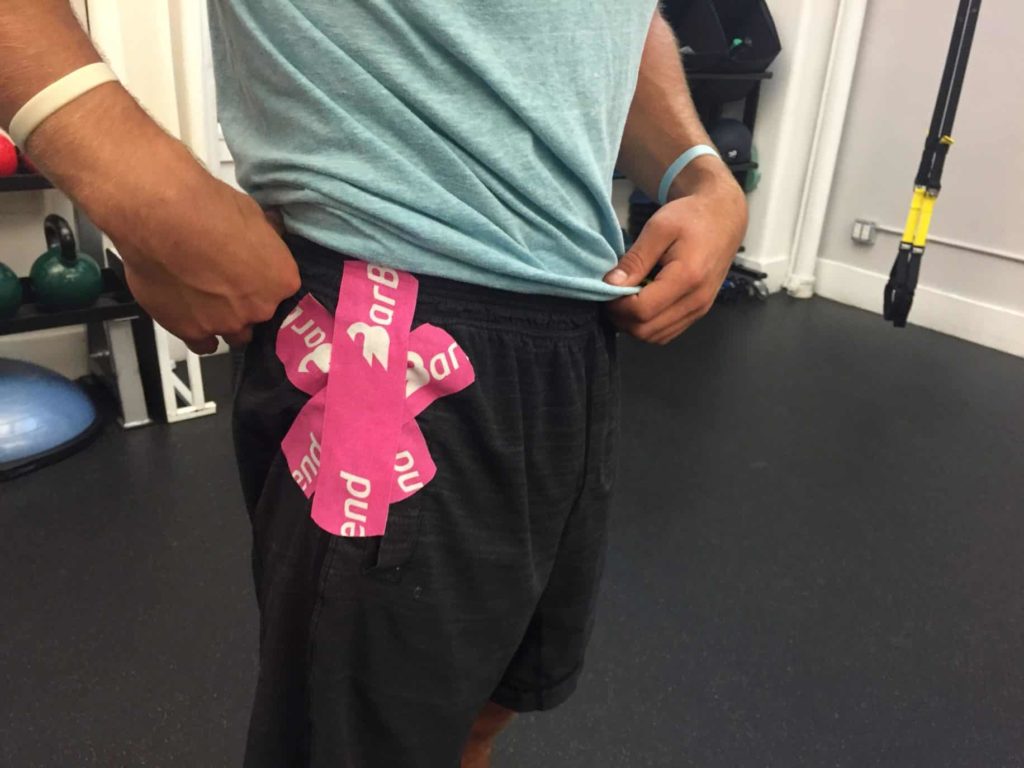
1. Iliotibial Band Star

To begin, an athlete will cut three strips of tape between 6-8 inches in length, or the length of the hand. Next, the athlete will round the edges of each strip of tape, so the corners don’t snag on clothing.

The tape’s placement will be dependent on where an athlete experiences pain and discomfort along the Iliotibial Band. Once the pain point is located, the athlete will take one strip of tape and tear it in the middle, similar to a bandaid leaving 2-inch anchors on each side. The middle of this strip will be placed on the area of pain, then the athlete will apply a 20-50% stretch on each side of the tape. After, the athlete will rub it in for adhesive purposes.

Kinesiology Taping for Hip

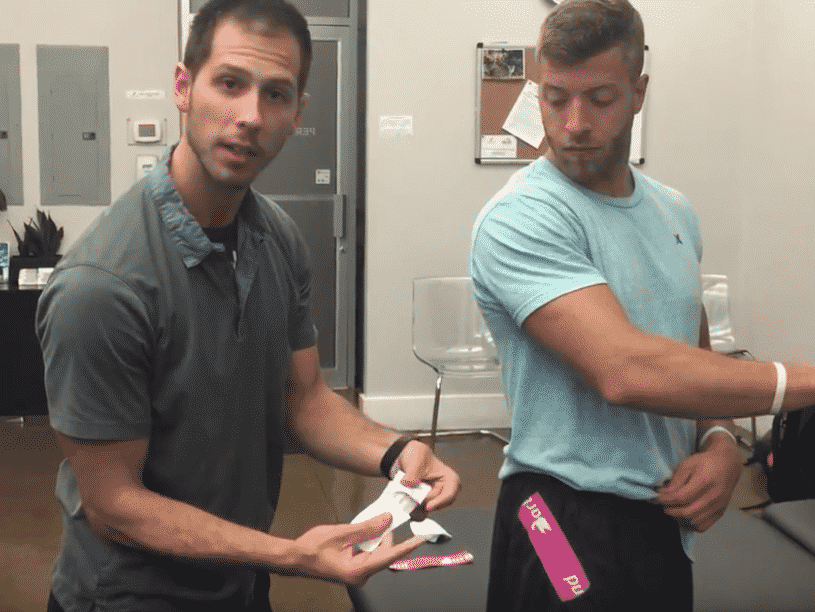
The second strip will be placed in on the pain point in similar manner with a 20-50%, then adequate rub in. This strip once placed will resemble an ex on the athlete. The last piece will be applied similarly to the first two, and will result in what looks like asterics symbol.

Kinesiology Taping for Hip Final

Tips for Hip Taping with Kinesiology Tape

  1. Create Equal Tension: Each strip should have a similar level of tension, which will vary between 20-50%.
  2. Proprioception: Gambino stated that tape itself isn’t the cure for pain, but it’s a facilitator for the body’s perception of it. The skin is very sensitive and the tape’s ability to create tension will give the brain feedback to decrease discomfort.
  3. Even Strips: When using three strips of tape for taping the hip, make sure to cut three pieces in similar length to ensure an equal fit..
  4. Hair and Taking It Off: If you’re excessively hairy in a specific area, then you’ll pull off little pieces at a time, and use your hand to gently repeatedly chop the tape off (in a karate chopping motion). You can also pinch the skin to release some of the tapes tension, while taking it off in a partitioned manner.
  5. Cut the Edges: The final tip was the cut the edges of the tape, so it’s rounded. This will prevent the corners from getting caught on edges of clothes and shoes.

Final Hip Taping Considerations

Kinesiology tape isn’t meant to cure or eradicate hip pain, but help alleviate discomfort. The Iliotibial Band can be a troublesome ligament when it comes to overuse for many athletes, so tape may be a useful method for limiting intra-workout discomfort.

About BarBend Team

The BarBend Team is made up of writers and editors with combined decades of experiencing covering the world of strength and strength sports. We're passionate about bringing the best from the world's of weightlifting, CrossFit, powerlifting, strongman, bodybuilding, and more. In addition to coverage of the latest in these and other strength-based sports, our team produces a variety of training, nutrition, and fitness content relevant to all levels and abilities. Interested in getting in touch for a pitch, story idea, or comment? Email us at info [at] barbend.com.

View All Articles

Primary Sidebar

Latest Reviews

Featured image for the Ironmaster Super Bench Pro V2 Review

Ironmaster Super Bench Pro V2 Review (2025): Our Expert’s New Favorite FID Bench

Titan T3 Power Rack Review

Titan T3 Power Rack Review (2025): An Expert-Approved Rig Beckoning to Budget-Minded Athletes

Our tester works out at the beach in preparation for the Rogue Resistance Bands Review

Rogue Resistance Bands Review (2025): Tested by a Certified Personal Trainer

Barbend tester Jake Herod works out on a Force USA Trainer

Force USA G3 Review (2025): Our Experts Tested This Compact All-In-One Rack for Small Home Gyms

BarBend

BarBend is an independent website. The views expressed on this site may come from individual contributors and do not necessarily reflect the view of BarBend or any other organization. BarBend is the Official Media Partner of USA Weightlifting.

  • About Us
  • Advertise With Us
  • Contact Us
  • Facebook
  • Instagram
  • Twitter
  • YouTube
  • Pinterest

Sections

  • CrossFit
  • Strongman
  • Bodybuilding
  • Powerlifting
  • Weightlifting
  • Reviews
  • Nutrition
  • Training

More

  • BarBend Newsletter
  • BarBend Podcast
  • The Ripped Report
  • 1RM Calculator
  • BMR Calculator
  • Macros Calculator
  • Protein Calculator
  • Squat Calculator

Policies

  • Accessibility
  • Advice Disclaimer
  • Cookies Policy
  • Disclaimers
  • Disclosures
  • Editorial Policy
  • Privacy Policy
  • Terms of Use

Copyright © 2025 · BarBend Inc · Sitemap