In a way, Peter Parker kind of cheated. Not everyone can suffer a bug bite and wake up the next day with their goal physique — and superhuman senses. But, regardless, if you want to build arms that can scale buildings and look good in (and out of) a t-shirt, you need an exercise like the spider curl.
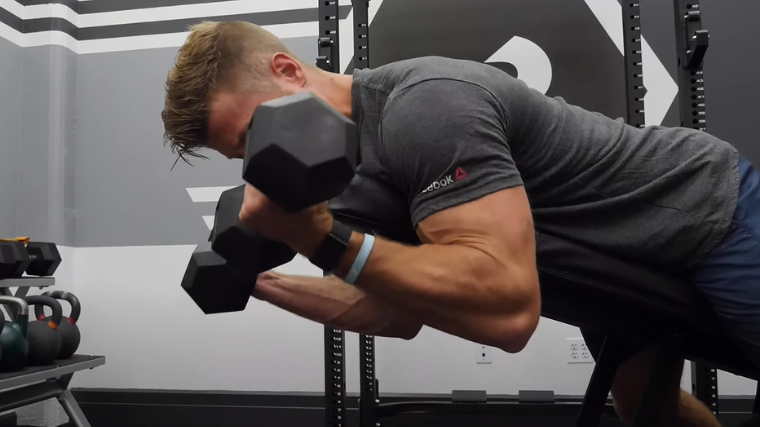
You’ve probably seen it in the gym before, but you may not know how to perform the spider curl for yourself. Here’s how to execute the movement properly, plus some extra information to help you untangle your web and sink your fangs into top-tier arm training.
- How to Do the Spider Curl
- Spider Curl Sets and Reps
- Common Spider Curl Mistakes
- Spider Curl Variations
- Spider Curl Alternatives
- Muscles Worked by the Spider Curl
- Benefits of the Spider Curl
- Who Should Do the Spider Curl
- Frequently Asked Questions
How to Do the Spider Curl
To perform the spider curl, you’ll need a few specific pieces of equipment. First, get yourself an adjustable weight bench — this is critical. You’ll also want a pair of dumbbells. You can certainly perform the spider curl with different types of equipment, but dumbbells are generally going to be your default.
Step 1 — Set the Bench
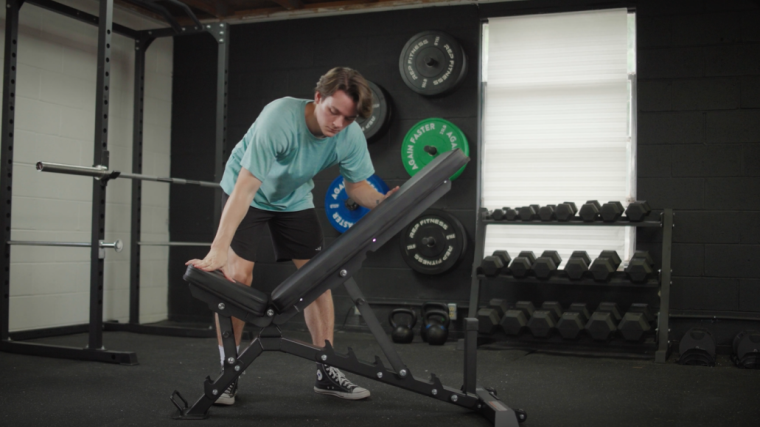
First things first, adjust the backrest of a weight bench such that it’s between 30 and 60 degrees relative to the floor.
Coach’s Tip: You’ll want to find an angle that allows your arm to hang straight down without causing any shoulder discomfort.
Step 2 — Set Yourself Up
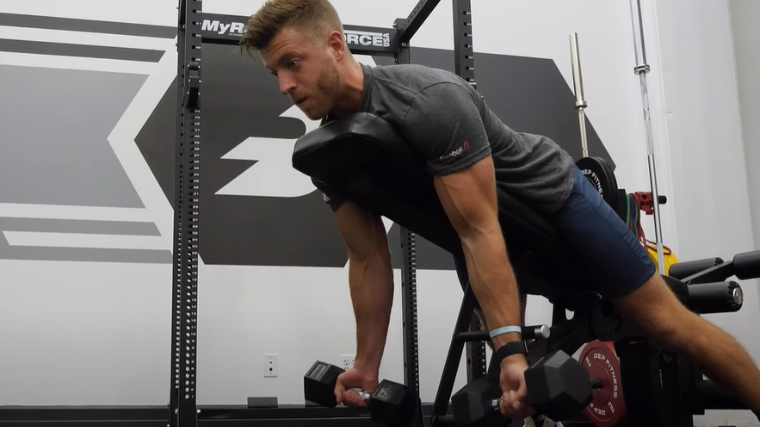
Once your bench is set up properly, grab a pair of dumbbells and lean your torso against the backrest. Your arms should hang straight down at your sides. Make sure the weights you’re holding can easily clear the frame of the bench.
Coach’s Tip: Your upper chest and collarbones should be roughly in contact with the top of the bench, allowing your head to move freely if needed.
Step 3 — Curl Away
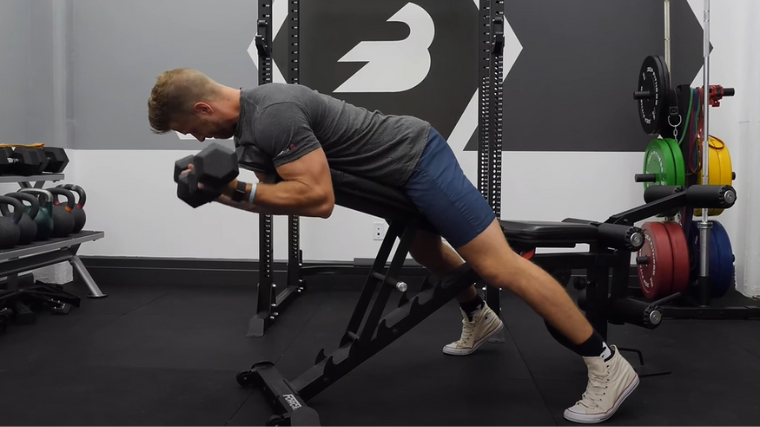
Once you’re set up, begin the spider curl by bending your elbow to draw the weights upward. Squeeze your biceps hard and curl until your forearm is at least parallel with the floor. Hold for a beat at the top and then slowly lower the weights back down.
Coach’s Tip: Your upper arm should remain static the entire time. Avoid letting your arm or elbow drift backwards as you curl.
Spider Curl Sets and Reps
It isn’t the most versatile exercise out there, but you should probably take a slightly different tack with the spider curl depending on your goals or experience level. Here are two unique ways to program the spider curl:
- While Learning the Movement: Go for 1 or 2 sets of up to 15 reps with a light weight.
- For Muscle Growth: Try 3 to 4 sets of 6 to 8 reps, working close to muscular failure.
Common Spider Curl Mistakes
Fortunately, the spider curl doesn’t have that many moving parts to it. It may not be as technically demanding as a large compound movement, but the unique setup does take a bit of work to get just right.
Setting the Bench Incorrectly
When performing the spider curl, your arms should fall in front of your torso, but that doesn’t mean they should be perpendicular to each other.
If you set the bench too low, you may experience some discomfort in your shoulder that interferes with your ability to perform the exercise. Conversely, setting the bench to be almost upright prevents your arm from falling in front of your body; an essential hallmark of the spider curl.
Using Heavy Weights
The unsupported position of your upper arm during the spider curl prevents you from using ultra-heavy weights most of the time. Not only should you focus on properly curling the weights with your biceps, but you also need to ensure that your arm stays put where it belongs.
If you work with weights that are too heavy, you may find yourself cheating the exercise by dragging your arm backward while you curl. This defeats the specific purpose of the spider curl altogether.
Spider Curl Variations
If you want to put a spin on the spider curl, you can make some minor modifications to the movement. However, the specific design of the exercise does limit its customizability to a degree.
Reverse-Grip Spider Curl
You can dial in on your grip and forearm strength by performing a reverse-grip spider curl. This exercise is identical to the standard movement, save for the position of your palms.
By working with a pronated, or palms-down, hand position, you shift some of the mechanical tension away from the biceps and toward other muscles. Your brachialis, brachioradialis, and the various small muscles of your wrist will take on much more of the load.
Resistance Band Spider Curl
One issue with free-weight curls (no matter your preferred variation) is the potentially poor strength curve. Meaning, you may find certain biceps exercises don’t give you the pump you’re looking for.
For the best possible squeeze at the top, grab a resistance band and fix it underneath the legs of the bench itself (or directly to the weight you’re using, if you have a barbell in-hand). Then, perform the spider curl by clutching the band instead. You’ll find the exercise gets exponentially harder towards the top, providing the most tension when your biceps are fully contracted.
Spider Curl Alternatives
If the spider curl doesn’t do it for you, no harm no foul. You can perform an assortment of other movements that mimic the unique posture of the spider curl. Here are a few solid picks for you to dabble in:
Preacher Curl
You can think of a spider curl as, essentially, an unsupported preacher curl. The preacher bench gives you a solid surface to rest your upper arm against, which is great for providing support and stability.
If you can’t seem to get the form of the spider curl down pat, head over to the preacher bench instead. Preacher curls target your biceps in a very similar way.
Cheat Curl
You can definitely make some solid arm gains with a bit of body English along the way. Cheat curls, where you intentionally include some hip momentum to help drive the weight up, are great for overloading your arms.
They also happen to mirror the posture of the spider curl while you’re standing. During a cheat curl, you’ll want to allow your upper arm to drift forward somewhat during the concentric, or curling, portion of the movement.
https://youtube.com/watch?v=II4UIgobmvo
This closely resembles the posture of your arm during the spider curl; but with much, much more weight on the bar.
Cable Curl
Cable work allows you to perform some truly unique movements that you couldn’t do with free weights. Since you don’t have to account for gravity, you can adjust the cable curl to place your arm in a similar position to the standard spider curl.
Simply set a cable attachment to the lowest peg and stand a foot or two away from the station. Your arm will naturally drift forward in front of your body, just like in the spider curl.
Muscles Worked by the Spider Curl
It’s no secret — the spider curl blasts your biceps. That said, there is a bit more going on under the skin. You should know how your biceps work, and why the spider curl is so effective, if you want to use it to maximize your gains.
Biceps
The primary (and in practical terms, only) function of your biceps is elbow flexion; bending your arm. When you perform the spider curl, your biceps work against resistance to close the angle of your elbow.
However, there’s a bit more to it. The biceps brachii has two distinct compartments. The short head, which attaches to your shoulder blade, and the long head that inserts on the glenohumeral joint on your shoulder.

[Read More: Our Favorite Forearm Workouts, + the Best Forearm Exercises]
When you allow your arm to hang in front of your body during a spider curl, you create some shoulder flexion. This flexion puts slack into the long head of the biceps, which prevents it from performing as much work. As such, the short head picks up the load.
This is why the spider curl is so effective, anatomically; it allows you to bias specific aspects of your biceps for potent, targeted muscle growth.
Forearms
Any free-weight curl you perform will also involve the musculature of your forearm to some degree. There are dozens of small muscles between your fingertips and elbow; many of them play intricate, but unnoticeable, functions during a curl.
You’ll generally notice some tension on your forearm as you physically clasp your hand around the handle of a dumbbell.
This low-level isometric tension is great for joint stabilization and endurance, but you probably won’t grow your forearms to a meaningful degree with the spider curl.
Benefits of the Spider Curl
It won’t turn you into a wall-crawling superhero, but the spider curl is one heck of a biceps-builder. In fact, it accomplishes that task in a way that many other curls simply can’t.
Targeted Biceps Activation
Scientific studies on the so-called “mind-muscle connection” are limited, and there isn’t a clear consensus on the subject. However, some literature has examined how focused concentration can affect hypertrophic outcomes.
For biceps curls, actively squeezing the muscle as hard as possible seems to correlate well with making gains. (1) This is likely because the spider curl is a single-joint isolation movement; you only have to direct your attention toward one individual muscle.
Regardless, the spider curl is a fantastic movement for honing in on your biceps and really squeezing them for all they’re worth.
Unique Muscle Stimulation
The very setup of the spider curl provides a level of biceps activation that you can’t get from every other movement. It enables you to zone in on one of the biceps’ two heads to a significant degree.
Further, even a light weight can feel quite heavy during the spider curl, as you have to flex your biceps while also making sure you don’t cheat the movement by swinging your upper arm forward. This makes the spider curl a particularly effective training tool.
Addresses Imbalances
Like any good unilateral exercise, the spider curl allows you to stimulate each of your biceps independently — if you choose to perform the movement with dumbbells, one arm at a time.
Barbells are all well and good, but it’s easy enough for the “dominant” side of your body to take over and bear more of the load than your weaker side. Dumbbell work circumvents this problem; if your left arm, for example, isn’t strong enough to curl the weight, that discrepancy is made immediately obvious.
You can use an exercise like the spider curl to bring up a lagging biceps as well by performing a few extra reps on that side.
Who Should Do the Spider Curl
Just about anyone who wants to strengthen or grow their arms can find a home for the spider curl in their workout routine. Still, there are a few camps that may benefit from the movement more than others.
Beginners
If you’re getting started in the gym, congratulations are in order. One of the most essential keys to building and maintaining a sustainable exercise habit is comfort. The movements you perform in the weight room should be comfortable and enjoyable, but also challenging.
You can pick any biceps curl you like as a beginner and make gains just fine. If the spider curl tickles your fancy, plug it in. It’s a fantastic way to start building up those guns.
Bodybuilders
Building beefy, bulging biceps is high on the priority list of every physique-minded gymgoer. If you’ve struggled to grow your biceps, you might want to take the spider curl for a spin instead.
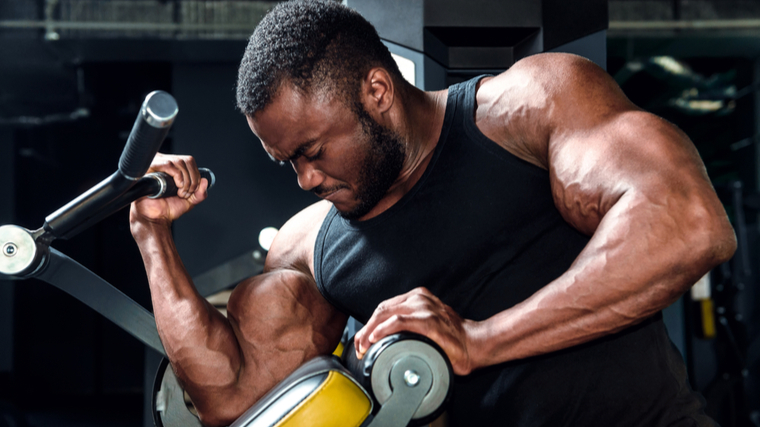
It might prove particularly effective if you haven’t incorporated a biceps curl that places your shoulder into flexion, such as the preacher curl.
Creepy Crawly Gains
Spider-Man may pull his punches, but you shouldn’t do anything of the sort in the weight room. If you want to make serious arm gains, you need to go hard — and have the right exercises to boot. The spider curl might just be what you’ve been missing. It’s definitely a movement worth spinning up during your next arm workout.
FAQs
Spider curl got your brain all tangled up? No worries. Here are a few common questions about the exercise, answered clearly.
What's the correct angle to set the bench at for the spider curl?
It’s definitely personal preference, but you don’t have to lean against a low-angled bench to effectively perform the spider curl. As long as your arm falls “in front” of your torso, you’re good to go. Start with a moderate incline at first, say about 45 degrees, and tweak from there as needed.
Where should I look while performing the spider curl?
Since there’s no load placed on your cervical spine during the spider curl, you can point your head in any direction you like. A safe bet is to simply maintain a neutral head position and look forward.
References
1. Schoenfeld, B. J., Vigotsky, A., Contreras, B., Golden, S., Alto, A., Larson, R., Winkelman, N., & Paoli, A. (2018). Differential effects of attentional focus strategies during long-term resistance training. European journal of sport science, 18(5), 705–712.