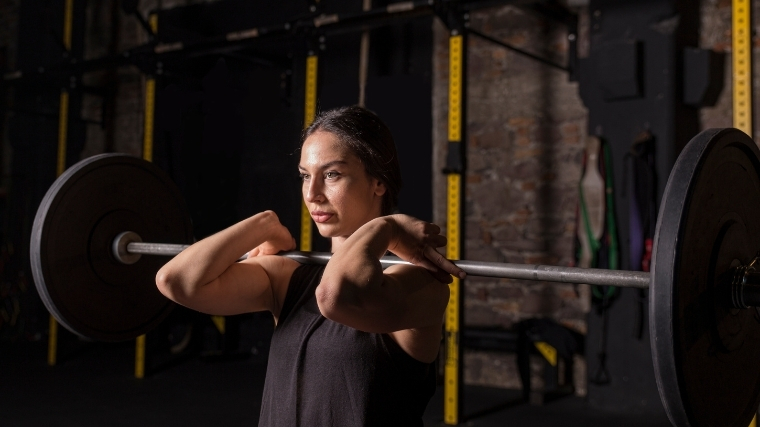
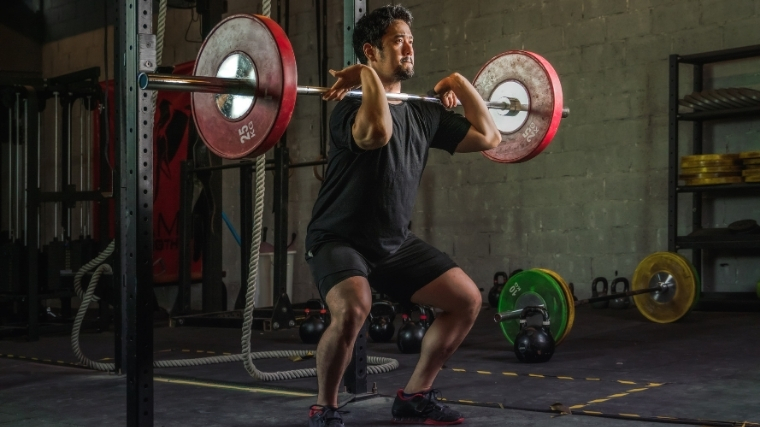
The front squat is a uniquely challenging and highly beneficial squat movement that differs drastically from back squats and overhead squats. The front squat can help improve a weightlifter’s clean, build muscle and strength in the legs, and produce more power.
In this article, we will go through everything you need to know about how, why, and who should do front squats:
- How to Do the Front Squat
- Benefits of the Front Squat
- Muscles Worked by the Front Squat
- Who Should Do the Front Squat
- Front Squat Sets, Reps, and Programming Recommendations
- Front Squat Variations
- Front Squat Alternatives
- Frequently Asked Questions
How to Do the Front Squat
Below is a step-by-step guide on how to perform the front squat using a barbell set up. Further below, we will discuss a wide variety of variations and front squat alternatives.
Step 1 — Proper Front Rack Positioning

Assume a proper front rack position by placing the barbell high up onto the shoulders, ensuring the bar is supported with the shoulders and upper chest (above the sternum). The posture should be tall with the elbows up and core tight. Note: This isn’t very comfortable, so don’t be worried if it smurfs a little. That’s just is what it is.
Form Tip: Work to maintain a full grip on the barbell, rather than allowing the fingers and wrists to bend backward (hyperextend). If you cannot perform this with a full grip, you can refer to the below modifications section.
Step 2 — Descend into the Squat

With the barbell resting in the front rack position, descend into a squat keeping the pelvis neutral and the chest up. Minimize forward lean of the torso, which will force greater loading on the quadriceps.
Form Tip: Be sure to sit down rather than pushing the hips back.
Step 3 — Stand Up

Once you have hit the bottom position in the front squat, push through the full foot and stand up, maintaining an upright torso, chest, and elbow positioning.
Keep the knees out and forward over the toes, allowing the torso to remain vertical rather than allowing the hips to push backward excessively. This will help keep the torso vertical and the quadriceps engaged.
Form Tip: Keep your elbows and chest up, and fight the urge to lean forward.
Benefits of the Front Squat
Below are three reasons why the front squat is a great movement for all fitness levels and goals.
More Quad mass
This movement can add quality amounts of lean muscle mass to the quadriceps and enhance overall leg development and performance. The front squat can then be used to increase quadriceps development and strength as it limits the capacity to squat with a more horizontal back angle. Simply put, the front squat forces you to stay upright, which forces your quads to work more.
Greater Knee Joint Stability
Lack of quadriceps strength and control can impede knee flexion and mobility, creating a cascade of countering movement imbalances throughout the hips, spine, and ankles.
Application to Sport-Specific Movements
The front squat has high transferability to Olympic weightlifting movements, functional fitness competitions and training, combat-based sports, and even manual labor. By integrating this front-loaded squat into training programs, you can develop the necessary strength for more demanding tasks and promote sound movement mechanics to decrease injury and improve overall performance.
Muscles Worked
The front squat differs slightly from the back squat due to the barbell placement in the front rack position. By doing so, the load is displaced in front of the midline, requiring a stronger upper back and quadriceps to ensure an upright torso and positioning.
Quadriceps
When front squatting, the load is placed in front of the lifter. This forces them to maintain a more upright torso position that creates a more vertical squat patterning.
Upper Back
Front-loaded movements force a lifter to maintain an upright position and therefore help strengthen the upper back. The front squat necessitates a vertical torso positioning for proper execution of the lift.
Erectors
The spinal erectors (lower back muscles) must work isometrically to maintain a rigid, upright torso positioning in the front squat. That said, the front squat allows for a more vertical torso positioning than a back squat, making this variation a good option if looking to decrease shearing forces on the lumbar spine when compared to a low bar or high bar squat (assuming the front squat is done properly).
[Read More: Best Lower Back Exercises for Strength and Reduced Pain]
Abdominals
Because the lifter is holding the barbell in front of them, they need to contract the abs extra hard to stray upright. And the core needs to remain contracted throughout the lift.
Who Should Perform Front Squats?
Below are a few groups of athletes that can benefit from including front squats within training programs.

[Read More: The Best Ab Exercises & Workouts, According to a CPT]
Strength and Power Athletes
Front squats have a high application to Olympic weightlifting, CrossFit movements (pistol squats, wall balls, cleans), and powerlifting.
- Powerlifting: Increasing the front squat, or simply training it, can help increase quadriceps strength and development, improve anterior core strength, and increase overall leg development. And that newfound quad strength will carry over to a heavier back squat for competition.
- Strongmen and Strongwomen: Increasing body mass and leg strength is key for strength athletes. Training the front squat can also enhance front-loaded performance (carries).
- Olympic Weightlifting: Increasing the front squat often corresponds with an increase in the back squat and overall leg and back strength. Additionally, it has a direct correlation to clean & jerk performance.
Competitive Fitness Athletes
As discussed above, the front squat can increase strength specific to movements like the clean, back squat, and competitive fitness movements. Lack of front squat training will often result in poor back, core, and quadriceps development and detrimental movement patterning in wall balls, pistol squats, back squats, and the Olympic lifts.
Sports Athletes
In addition to the back squat, the front squat can increase leg strength and muscle mass while limiting lower back stress (compared with a less vertical back angle in the back squat). Some athletes, such as pitchers, rely on an upright torso and leg strength to perform, making this a good squatting variation for some athletes.
General Population
The front squat can be difficult for many deskbound individuals to perform. Many beginners will often start with back squats (which are also beneficial) yet end up performing a squat that places high amounts of loading on the hips and lower back.
[Read More: The Best Leg Exercises for Your Next Leg Day]
Using the front squat, coaches and trainers can force proper positions while also building core strength and muscular development of the quadriceps and glutes.
Front Squat Sets, Reps, and Programming Recommendations
Below are three primary sets, reps, and weight (intensity) recommendations for coaches and athletes to properly program the front squat specific to the training goal. Note that the below guidelines are here to offer gym-goers loose recommendations for programming.
To Build Muscle
The front squat can be done within higher training volumes to build muscle mass and core strength. Incorporating more advanced time under tension training protocols can further the hypertrophic effects of front squat training. To start, perform three to five sets of six to 12 repetitions with moderate to heavy loads. Tempos, pauses, and eccentrics can be done throughout the range of motion to induce additional muscular damage and hypertrophy.
To Improve Strength
For developing leg and back strength, the front squat can be used by most athletes and lifters. The front squat can be trained at high loads and with low rep ranges if the goal is maximal strength. It is important to adhere to proper front squat technique under heavy loads. For most liters, start by performing four to six sets of one to five repetitions with a challenging load.
To Develop Muscular Endurance
The front squat can be a great way to build muscular endurance in the back, quadriceps, and core muscles. Many lifters may be limited by upper back and core strength during higher rep front squat training. If the goal is quadriceps development and endurance, lifters may want to swap to other less limiting exercises that can more sufficiently overload the quadriceps without being limited by upper back and core endurance. Try performing two to four sets of 15-20 repetitions. It is important to note that the limiting factor during higher repetition-based front squats is upper back and core strength and endurance.
Front Squat Variations
Below are five front squat variations to build strength, hypertrophy, and improved squatting performance.
Zombie Front Squat
The Zombie front squat is essentially a front squat with no hands. To do this, the lifter places their hands out in front of them, like a Zombie, with the bar balanced on the anterior deltoids.
This is a great variation to reinforce an active upper body and torso positioning (vertical) for lifters who may lean excessively forward in the front squat and/or rely too much on their arms and wrists to support the load.
Pause Front Squat
The pause squat is performed similarly to most pause movements. The lifter performs a full front squat and pauses at the bottom of the front squat, briefly maintaining proper positioning and core tension.
This is a great variation for lifters who struggle to maintain positioning in the bottom of the front squat and/or those who have limited leg strength to stand up from the bottom of the squat.
1 ¼ Front Squat
The 1 ¼ front squat is a variation that increases the training volume of the squat, often at the weakest range of motion. To perform this, the lifter descends into a full front squat, stands up a few inches, drops back down, and then fully comes up into the standing position. This combination of a full front squat and an additional ¼ front squat (bottom of the squat) increases loading on the quadriceps.
Double Pause Front Squat
The double pause front squat is a pause squat with an added pause somewhere else throughout the range of motion. However, this can vary based on the individual and goal. Pausing in the hole and somewhere just above parallel is a good starting point.
Tempo Front Squat
Adding a tempo to the front squat is a great way to increase movement coordination and positional strength. This can help individuals who struggle with losing positioning at the bottom of the front squat or clean or add additional emphasis to leg drive in the front squat.
Front Squat Alternatives
Below are five front squat alternatives that can be used to improve leg strength, muscle hypertrophy, and posture.
Goblet Squat
The goblet squat is a regressed version of the barbell front squat that can be done to help beginners develop proper positioning in the front-loaded squat. Additionally, this exercise can be used with heavy loads to increase back, core, and quadriceps strength, similar to the front squat.
Zercher Squat
The Zercher squat is similar to a front squat in that it challenges postural strength, core stability and shifts loading to the anterior aspect of the body. In this movement, the lifter places the barbell in the crook of the elbows rather than on the front rack.
Split Squat
While not traditionally done with a front rack position (however it can be), the split squat is a great unilateral exercise to develop quadriceps strength and muscle mass. This exercise can be used as an accessory movement to increase front squat and lower body performance.
Hack Squat
The hack squat machine is an excellent alternative to the front squat as it helps emphasize quadriceps growth via increased knee flexion. This is ideal for lifters who need additional quadriceps development yet may be limited in the front squat by mobility, upper back strength, or a combination of the two. The hack squat can be done using tempos, pauses, and double pauses, just like front squats, to really maximize growth.
Double Front Rack Kettlebell Squat
Double front rack kettlebell squats are a great alternative to barbell front squats for lifters who may not have access to a barbell or are looking to attack unilateral stability and strength of the upper back. By using two kettlebells, the lifter is forced to stabilize each kettlebell independent of one another, which can help address any asymmetries in upper back strength or oblique/core stability that otherwise would go unseen in the barbell front squat.
Frequently Asked Questions
What is the proper grip width for the front squat?
While this may vary from person to person, most lifters should take a grip that’s slightly wider than shoulder-width on the barbell for front squats.
The wider the grip, the greater need for shoulder, triceps, and lat flexibility. If the grip is too narrow, the lifter may have issues collapsing forward in the front squat and/or find additional strain being placed on the wrists.
What should you do if front squats hurt your wrists?
If your wrists hurt in the front squat, this is most likely due to improper front rack positioning. If this is the case, you need to first address this by improving front rack mobility and then improving front rack performance via light front squats. If your pain comes from general stiffness, that is one thing. If your pain is more than stiffness and slight discomfort, then opt to perform the front rack mobility drills and improve technique, while using other variations like the hack squat to attack muscular development. (Also, always see a doctor if you’re facing severe pain.)
How to improve front rack mobility for the front squat?
You can go through this front squat front rack mobility and warm-up flow for beginners looking to improve their front squat front rack position. In short, improving lat and tricep flexibility, while also practicing the front rack position are often two of the most effective ways to improve your front rack mobility for the front squat.
Featured image: Mongkolchon Akesin/Shutterstock