It’s leg day, and you want to make sure you’re choosing the most effective leg exercises for lower-body hypertrophy, strength-building, or whatever your particular goals are this training cycle. Whether you’ve hit a plateau with your back squat — or you’re just looking for creative ways to work your legs — your training can benefit massively from peppering Jefferson squats in with your regularly scheduled back squats.
While you’re probably already familiar with the basics of how to perform back squats, Jefferson squats may be new to you. While pretty much nothing will compare to back squats when it comes to total body engagement, adding Jefferson squats to your repertoire will help address strength and muscle asymmetries and boost lower-body hypertrophy.
What’s the difference between Jefferson squats and back squats, though? When and how should you integrate them into your program? Read on to learn more about how to integrate these squat variations into your training, depending on your experience levels and goals.

The Back Squat vs. Jefferson Squat — Form Differences
You can deduce a lot about the back squat based on its name. You load a barbell on your back and then squat. One plus one equals two in this case. The Jefferson squat, on the other hand, doesn’t tell you anything useful. Is it a normal squat, except a man named Jefferson must spot you? Or maybe it’s when you squat while watching the wholesome 1970s sitcom The Jeffersons? No and no. To do the Jefferson squat, you straddle the bar with your legs and hold it with both hands.
The Jefferson squat looks more like a deadlift, but it’s still a quad-focused movement. Your feet face different directions instead of maintaining bilateral symmetry and working in a simpler plane of motion. For both lifts, you’ll “push your knees out.” Still, Jefferson squats will have your legs at completely different angles to each other — they’ll be more perpendicular than parallel, which will likely leave you working a little harder to figure out what your form should look like based on your limb length and leverages.
How to Do the Back Squat
If you’re a powerlifter, you’ll likely opt to do the low-bar back squat most often; if you’re a weightlifter, you might opt for the high-bar back squat as your primary squat form instead. Both types of back squats are incredible for building strength, overall body coordination, and lower body hypertrophy. The following “how-to” covers the high bar back squat since the set-up is a little less complex than the setup for the low bar squat.
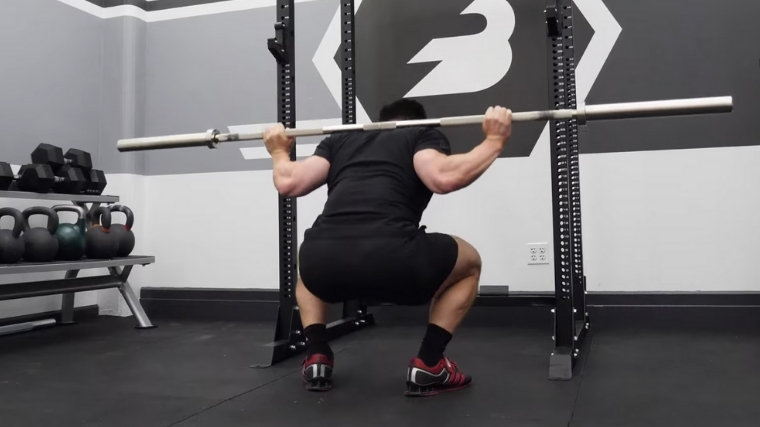
- Step up to the center of the bar and plant your feet about shoulder-width apart. Brace your core and grasp the bar with your hands just outside your shoulders.
- Pull your shoulders down and away from your ears, engage your traps, and pin the bar on the shelf on your upper back.
- Stand up, unracking the bar. Get settled, then take two or three steps back — take a moment to re-establish your foot position.
- As you sink into your squat, press your knees out (instead of letting them cave in). Maintain a relatively upright torso, keeping the bar in a vertical path tracking above your midfoot.
- Break parallel with your thighs to reach depth, then drive your feet into the ground to help you rise back to standing.
- Brace your core again and repeat.
How to Do the Jefferson Squat
If you’ve never done a Jefferson squat before, make sure you’re first practicing your position with no weight whatsoever — practice the motions below while imagining a barbell to make sure you’re getting in the right position for your body. Once that feels comfortable in both orientations, it’s time to practice with an empty bar. Only then should you start to add weight (conservatively) — form is much more important than how much weight you’re moving.
- Find your stance: place your feet on opposite sides of the bar, with your front foot facing forward and your back foot rotated out by about 90 degrees. Adjust as needed (this will depend a lot on your limb length) so that when you sink into a squat in this position, your knees track directly over your ankles, and your feet can stay flat on the ground. You will be emphasizing your front leg during the lift, though both feet will stay flat.
- Squat down and grab the bar with your hands, using a mixed grip. Your hands should be equal distance apart, and you’ll want to keep your chest up and your knees out.
- Press both feet down into the ground so that you push yourself into standing; it’s okay if you aren’t able to reach full extension at the top of the lift. Just make sure that you’re not compensating by hinging forward — maintain the “squat” nature of the lift instead of adding a hinge to attempt to straighten your legs more. It’s okay to stop short of full standing if you need to.
- Descend slowly until your thighs break parallel or as deep as your hip mobility allows without compromising your form. Let the bar settle and still before you rise again, avoiding bouncing it off the ground in a stop-and-go technique.
- When you’re done with your reps, re-establish your position in the opposite orientation and repeat.
The Back vs. Jefferson Squat — Performance Differences
Whether you’re looking to increase strength or hypertrophy, you’ll probably want to integrate both types of squat into your program in one way or another. That said, the Jefferson squat has some distinct benefits that make it worth integrating as an accessory exercise.
General Strength
Naturally, you’re going to be able to move a much heavier load with the back squat versus the Jefferson squat. In this way, the back squat reigns supreme when looking at which movement will allow for the most weight to be applied. Unlike the Jefferson squat, the back squat is placed upon the back, forcing the lifter to withstand the load, brace, and move. The synchronization of nearly every muscle unit and leverages in this total-body lift will allow lifters to challenge and continually train strength.
Muscular Hypertrophy
When it comes to muscle hypertrophy and endurance, both exercises can produce significant increases in quadriceps volume and hip performance. The Jefferson squat is a highly isolated approach to training the quads and hips, often done with much less loading and less stress on the lumbar spine. The back squat can also be done in higher volumes — but it requires the lifter to withstand moderate to heavy loads for great amounts of time (60-120 seconds) while performing higher-rep-based sessions.
It’s also worth noting that, though the back squat will help you move more weight overall, the Jefferson squat is a unilateral exercise — meaning that if you’re looking to target your quads with higher volume for hypertrophy, the Jefferson squat is a great move to turn to. The Jefferson squat also places a big emphasis on your adductor muscles (your inner thigh) because of the explicitly hip-opening nature of the exercise, so if you’re looking to strengthen this oft-neglected area specifically, Jefferson squats may be your new best friend.
Which is Better for Strengthening Your Main Lifts?
Because the Jefferson squat has you moving in all three planes of motion (sagittal, frontal, and transverse), they might be your best bet for prepping for sports that require you to move your body through different planes of motion — think football or rugby. Since the Jefferson squat also emphasizes the adductors so strongly, it’ll directly translate into a stronger back squat and sumo deadlift. And if you’re in a muscle growth phase, the Jefferson squat may be easier to work for more volume and be a surer way to stimulate symmetrical growth.
Of course, if you’re a powerlifter who back-squats in competition, then you need to back squat. However, the Jefferson squat will indeed be a useful accessory move to help your back squat continue to improve. But since the back squat is the main lift in itself, it might be the most effective lift to emphasize consistently.
When to Use Back Squats
If you’re prepping for a powerlifting meet, it’s (low bar) back squats all day. And if you’re a CrossFitter or weightlifter, you’ll also want (high bar) back squats to be one of your primary lifts since they’re directly related to your sport-specific lifts.
When you’re looking to improve overall strength and athleticism, too, back squats are a great way to go — they’ll challenge you to use your entire body to move hefty loads, which will do well to stimulate strength and muscle gains. Whether you’re doing high bar or low bar, back squats are going to allow you to maximize the amount of weight you’re moving, which matches the goals of so many people strolling toward the squat rack every day.
When to Use Jefferson Squats
No matter what kind of lifter you are, Jefferson squats are excellent accessory exercises — they’ll translate into stronger back squats and sumo deadlifts, and they’ll give you a tremendous amount of core strength (and even work your grip). Their emphasis on making you move through multiple planes of motion at once will also prepare you for the odd and challenging assortment of moves required in many CrossFit WODs, too. And since it’s a unilateral move, it’ll fight any muscle and strength imbalances you’re working with.
Jefferson squats are also a spectacular accessory option if you’re a bodybuilder or weekend warrior looking to gain muscle. They’ll work your legs one at a time due to their unilateral nature, making them excellent for developing your quads and glutes while making sure each side is getting the proper amount of attention.
How to Program Each Squat
Low-bar back squats are the main lifts for powerlifters; high bar squats are pretty directly translatable into weightlifters’ main lifts. So back squats should probably be the centerpiece of most people’s programming, certainly performed at the beginning of a workout after your warmup.
If you’re using the back squat to improve your overall strength, you’ll want to perform low reps with heavier weight; if you’re looking to use your back squat to stimulate hypertrophy, go somewhat lighter with a higher rep scheme.
On the other hand, the Jefferson squat is more of an isolation move for your front leg, so you’ll want to program it accordingly. If you’re looking to add extra volume to your leg day and add some weighted unilateral lower-body moves that aren’t lunges or split squats — Jefferson squats are a good go-to. If back squats are in your program, Jefferson squats should consistently be performed afterward instead of beforehand.
In general, the idea isn’t to work yourself toward a “max” Jefferson squat, whereas you’re probably going to be training toward a one-rep max back squat at some point or another. Instead, you’ll likely be programming Jefferson squats for volume, working with anywhere from eight to 15 or even 20 reps per side, depending on your exact goals. Just make sure your form is impeccable at all times.
The Bottom Line
Looking to build a massive amount of lower body strength and move tremendous amounts of weight? The back squat is the choice for you. Looking to correct muscle and strength imbalances and add a major amount of volume to your leg day? Jefferson squats will help you enormously.
Both types of squats are going to help you develop strong, well-built legs, so you’ll likely want to integrate both into your training program. Just make sure you always perform your back squat first, since it’s most energetically demanding, and you’ll move the most weight with it — safety first.
Featured image:
