• Skip to primary navigation
  • Skip to main content
  • Skip to primary sidebar
The BarBend Logo in white.

BarBend

The Online Home for Strength Sports

  • News
    • CrossFit
    • Strongman
    • Bodybuilding
    • Powerlifting
    • Weightlifting
    • HYROX
  • Reviews
    • Recovery
      • Best Cold Plunges
      • Best Saunas
      • Best Mini-Massage Guns
    • Supplements
      • Best Protein
        • Best Vegan Protein Powders
        • Best Whey Isolate Protein Powders
        • Best Mass Gainer
        • Best Protein Bars
      • Best Pre-Workouts
        • Best Pre-Workout for Women
        • Best Pre-Workouts for Men
        • Best Non-Stim Pre-Workouts
        • Strongest Pre-Workouts
      • Best Creatine
      • Best Electrolyte Supplements
      • Best Greens Powder
      • Best Meal Replacements
      • Best Nitric Oxide Supplements
      • Best Fat Burners
      • Individual Supplement Reviews
    • Cardio Equipment
      • Best Treadmills
      • Best Rowing Machines
      • Best Exercise Bikes
      • Best Ellipticals
      • Best Recumbent Bikes
      • Individual Cardio Equipment Reviews
    • Strength Equipment
      • Best Adjustable Dumbbells
      • Best Dumbbells
      • Best Kettlebells
      • Best Barbells
      • Best Squat Racks
      • Best Weight Benches
      • Best Resistance Bands
      • Best Leg Extension Machines
      • Individual Strength Equipment Reviews
    • Apparel
      • Best Weightlifting Shoes
      • Best Cross Training Shoes
      • Best Running Shoes
      • Best Gym Shorts
    • Fitness Tech
      • Best Running Apps
      • Best Fitness Trackers
      • Best Workout Apps
      • Best Smart Scales
    • Support Gear
      • Best Lifting Straps
      • Best Gym Bags
      • Best Lifting Gloves
      • Best Wrist Wraps
  • Nutrition
    • Diets
      • Carb Cycling
      • Vertical Diet
      • Reverse Dieting
      • Carnivore Diet
      • Ketogenic Diet
      • Intermittent Fasting
      • IIFYM Diet
    • Muscle Gain
      • How to Dirty Bulk
      • Go From Cutting to Bulking
      • Eat These Carbs
      • How to Eat for Muscle
    • Fat Loss
      • Macros for Fat Loss
      • Calorie Deficits
      • Natural Fat Burners
      • Cut 2 Pounds Weekly
    • Supplement Guides
      • Pre-Workout
      • Whey Protein
      • Mass Gainers
      • Greens Powders
      • Creatine
      • BCAAs
    • Daily Protein Needs
    • Pre- and Post-Workout Nutrition
    • Foods With Creatine
    • Bulking Tips
  • Training
    • Exercise Guides
      • Deadlift
      • Bench Press
      • Back Squat
      • Overhead Press
      • Lat Pulldown
      • Shoulder Exercises
      • Chest Exercises
      • Ab Exercises
      • Quad Exercises
      • Biceps Exercises
    • Training Guides
      • Beginner’s Guide to the Gym
      • How to Build Muscle
      • Guide to Muscle Hypertrophy
      • How to Train on a Cut
    • Workouts
      • Back Workouts
      • At-Home Workouts
      • Chest & Back Workouts
      • Full-Body Workout
      • HIIT Workouts
      • Bodybuilding Workouts
      • Farmer’s Carry Workouts
    • Programs
      • 5×5 Program
      • Bodybuilding Programs
      • Push-Up Program
      • Pull-Up Program
      • 5/3/1 Program
      • Powerbuilding Program
      • German Volume Training
      • Build Your Own Program
  • Calculators
    • Protein Intake Calculator
    • Macros Calculator
    • BMR Calculator
    • Squat Calculator
    • Calorie Calculator
  • Community Forum
Home » Exercise Guides » 7 Steps for Nailing the Perfect Squat (Feat 2-Time IPF World Champion Taylor Atwood)

7 Steps for Nailing the Perfect Squat (Feat 2-Time IPF World Champion Taylor Atwood)

Creating strings of squat cues will lead to success and consistency under the bar.

Written by Jake Boly, CSCS
Last updated on April 24th, 2024

There’s a lot that goes into a great squat. The un-rack, walkout, descent, and ascent all need to be perfectly aligned to move efficiently under a loaded bar. 

An important lesson to learn under the barbell is that no two squats will ever look exactly the same, however, there are squat principles that should be carried out across every athlete’s form. An incredibly useful training tool for doing this and being consistent under the bar is building a string of squat cues and steps to follow every workout to increase proficiency.

In this article and video, we had two-time IPF World Champion Taylor Atwood take us through his favorite steps for executing great squats. Did we mention that on top of his two World Championships, Atwood also owns the IPF Open squat world record with a massive 283kg lift? We think it’s safe to say that Atwood knows a thing or two about squatting big weight. 

https://youtu.be/3tn-xqyUUkQ

7-Steps to the Perfect Squat

1. Hand Placement and Lats

Atwood’s first step for nailing the squat has to do with hand placement and packing the lats.

He recommends finding a hand width that allows you to maintain a packed lat position and stay consistent throughout every rep. For Atwood, he uses the rings to assess his hand width and points out that doing so is a great tool for staying consistent across multiple training days. 

2. Bar Placement

Bar placement will vary for different athletes based on the squat style chosen to perform.

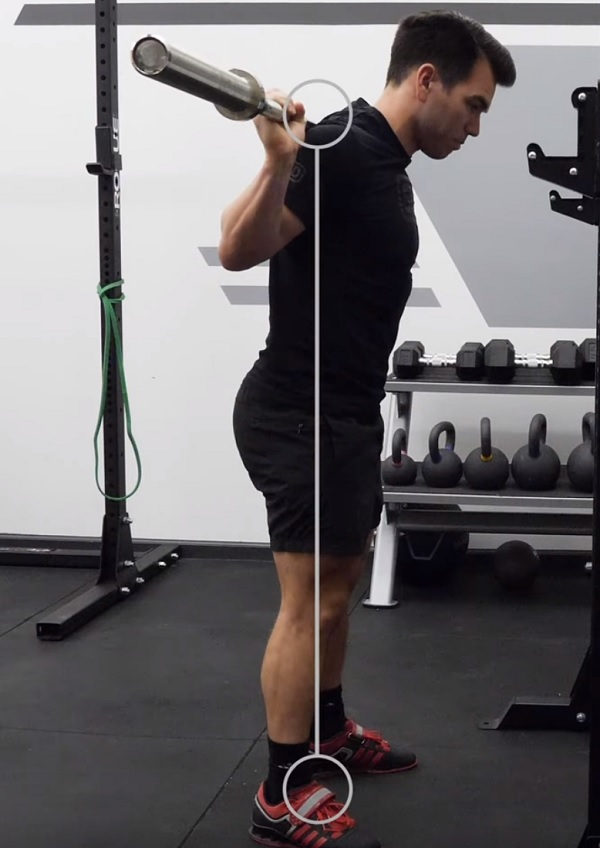
In the high-bar squat, the bar will lay across the traps, while in the low-bar, the bar lies across the posterior deltoids. For this step, Atwood recommends consistently positioning the bar in the style in which you squat. Since Atwood is a powerlifter, he utilizes a low-bar position and then matches his bar placement with his grip width and packed lats to get the bar sitting over the mid-foot. 

Basically, he positions the bar on his back so it’s over the mid-foot when standing up with weight. His grip width, bar placement, and lats are all manipulated to create this positioning. 

Taylor Atwood Squats

3. Walkout 

Once you’ve positioned the bar on your back and have a packed posture, it’s time to walkout the squat. 

Atwood likes and recommends using the 3-step walkout. This walkout is generally easy to accomplish and it helps limit energy dissipation due to taking too many steps. A walkout will be highly individual, and your 3-step walkout might look slightly different than what’s displayed in this video due to differences in squat styles, racks, and gym setup.

Once you’ve gotten your position and your hips and mid-foot are under the bar, it’s time to walk out the weight. 

  • Step One: Take a small step back with the first foot. You can use whichever foot you prefer and it’s important to go with what’s most comfortable and natural for you. 
  • Step Two: Take a second, slightly longer step with the opposing foot. 
  • Step Three: Take a small step with the first foot to align your stance and to nail an even position with the feet. 

If you’re brand new to the 3-step walkout, then work this process with lighter weight to acclimate yourself to a new walkout style. 

Squat Walkout
Squat Walkout

4. Breath

Breath is hugely important for the squat. 

Atwood’s fourth step is once you’ve unracked the bar, walked the weight, and taken your position, is to take a deep belly breath to increase your intra-abdominal pressure. He points out that your breath should fill the belly and obliques, and to avoid only breathing into the chest, as this can then move the barbell. 

5. Brace 

To be efficient under the barbell, you have to brace properly. 

For the squat, Atwood stresses that bracing is one of, if not the most important cues for success. A strong brace is much more than simply creating intra-abdominal pressure and it’s actually a sequence of multiple body parts and cues stacking on top of one another to create full body tension. 

Squat Bracing

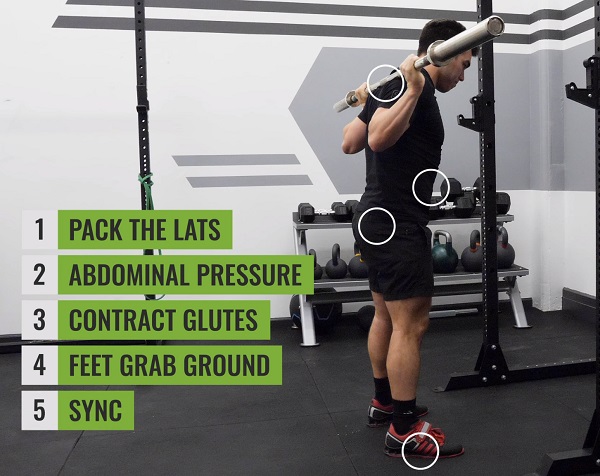
Five keys for nailing full body tension include packing the lats, creating intra-abdominal pressure, contracting the glutes, gripping the floor with the feet, and syncing all of these together. 

6. Descent 

Once you’ve braced, Atwood states that you’re going to actively think about maintaining that full body tension while controlling the descent. Avoid dive bombing the movement and load the body evenly throughout the full eccentric. 

7. Ascent 

After you’ve descended and you’re in the hole of the squat, it’s time to shift into the ascent, or the concentric phase of the movement. For the ascent, Atwood likes to keep three things in mind. 

  1. Be explosive. Once depth is achieved, Atwood likes to think about being as powerful and explosive out of the hole as possible. 
  2. Maintain tension. Explosive doesn’t mean loose, so once he’s shifting into an explosive thought process, he still attempts to maintain tension and postures throughout the full eccentric-to-concentric shift. This means maintaining intra-abdominal pressure until successfully executing the concentric movement pattern.
  3. Drive through the mid-Foot. Now that you’re thinking about being explosive and you’ve maintained tension, Atwood recommends putting it all together by driving through the mid-foot. This assists with the maintenance of lifting postures, along with power production.

Building a Perfect Squat

A perfect squat is the culmination of multiple factors stacking up and aligning to produce one successful movement. 

When it comes to building your squat, it’s useful to incorporate multiple steps to create consistency across the board. Typically, no two days feel exactly the same in the gym, so having a string of cues to follow every squat session is useful for creating consistent movement patterns and mindsets for both good and bad squat sessions! 

About Jake Boly, CSCS

Jake holds a Master's in Sports Science and a Bachelor's in Exercise Science. Jake formerly served as BarBend's Fitness and Training Editor.

View All Articles

Primary Sidebar

Latest Reviews

Featured image for the Ironmaster Super Bench Pro V2 Review

Ironmaster Super Bench Pro V2 Review (2025): Our Expert’s New Favorite FID Bench

Titan T3 Power Rack Review

Titan T3 Power Rack Review (2025): An Expert-Approved Rig Beckoning to Budget-Minded Athletes

Our tester works out at the beach in preparation for the Rogue Resistance Bands Review

Rogue Resistance Bands Review (2025): Tested by a Certified Personal Trainer

Barbend tester Jake Herod works out on a Force USA Trainer

Force USA G3 Review (2025): Our Experts Tested This Compact All-In-One Rack for Small Home Gyms

BarBend

BarBend is an independent website. The views expressed on this site may come from individual contributors and do not necessarily reflect the view of BarBend or any other organization. BarBend is the Official Media Partner of USA Weightlifting.

  • About Us
  • Advertise With Us
  • Contact Us
  • Facebook
  • Instagram
  • Twitter
  • YouTube
  • Pinterest

Sections

  • CrossFit
  • Strongman
  • Bodybuilding
  • Powerlifting
  • Weightlifting
  • Reviews
  • Nutrition
  • Training

More

  • BarBend Newsletter
  • BarBend Podcast
  • The Ripped Report
  • 1RM Calculator
  • BMR Calculator
  • Macros Calculator
  • Protein Calculator
  • Squat Calculator

Policies

  • Accessibility
  • Advice Disclaimer
  • Cookies Policy
  • Disclaimers
  • Disclosures
  • Editorial Policy
  • Privacy Policy
  • Terms of Use

Copyright © 2025 · BarBend Inc · Sitemap