If you’re in the market for bigger and stronger shoulders, you’ve got to do more than pressing. Building your rear delts — aka your posterior deltoids — gives your shoulders a well-rounded, 360-degree pop, helps you lift heavier in compound pulling movements like pull-ups and rows, and promotes healthier shoulder musculature. And if you spend a lot of time hunched over your computer or phone, well-developed rear delts can work wonders for your posture.
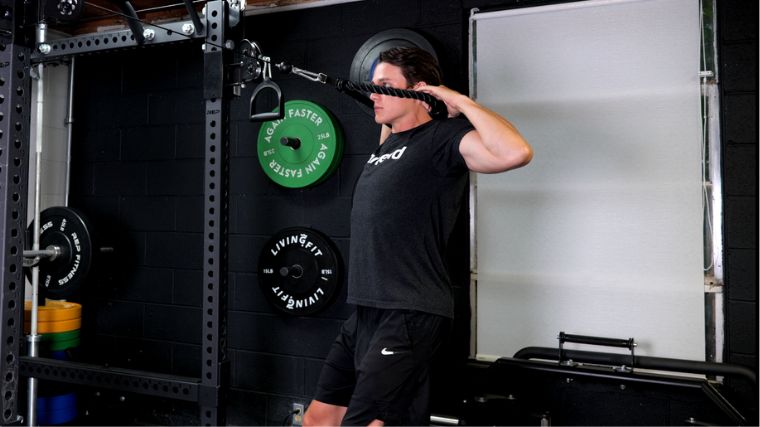
The best rear delt exercises target the backs of your shoulders in isolation. You’ll continue rounding them out in conjunction with other muscles in compound exercises. From bodyweight movements to cables, dumbbells, and barbells — choose your fighter, and start pulling.
Best Rear Delt Exercises
- Band Pull-Apart
- Standing Cable Face Pull
- Dumbbell Reverse Flye
- Inverted Row
- Wide-Grip Pull-Up
- Wide-Grip Lat Pulldown
- Single-Arm Dumbbell Row
- Bent-Over Barbell Row
- Assisted Pull-Up
Editor’s Note: The content on BarBend is meant to be informative in nature, but it should not be taken as medical advice. When starting a new training regimen and/or diet, it is always a good idea to consult a trusted medical professional. We are not a medical resource. The opinions and articles on this site are not intended for use as diagnosis, prevention, and/or treatment of health problems. They are not substitutes for consulting a qualified medical professional.
1. Band Pull-Apart
[Read More: 4 Challenging Band Pull-Apart Variations For A Stronger Upper Back]
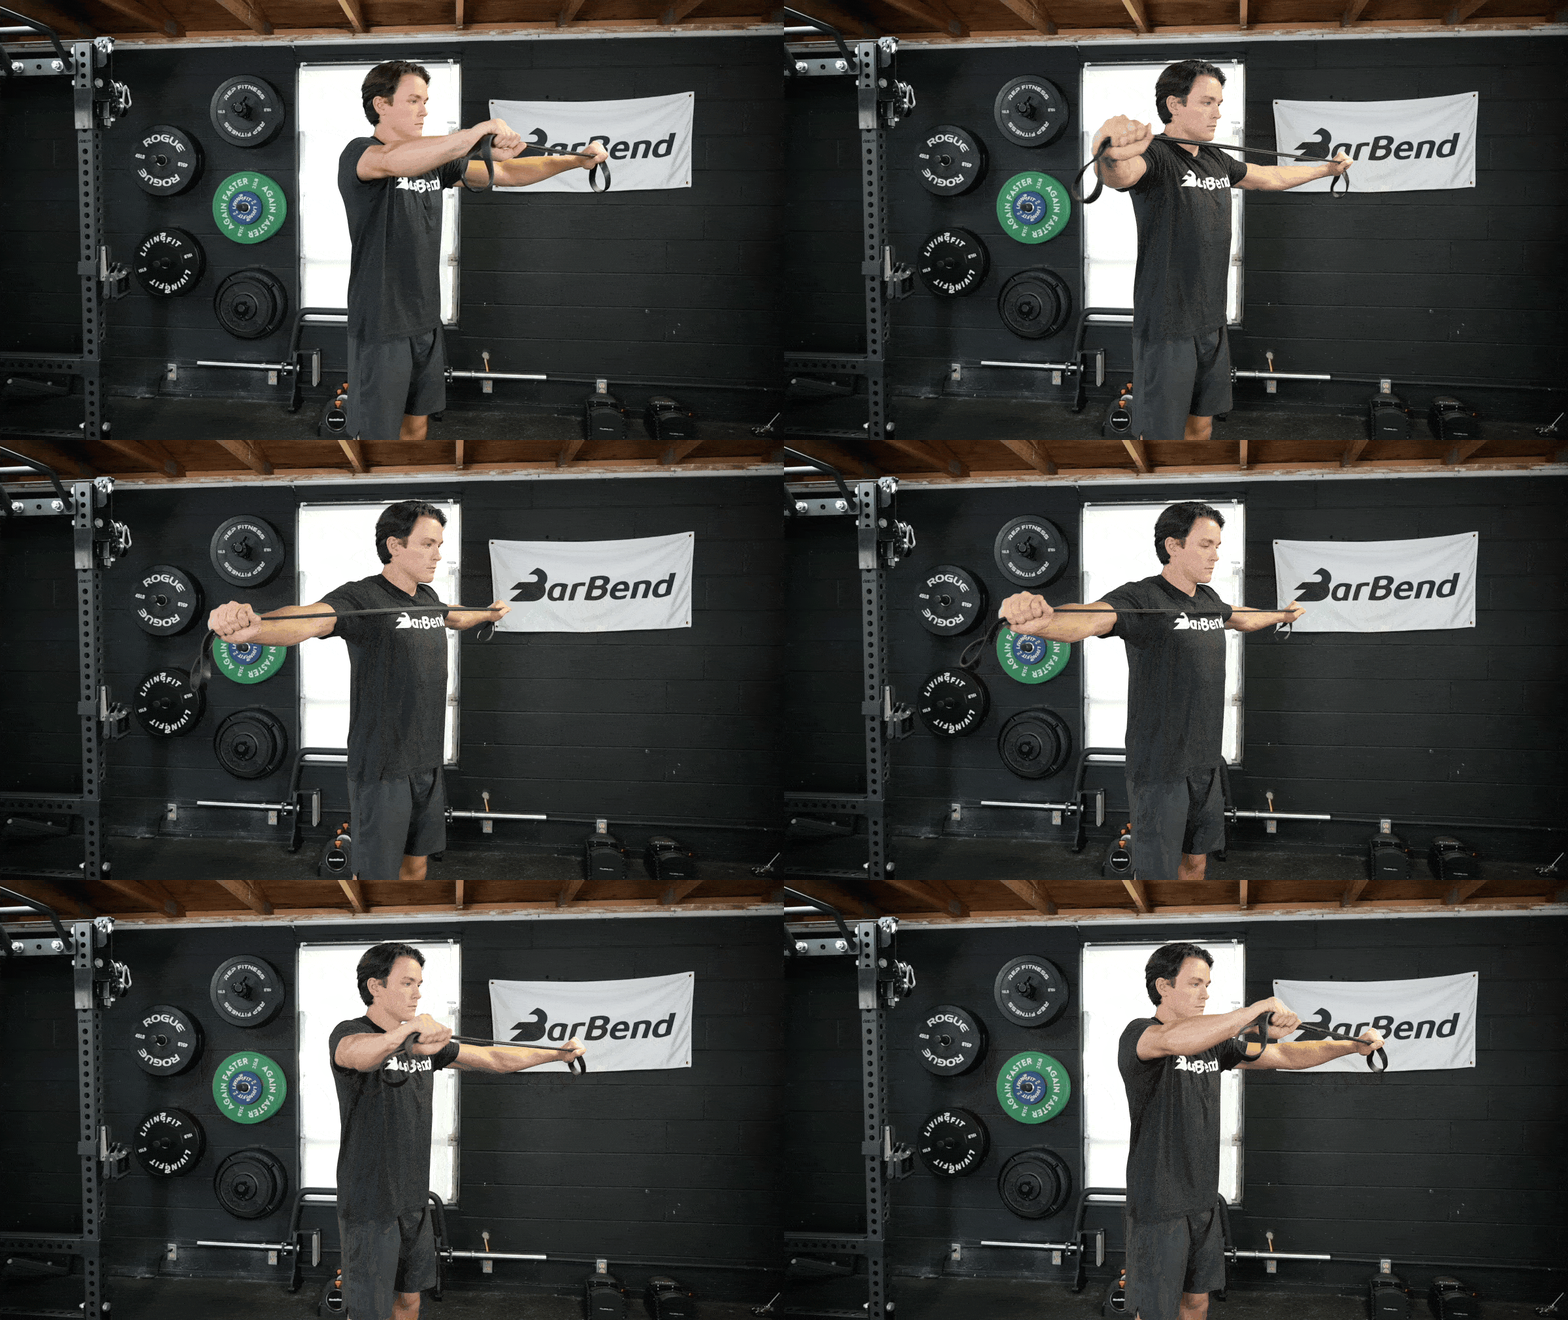
Why Do It: If you’re unsure what working your rear delts should feel like, the band pull-apart is a must. Although other muscles are involved, the pull-apart specifically works your rear delts so you can build a mind-muscle connection. The band pull-apart works horizontal abduction or moving your arms away from your body in a straight line — one of your rear delts’ important functions.
Equipment Needed: Use a resistance band for this one.
How to Do It
- Stand tall with your feet shoulder-width apart, holding a long resistance band in front of you with your palms face down. Hold your hands at shoulder height and at shoulder width-distance apart.
- Push your feet into the ground with your knees slightly bent, hips tucked, and glutes squeezed. Engage your core, depress your shoulders, and retract your head. Maintain this tension.
- Inhale and then exhale as you pull your band apart, keeping your arms straight or with a very soft elbow bend. Pull until you can feel your rear delts engage when shoulder blades squeeze together. Hold for a second to feel the contraction on the backs of your shoulders.
- Inhale and slowly return your hands to starting position with control while fighting the resistance of the band. Exhale to pull again and repeat. Continue for your desired number of reps.
Coach’s Tip: Move slowly with control instead of momentum and keep the rest of your body engaged.
Sets and Reps: Perform two to three sets of 15 to 20 reps as a warm-up. To increase difficulty and build strength, try a band with a heavier resistance and perform three to four sets of eight to 10 reps.
Make it Easier: Keep your hands close to the ends of the band to decrease the level of tension. As you gain more strength, bring your hands gradually closer together.
Make it Tougher: Perform your pull-aparts from a hinge position, which will require you to pay extra attention to core stability and hamstring flexibility.
2. Standing Cable Face Pull
[Read More: Banded Face Pull Alternatives]
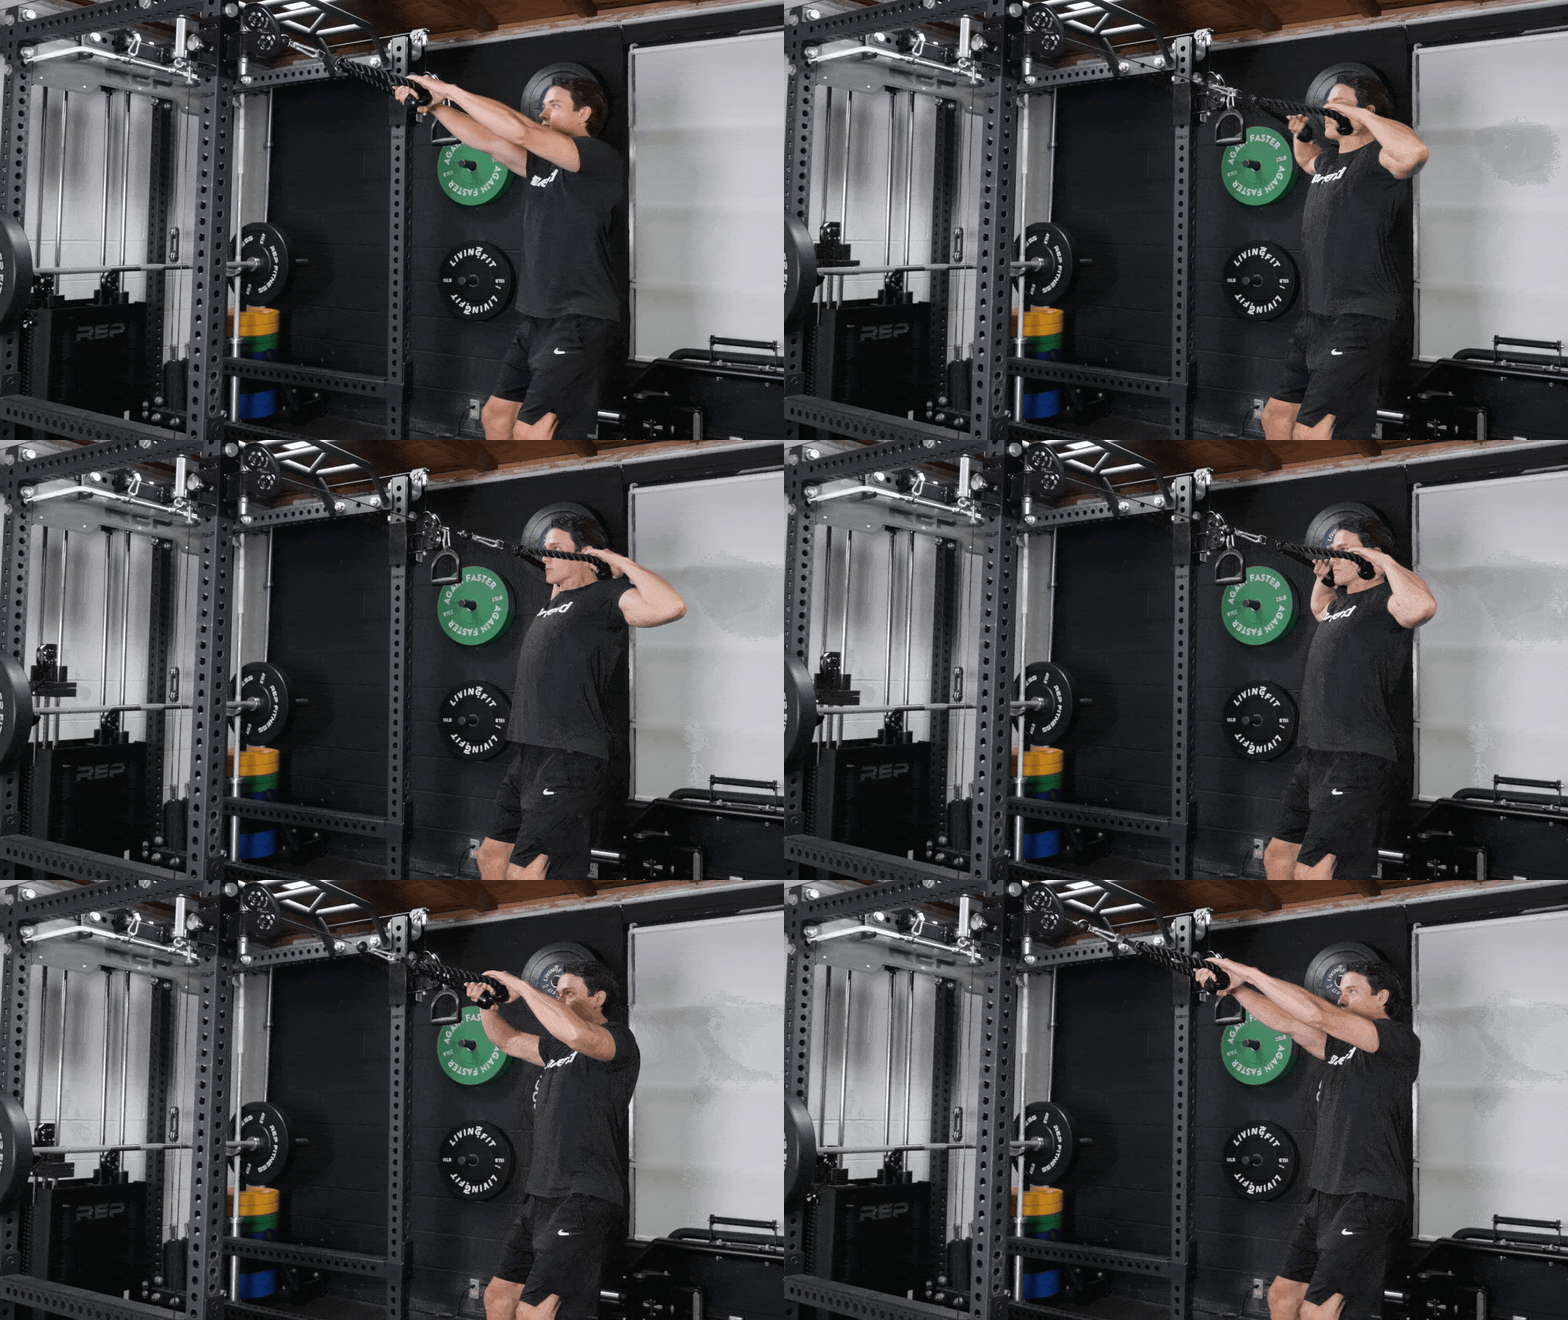
Why Do It: The face pull has you working at an angle to uniquely feel your rear delts engage to help your shoulder blades retract. You’ll also be working your upper back and rotator cuffs. Instead of simply stretching, you’re adding resistance to help you build muscle and strength in a little-targeted region.
Equipment Needed: Perform this with a cable machine and triceps rope attachment. Alternatively, you can loop a resistance band around a stable anchor (like a squat rack) at eye level and use that.
How to Do It
- Secure the rope attachment to a cable machine at eye level. Grab the ends with an overhand grip and your palms facing each other.
- Step backward while facing the cable machine until you feel enough tension and resistance while keeping your arms straight. Keep your feet shoulder-width apart. Bend your knees slightly and keep your hips tucked while squeezing your glutes.
- Inhale then exhale as you pull the rope towards your face. Bend your elbows and pull until the ends of the rope are on either side of your face. You’ll feel your rear delts as you squeeze your shoulder blades together. Keep your elbows up and pause here.
- Slowly return your arms to starting position while resisting the tension provided by the cable. Repeat.
Coach’s Tip: Your shoulder blades should retract, but try to resist hyperextending your thoracic spine. Keep your chest up and ribs down as you engage your core to protect your spine.
Sets and Reps: Perform three sets of 10 to 15 reps for rear delt muscle hypertrophy. Be sure you can maintain your standing position.
Make it Easier: Stand a little closer to the anchor point to decrease the resistance while you get a feel for this move.
Make it Tougher: Take long pauses in the fully-flexed position, emphasizing driving your shoulder blades down and away from your ears.
3. Dumbbell Reverse Flye
[Read More: The 9 Best Reverse Flye Variations to Boost Your Back Training]
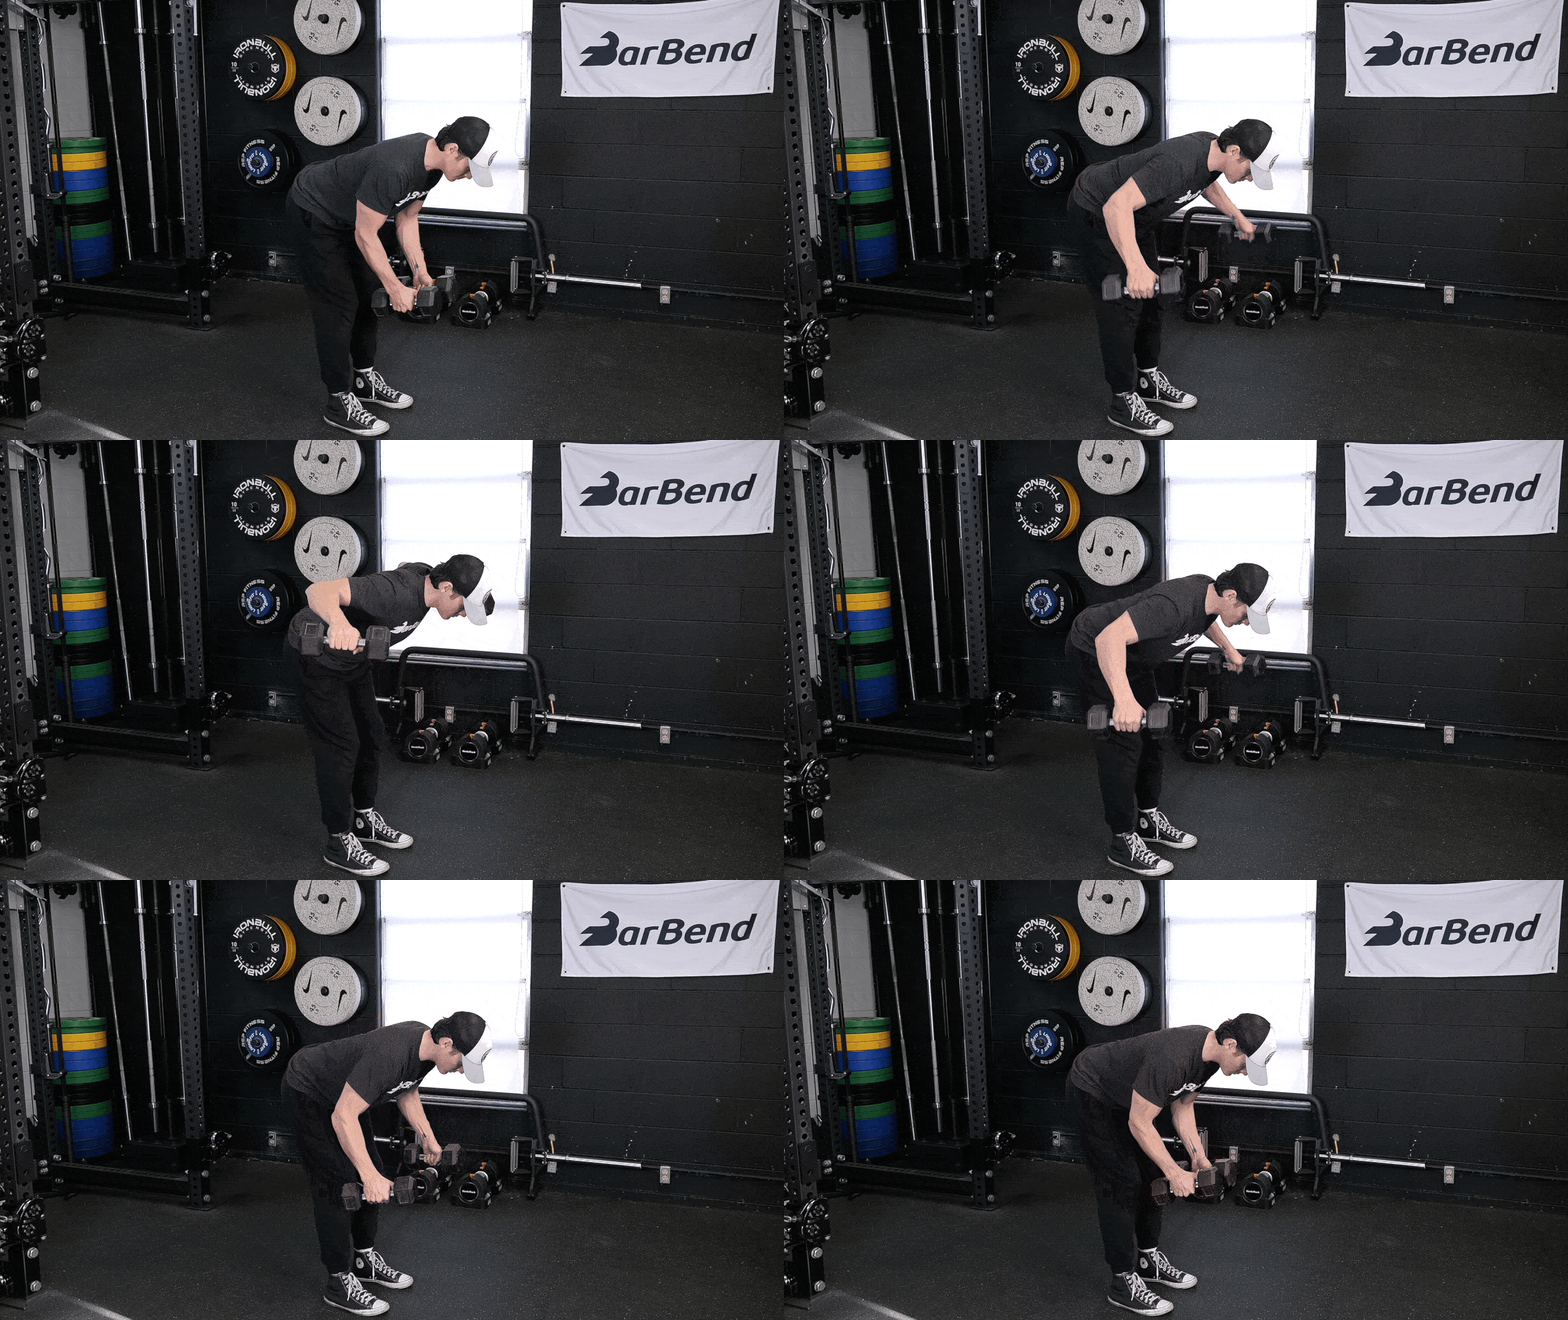
Why Do It: The dumbbell reverse flye targets your rear delts while also working your upper back muscles. You can do this move standing for an added core and lower body challenge or seated for more support. More than likely, you’ll need to start with a lighter weight than you expect.
Equipment Needed: You’ll just need two dumbbells for this — light ones will do the trick.
How to Do It
- Grab your dumbbells and stand with your feet shoulder-width apart and knees slightly bent.
- Hinge your hips back until your upper body gets more parallel to the floor. Let your arms come slightly forward with your elbows softly bent and palms facing each other. Tuck your chin, engage your abs, and squeeze your glutes to keep your spine neutral and protect your back.
- Inhale then exhale to raise your arms until they are parallel to the floor. Think of lifting from your elbows. Keep your wrists and arms straight. Squeeze your shoulder blades together at the top without overly arching your spine. Feel your rear delts engage isometrically.
- Slowly lower your arms back to starting position as you inhale. Exhale and repeat.
Coach’s Tip: This can be a difficult exercise for your spine — be sure to keep your core engaged and move with control to resist excessive spinal movement under load.
Sets and Reps: Try three sets of 12 to 15 reps with a light weight to start. For building muscle, aim for four sets of eight to 10.
Make it Easier: Bend your elbows to make the weight a bit easier to manage.
Make it Tougher: At the end of your range of motion, rotate your hands so that your pinkies are facing toward each other behind your back. Squeeze tightly before lowering.
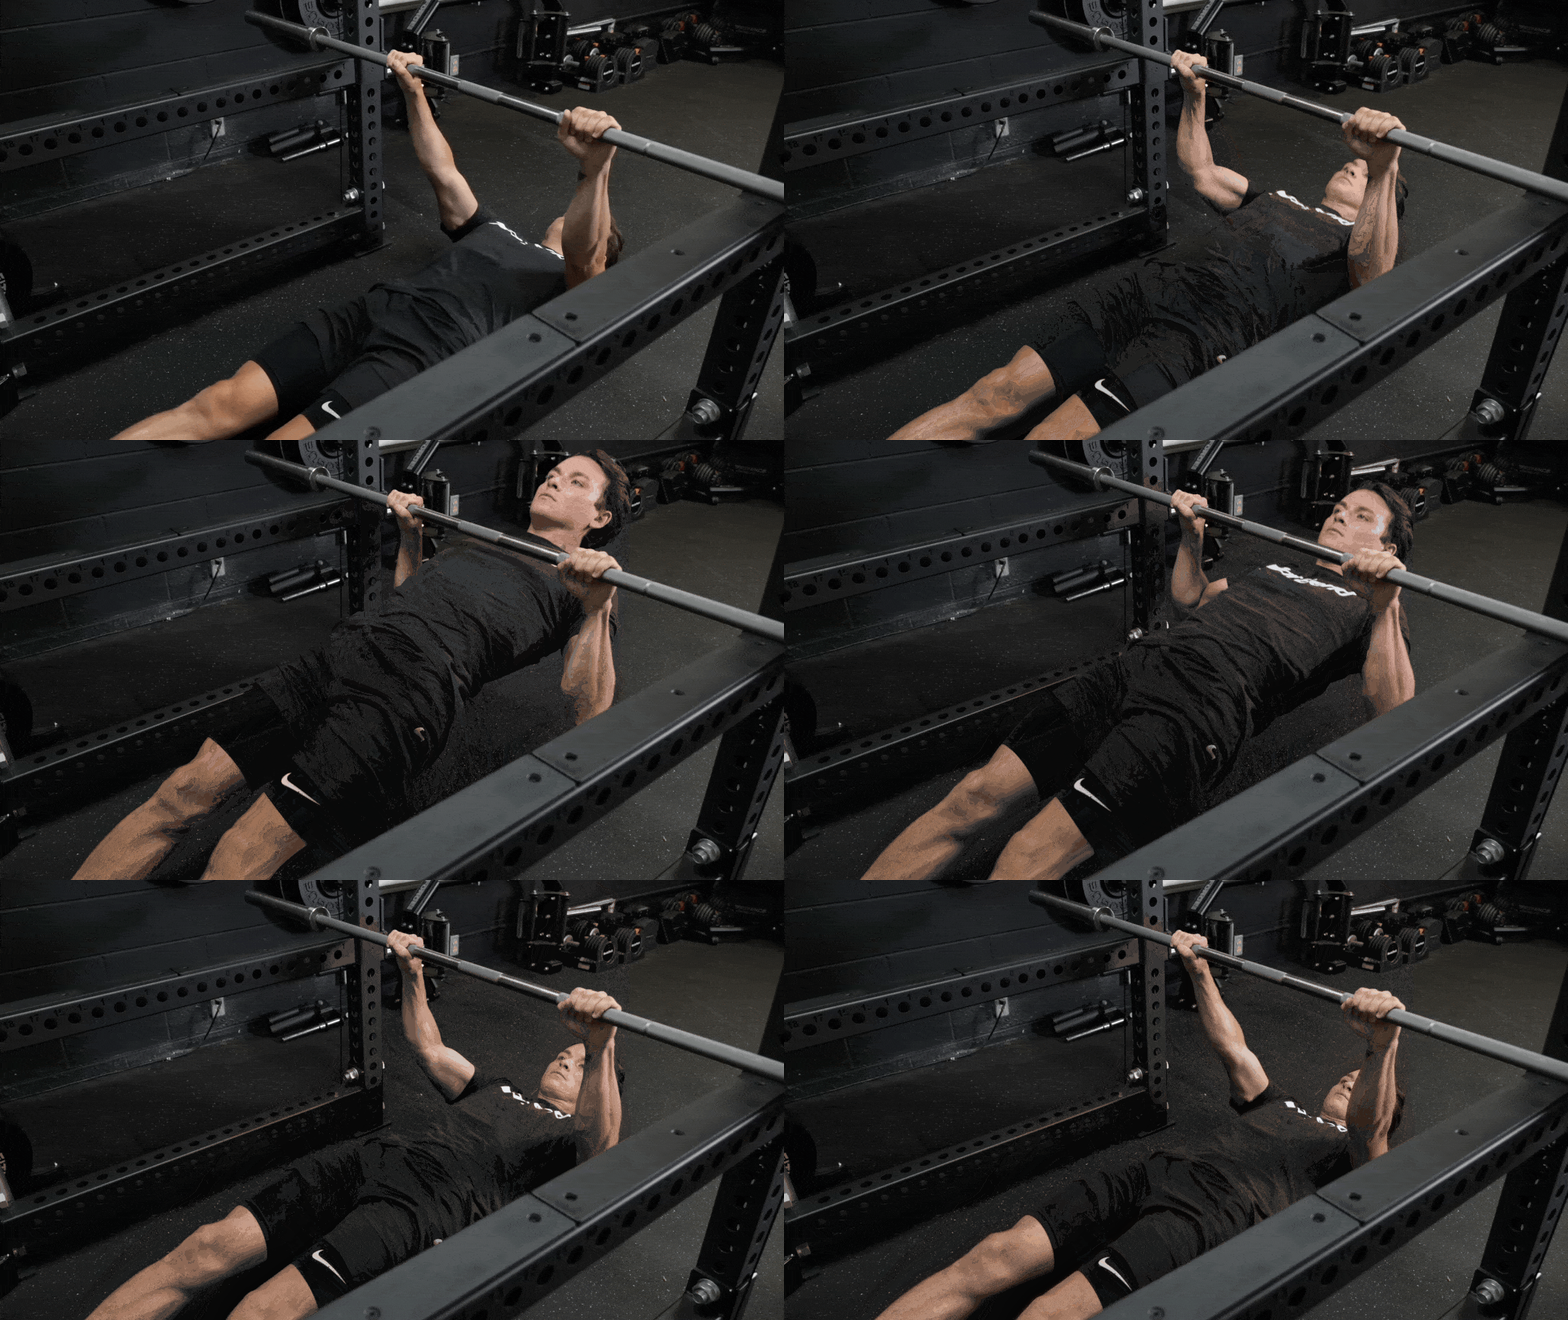
4. Inverted Row
[Read More: Six Benefits of Inverted Rows That’ll Turn Your Workout Upside Down]
Why Do It: The inverted row trains the horizontal pulling movement pattern. It doesn’t isolate your rear delts — it mainly works your back and lats — but your rear delts assist in stabilizing your scapula as it retracts. Your rear delts get a moment to shine by assisting in this larger movement.
Equipment Needed: You can do these with a barbell anchored securely in a squat rack or the bar of a Smith machine. Alternatively, use a TRX suspension strap.
How to Do It
- Set your bar or TRX handles at waist height (or higher if you need more support). Lie underneath with your heels digging into the floor, toes up, and your entire body straight as you hold on with an overhand grip. Keep your hands slightly wider than shoulder-width apart.
- Retract your head, depress your shoulders, engage your abs, tuck your hips, and squeeze your glutes. Think of your body as a stiff plank with your shoulders, hips, and feet in a straight line. Hold this position with tension at the bottom.
- Inhale then exhale as you pull yourself up until your chest touches the bar or your hands reach your chest level. Squeeze your shoulder blades together at the top but keep your ribs down.
- Lower down slowly as you inhale and exhale to repeat. Keep your body in a straight line throughout the movement. Continue for your desired number of reps.
Coach’s Tip: Try not to let your hips sag behind you. Engage your abs and squeeze your glutes to keep your lower back neutral and in line with your shoulders.
Sets and Reps: To get accustomed to the movement, try three to four sets of 10 to 12 reps. To build both muscle and strength, perform three to four sets to failure.
Make it Easier: The farther your feet are from the anchor point, the less of your body weight you’ll be pulling. Stay more upright to make this move more accessible.
Make it Tougher: To increase difficulty, you can change the angle by bringing your body more parallel to the floor (i.e., make yourself more horizontal by bringing your feet closer to the anchor point).
5. Wide-Grip Pull-Up
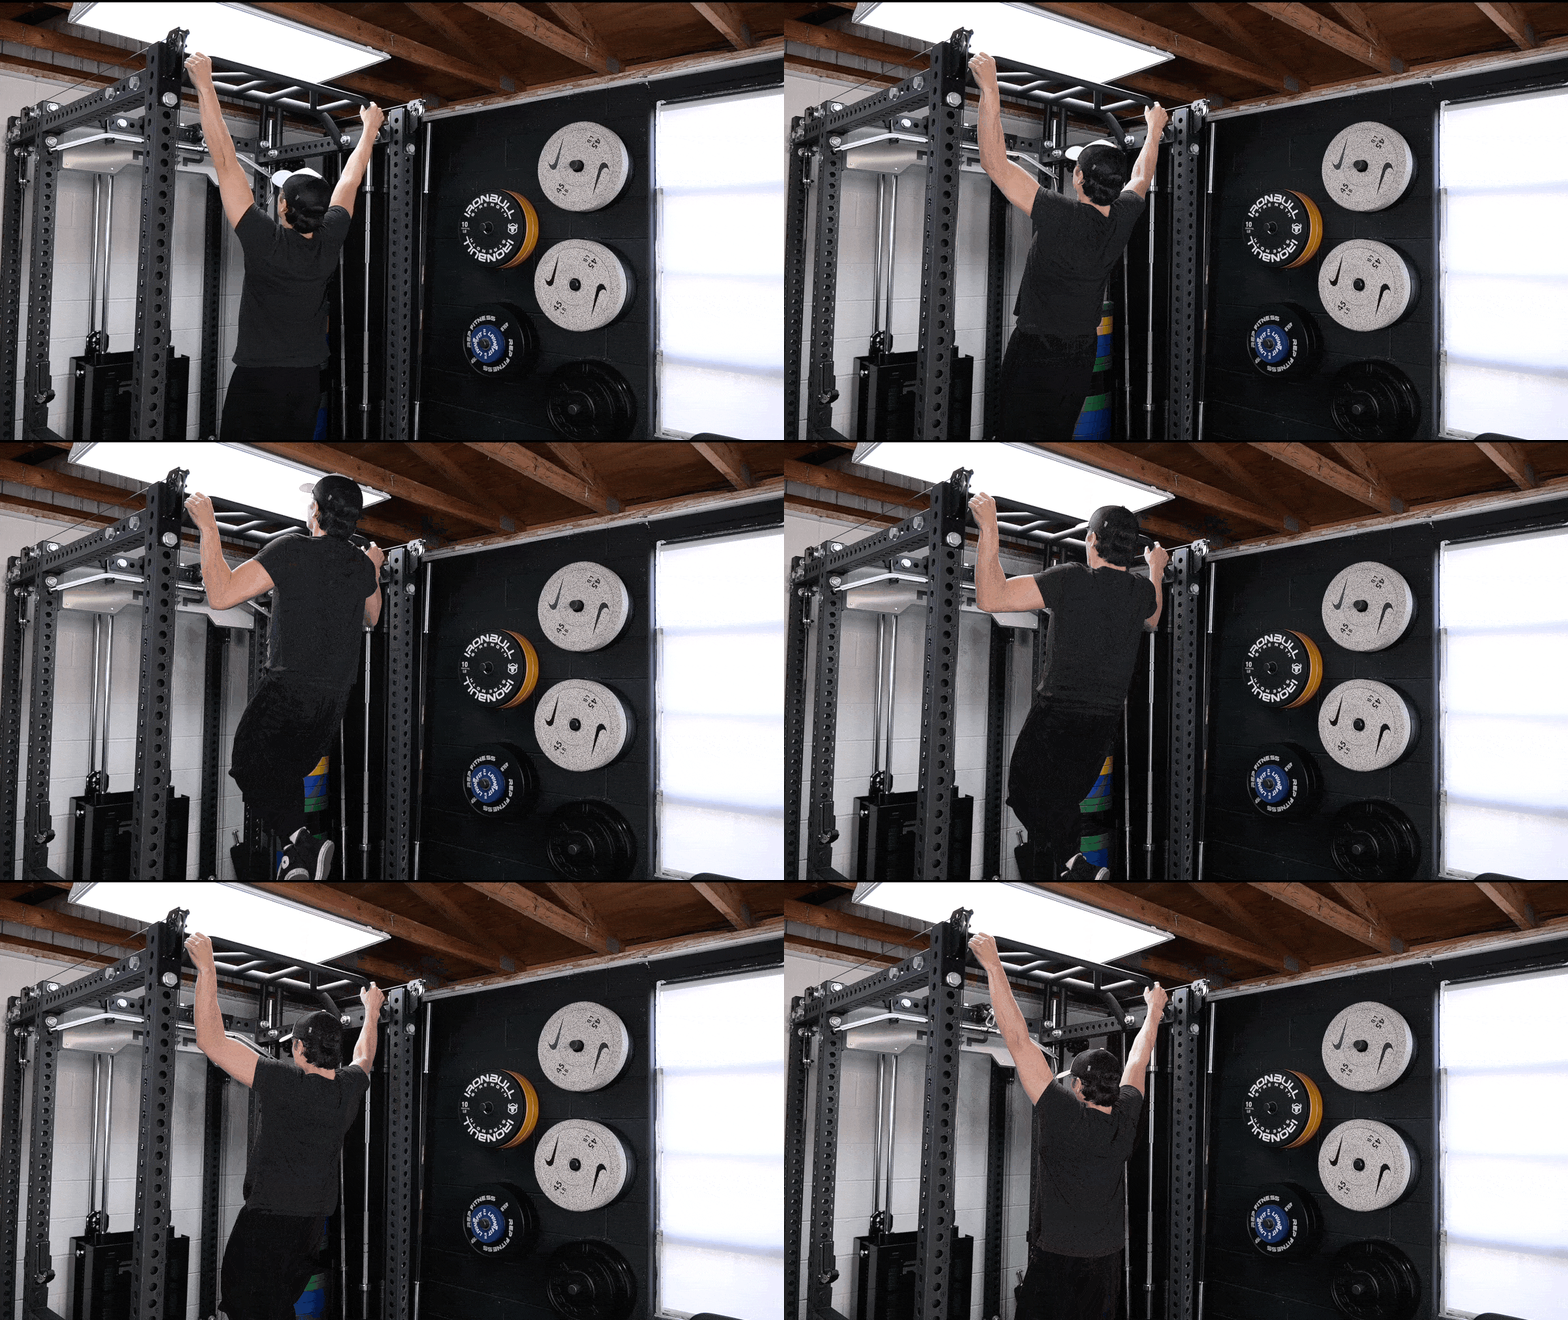
Why Do It: The goal of many a strength athlete, the pull-up is a classic exercise that will work your vertical pulling movement pattern. Your rear delts assist in stabilizing your shoulders and keeping them externally rotated while you use your lats, back, and upper-body strength to pull yourself up. Pull-ups don’t isolate your rear delts, but wide-grip pull-ups may tax them more than a narrower grip since they emphasize your shoulders.
Equipment Needed: All you’ll need is a pull-up bar here (along with a pull-up assist band if necessary).
How to Do It
- Grab your bar with an overhand grip and your hands wider than your shoulders. Get your feet off the ground.
- Depress your shoulders to engage your lats and back. Feel your rear delts assist in externally rotating your shoulders. Pull your head back and engage your core and glutes. Hang here to feel the tension.
- Inhale then exhale to pull yourself up. Pull your chest up to the bar and think of driving your elbows down toward the floor and slightly behind you. Get your chin above the bar. Squeeze your shoulder blades down and together at the top.
- Lower down slowly maintaining full-body tension until your arms are fully straight and repeat.
Coach’s Tip: Build a mind-muscle connection with your rear delts as you pull yourself up. Think of them helping to keep your shoulders back, down, and away from your head. Try not to relax at the bottom of your rep to maintain your energy.
Sets and Reps: If you are new to pull-ups, try doing three sets of one to three reps. Give yourself time to rest and recover in between sets. For advanced athletes, try four sets to failure.
Make it Easier: New to pull-ups or can’t do one yet? No problem. You can start with learning wide-grip hangs. You can also try assisted wide-grip banded pull-ups or use a pull-up machine.
Make it Tougher: Perform tempo pull-ups — taking your time in the eccentric (lowering) portion of the lift — to spend more time under tension and increase your strength-building potential.
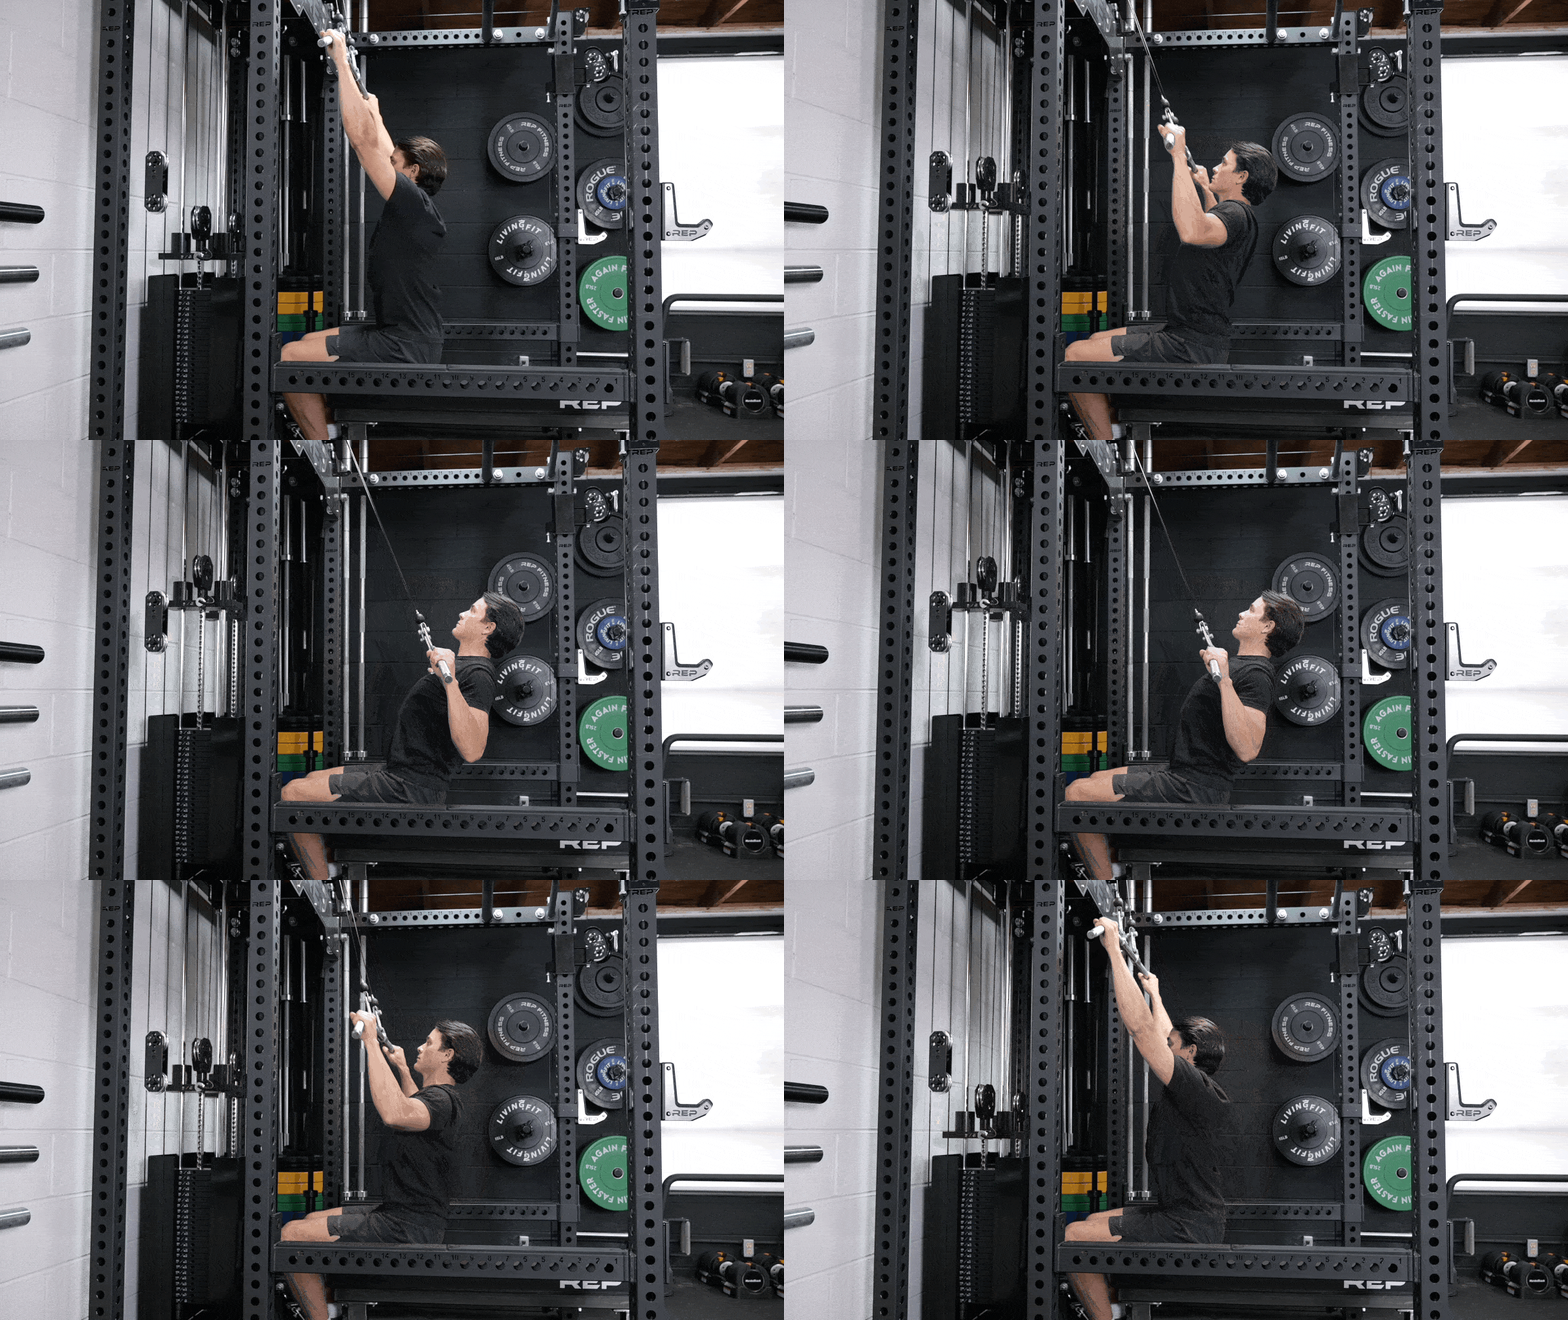
6. Wide-Grip Lat Pulldown
[Read More: Close-Grip vs. Wide-Grip in the Lat Pulldown — Differences, Similarities, and Does It Really Matter?]
Why Do It: If you’re not ready for wide-grip pull-ups, the wide-grip lat pulldown gives you similar benefits from a seated position. You’ll majorly strengthen your lats and back without needing to pull your entire body weight. Your rear delts can perform their function of assisting in scapular stability and external rotation as you use larger muscles to perform this vertical pulling exercise.
Equipment Needed: Do this with a specialized lat-pulldown station or a generalized cable machine.
How to Do It
- Attach a wide bar to a lat pulldown machine. Adjust your seat so you can sit tall with your feet flat on the ground and can comfortably reach your bar. Grab the bar with an overhand grip and your hands wider than your shoulders.
- Depress your shoulders, engage your abs, and pull your head back. Maintain this tension as you lean back slightly, keeping your spine in a straight line.
- Inhale then exhale as you pull your bar down to your chest. Think of pulling your elbows toward the floor. Keep your wrists straight. Squeeze your shoulder blades down and together at the bottom and try to feel your rear delts.
- Return your bar to the starting position and fight the resistance on the way back up. Repeat for your desired number of reps.
Coach’s Tip: If you feel more biceps than lats in this exercise, really think about initiating the movement by pulling your elbows toward the ground. You may also need to adjust your weight.
Sets and Reps: Try three sets of 15 to 20 for muscle building. For building strength, perform four to six sets of eight to 10 reps at a heavy weight where you can still maintain good form.
Make it Easier: Use a lighter weight and use a small amount of body English to help move the load if necessary.
Make it Tougher: Perform these in a kneeling position to force your core to keep you stable.
7. Single-Arm Dumbbell Row
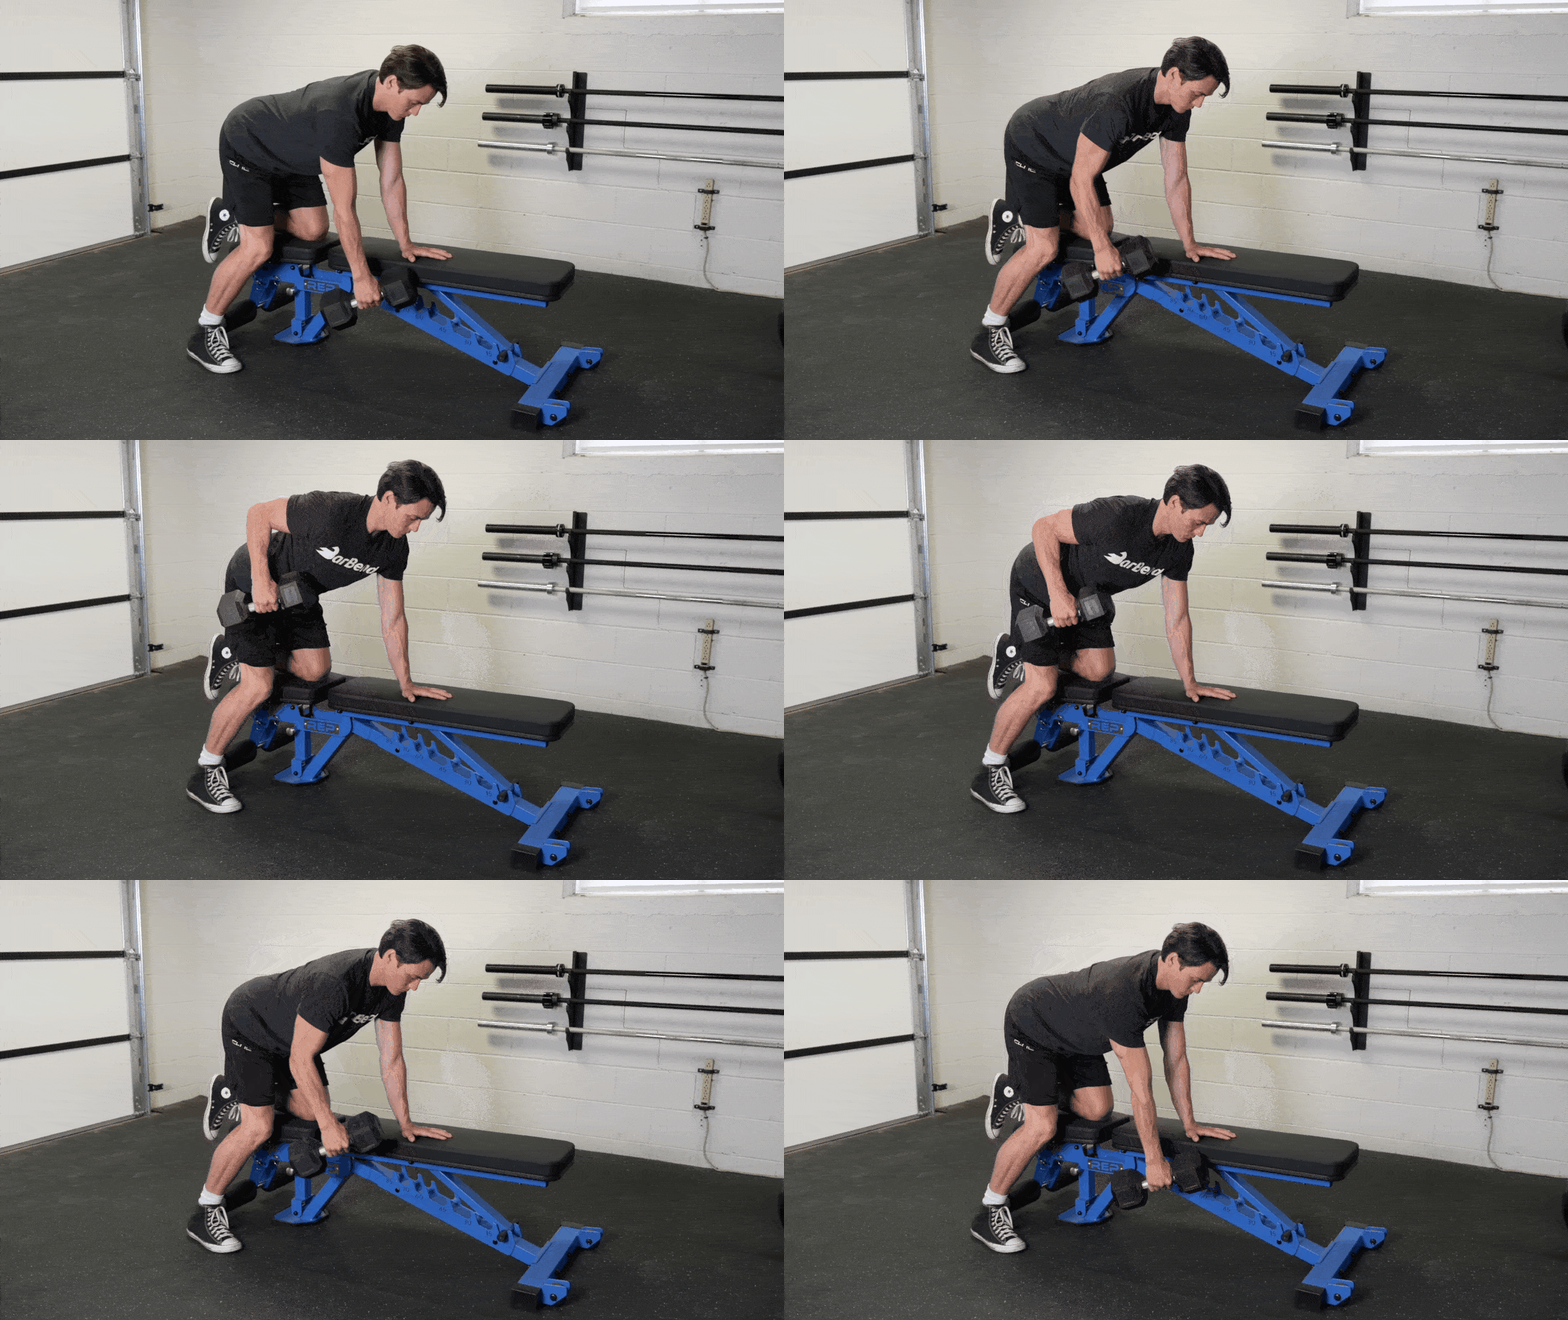
Why Do It: The single-arm dumbbell row is a unilateral compound horizontal pulling movement that will hit your rear delts and other upper back muscles. Unilateral exercises help to address strength, muscle, stability, and mobility imbalances. The single-arm row unilaterally engages your rear delts to stabilize your shoulder throughout the movement.
Equipment Needed: Use a dumbbell here, as well as a weight bench.
How to Do It
- Stand behind a bench and hold your dumbbell in one hand. Hinge your hips back until your torso comes parallel to the floor. Place your non-working hand on the bench in front of you.
- Engage your abs and squeeze your glutes to keep your spine neutral. Keep your knees slightly bent. Tuck your chin and gently retract your head. Depress both shoulders.
- Inhale then exhale to row your dumbbell. Think of lifting your elbow back and behind you while you keep it close to your body. Feel your shoulder blade fully retract and squeeze it at the top. Focus on engaging your rear delt throughout the movement.
- Inhale to slowly lower your weight back to the starting position. Engage your rear delt at the bottom to keep your shoulder externally rotated and depressed. Keep your abs engaged to keep your spine neutral throughout the exercise. Continue for your desired number of reps and then repeat on your other side.
Coach’s Tip: Try not to let your shoulder internally rotate and elevate — or round forward — at the bottom in between reps. Engage your rear delt and back of your shoulders to resist this.
Sets and Reps: Perform three sets of 12 to 15 on each side for muscle gain. Decrease your reps and increase your weight to progress. For strength gains, try four sets of six to eight on each side.
Make it Easier: If you need more support for your torso, perform an incline prone row instead.
Make it Harder: Use wrist wraps to help you hold onto the weight so that your grip doesn’t become the limiting factor of this lift.
8. Bent-Over Barbell Row
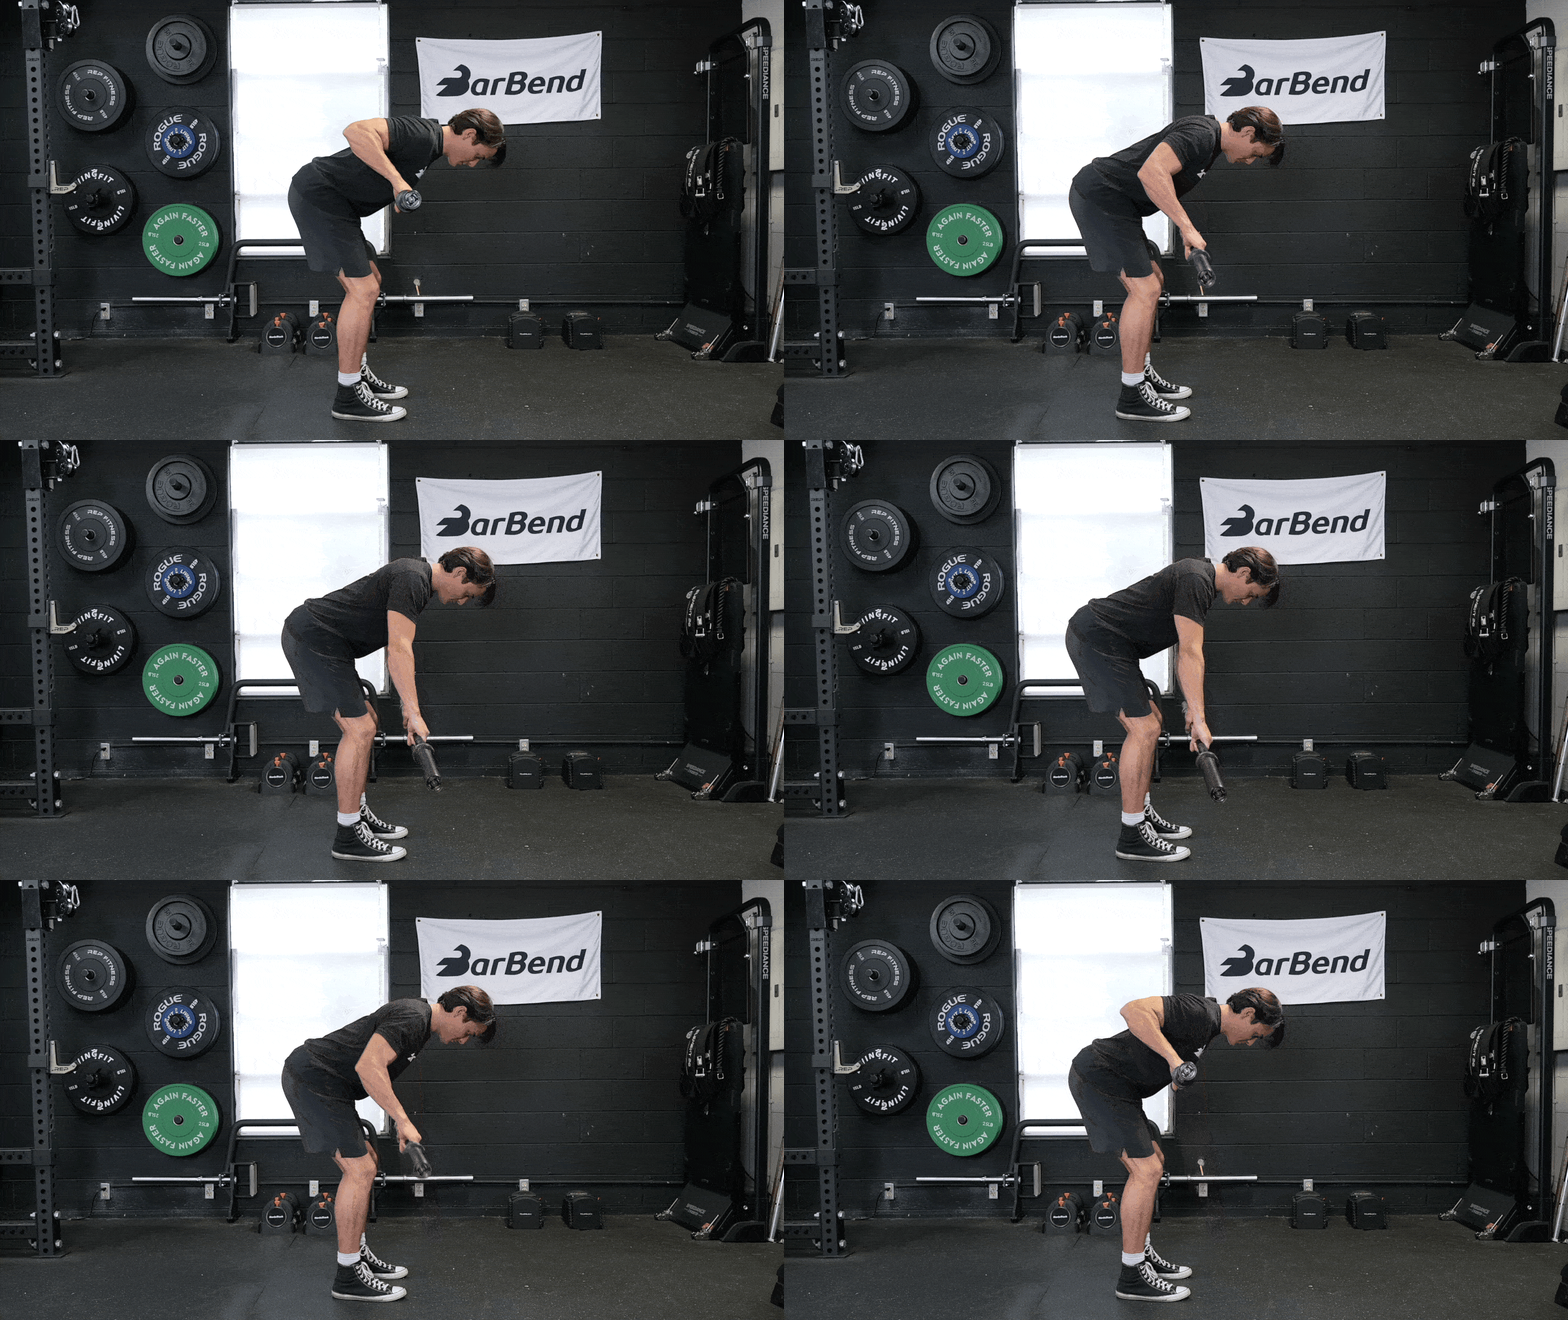
Why Do It: The bent-over barbell row targets your entire upper and mid-back while working your core and lower body to support yourself. With barbells, you have room to progress to heavier weights. Being mindful to engage your rear delts can help protect your shoulders and spine. Going for a slightly wider grip can hit your rear delts a little more than a traditionally narrower grip.
Equipment Needed: You’ll need a barbell, weight plates, and collars.
How to Do It
- Stand upright with your feet shoulder-width apart, knees slightly bent, hips tucked, and glutes gently squeezed. Hold your barbell with a prone grip and your hands slightly wider than your shoulders.
- Pull your navel toward your spine to engage your abs. Hinge your hips back so your torso gets lower to the floor. Let your barbell come forward with your arms straight but keep your shoulders depressed. Keep your spine neutral and avoid rounding your back. Feel your rear delts keeping your shoulders externally rotated.
- Inhale, then exhale to row. Draw your elbows towards the ceiling and pull your bar towards your lower chest. Squeeze your shoulder blades at the top.
- Inhale to slowly lower your arms back down until they are fully straight. Exhale to repeat. Continue for your desired reps and sets.
Coach’s Tip: It’s crucial to keep your abs and lower body engaged. Avoid rounding your back and resist any spinal movement under load. If you are using momentum to complete your reps, lower your weight until you can row while keeping the rest of your body still.
Sets and Reps: Perform four sets of 10 for hypertrophy. For strength gains, try five sets of five heavy reps.
Make it Easier: Do the dumbbell variation of the bent-over row for a lighter, generally more accessible version.
Make it Harder: Perform a Pendlay row — returning the bar to a stop on the ground between each rep — instead of a regular barbell row.
9. Assisted Pull-Up
[Read More: The Best Pull-Up Variations for All Experience Levels]
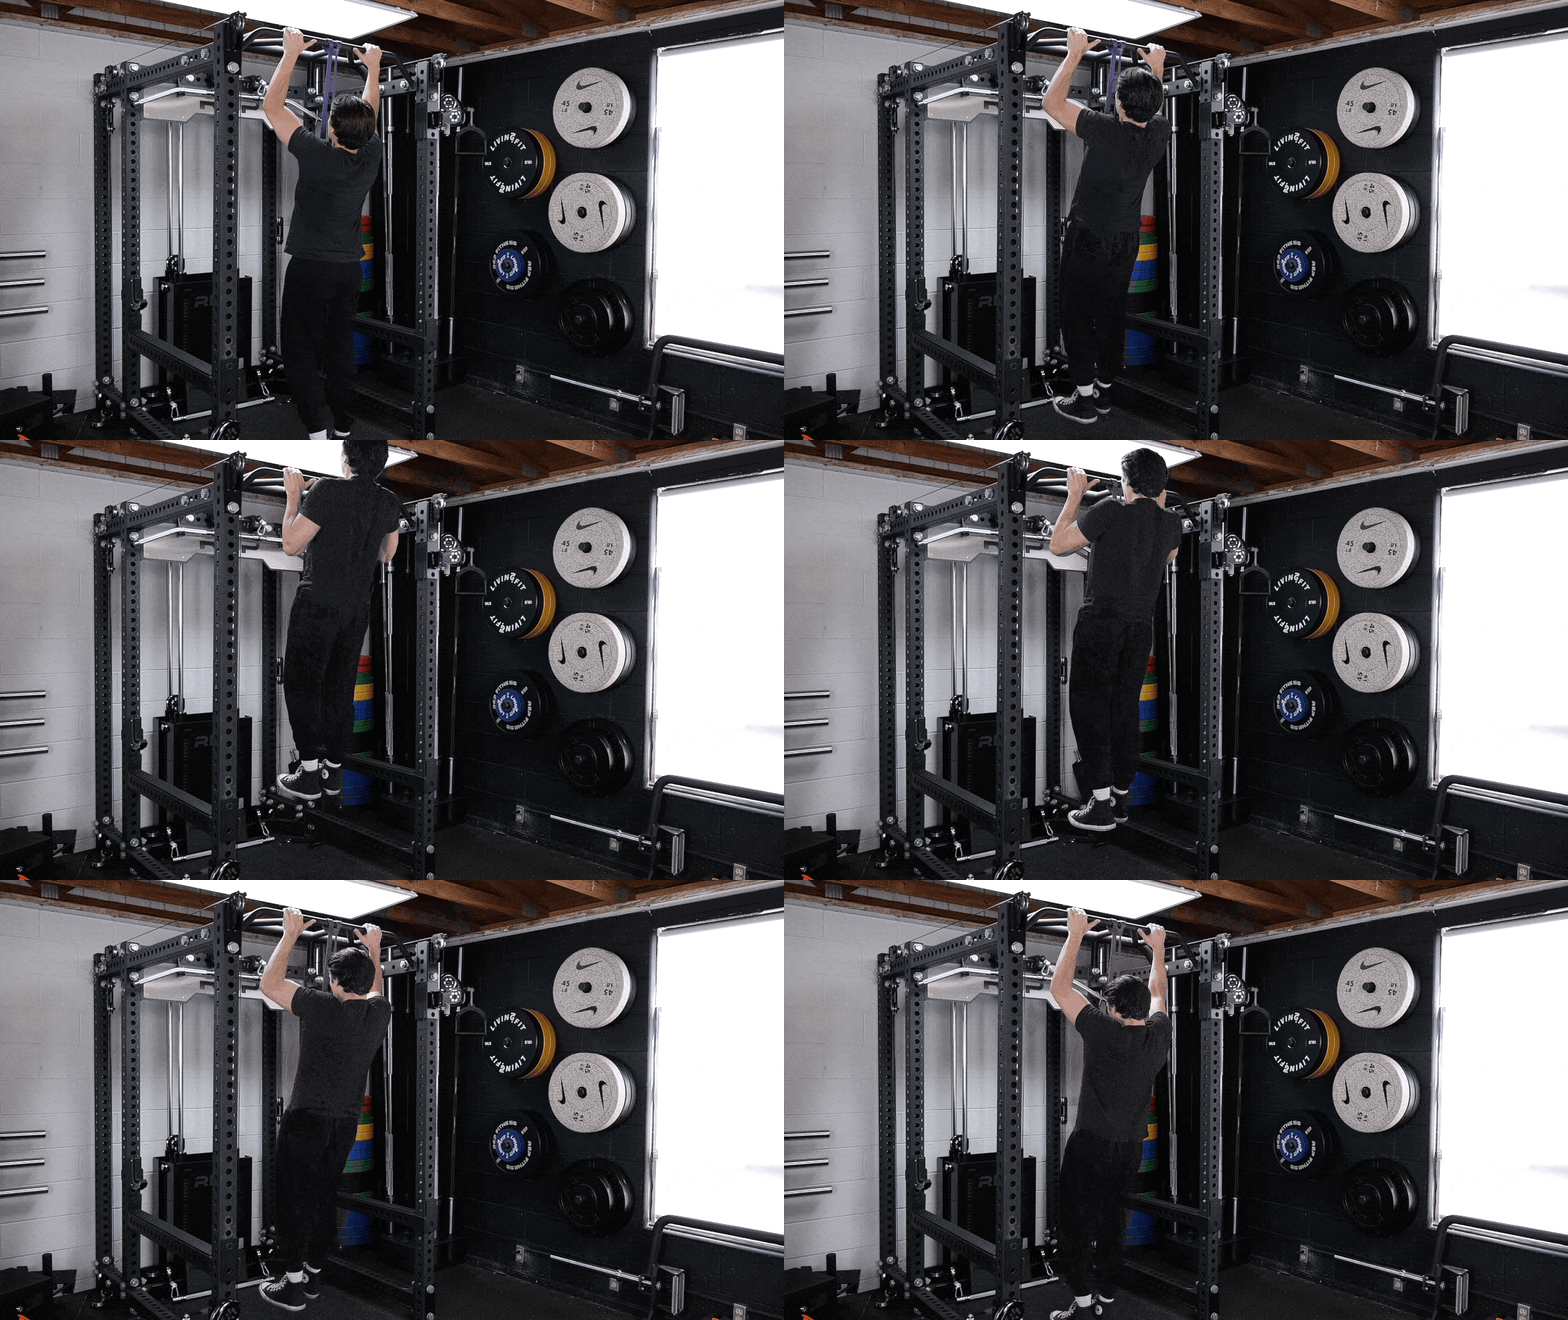
Why Do It: While the most effective ways to target your rear delts are isolation exercises, bigger-ticket pulling exercises can help, too. If you haven’t yet mastered the wide-grip pull-up but are ready for something bigger than a lat pull-down, the assisted pull-up is a great go-to. Your rear delts will get practice stabilizing a major compound movement even as you support yourself with a resistance band.
Equipment Needed: You’ll need a pull-up bar and a pull-up assist band. You can use a step-up platform or plyo box to step into the band if needed.
- Loop a pull-up assist band securely around the center of a pull-up bar.
- Step into the bottom of the loop and brace yourself into a hollow-body position. Use a step-up platform or plyo box to help you get into position if necessary, placing your hands on the pull-up bar and securing your grip.
- Draw your shoulder blades back and down and drive your elbows toward the ground. Pull up until your chin clears the bar.
- Slowly lower and return to starting position. Repeat for reps, taking breaks as needed.
Coach’s Tip: Don’t be afraid to choose a very thick band to assist you. Work at the same level until you can do between eight and 10 reps, then “graduate” to the next level of thickness.
Sets and Reps: Perform three to five sets to failure.
Make it Easier: If you’re struggling to get your chin over the bar even with the band’s help, hop up above the bar and use the band to help you perform slow negatives (the lowering portion of the lift).
Make it Harder: Integrate 1 ½ reps into your pull-up routine to increase the challenge.
Rear Delt Warm-Up
It’s important to warm up before any type of workout. A proper warm-up will get your blood flowing and prepare your joints, muscles, and brain for training. It can help you avoid straining or injury during your workout. Perform exercises that engage your rear delts as a dynamic warm-up gets them ready to do their job of rotating, extending, and stabilizing your shoulders.
Choose some exercises using light or minimal resistance to get your rear delts working to support your shoulders in pulling movements. Below is a sample rear delt warm-up routine to try.
- Band Pull-Apart: 2 x 15
- Prone Y T W Raise: 2 x 10
- Band Face Pull: 2 x 15
- Scapular CAR: 2 x 4*
Perform two slow controlled articular rotations (CARs) in each direction.
How to Train Your Rear Delts
You may be able to train your rear delts more frequently than your lower body since they are a smaller muscle group. That said, they’re called in for support in many compound exercises, so ensure that you’re giving adequate rest and recovery. You can train them directly two to three times a week, or incorporate low-intensity exercises to your daily warm-ups.
Rear Delt Exercise Selection
When training your rear delts, it all comes down to your goals. If you don’t have a lot of time and do full-body bodybuilding workouts, you can stick to compound pulling exercises like rows, pull-ups, and pulldowns where your rear delts will work to assist the movements.
If you’re looking for muscle growth for aesthetics, strength, or rehabilitation, it can be helpful to add some more targeted movements like the cable face pull and dumbbell reverse flye. You can incorporate them to the meat of your workout — they don’t necessarily need to be done at the end. You can also do isolation movements like the band pull-apart as part of your warm-up.
Rear Delt Sets and Reps
It’s important to vary your sets and reps based on your goals when training your rear delts so your muscles can respond accordingly.
- For Strength: Choose a heavy and challenging weight and perform four to five sets of four to six reps.
- For Muscle Growth: Use a moderate load for three to four sets of eight to 12 reps, leaving one to two reps in the tank at the end of each set. If you’re working with lighter weights, bands, or cables, aim for 12 to 15 reps.
- For Endurance: Try three sets of 15 reps at a light to moderate weight with minimal rest in between. For cable and banded exercises, aim for between 20 and 25 reps.
You will need to adjust these ranges depending if you are doing compound movements like rows and pull-ups or targeted moves like face pulls and flyes. You can go heavier on compound movements, but stay with a moderate weight for more targeted exercises.
Whichever fitness goal you are going for, proper form, focus, and tension combined can get you the results you want.
Rear Delt Training Tips
Training your rear delts is key to developing balanced shoulders in terms of strength, size, and stability. Now that you know the best exercises to choose from, here are a few key tips to get the most out of your work and keep making progress.
Learn Scapular Control
Try to build a mind-muscle connection with your rear delts as you move through your shoulder rotations. Keep your shoulders back and down, and never yank from your arms. Lead every movement, especially the lighter ones like face pulls and pull-aparts, with the backs of your shoulders.
These make great warm-ups before training your rear delts to prime your brain and muscles. All of the exercises here involve retracting your scapula, but you also want to engage your rear delts to keep your shoulders stable as they retract.
Train Rear Delts First
Trainers often recommend performing isolation exercises at the end of your session to maintain the most energy possible for compound movement. In general, this is solid advice to follow. But if your focus is on building your rear delts, you can absolutely train them first.
The beginning of your session is when you have the highest amount of energy and focus, so it can be helpful to start with whatever you want to put most of your effort into. Using lighter, smaller movements like pull-aparts will also help prime your upper body for bigger actions.
Change Your Variables
Progressive overload — making your workouts increasingly more difficult over time by changing variables — is essential to getting stronger. But you don’t necessarily want to be continually adding load to your rear delts because they are small muscles.
You can keep challenging them by pulling from different angles. Face pulls, lat pulldowns, and inverted rows will all hit your rear delts from different angles and allow you to keep strengthening them. You can also vary your equipment by using bands, dumbbells, cables, and barbells. Going unilateral in pulldowns and rows is another way to add variation to your rear delt training.
Benefits of Training Your Rear Delts
Your rear delts are often overlooked and difficult to isolate, but these small muscles on the backs of your shoulders are key to shoulder health and strength. Training them can benefit your athletic performance, joint health, and how you feel in your day-to-day life.
Increases Shoulder Stability
Your rear delts assist in stabilizing your shoulders. Increase your stability by teaching them to engage as you perform different movements. This can help prevent injury in other exercises like overhead movements and Olympic lifting.
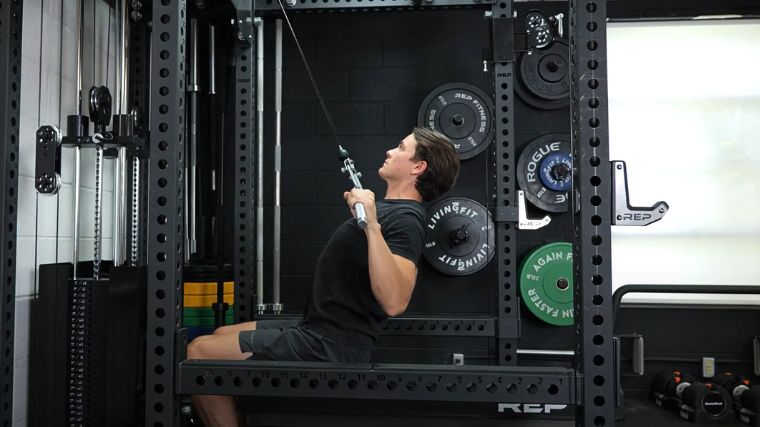
Enhanced shoulder stability can also improve activities of daily life like reaching up to grab a glass from a cabinet or placing luggage in an overhead compartment. Having strong and stable shoulders can help manage injury risk in your everyday life, which becomes increasingly important for adults as they age.
May Improve Posture
Humans spend a lot more time sitting or hunched over computers and cell phones than they used to. This has led to poor posture, forward jutting heads, and shoulders rounding forward. Keeping your shoulders chronically internally rotated and unengaged can cause pain and discomfort.
Training your rear delts builds strength in the backs of your shoulders and can help to improve your posture and decrease pain. A few hours in the gym per week can only do so much to counteract your posture if the majority of your time is still spent in a hunched position. Incorporating quick exercises like band pull-aparts to engage your rear delts throughout your day-to-day life can help combat poor posture.
Builds Balanced Upper Body Strength
Many people who are new to the gym understandably spend a lot of time doing pushing exercises that emphasize their chests and fronts of their shoulders like the bench press. These exercises are important, but training your rear delts can help you build more balanced and holistic upper body strength.
Incorporating pulling movements that emphasize your rear delts into your program can help you build balanced shoulders when it comes to both strength and size. Your anterior and medial delts can be prone to overuse when you focus on pushing. Training your rear delts makes your overall shoulders stronger and protects your shoulder joints in all types of movements.
What Muscles Make Up the Rear Delts
Your deltoid muscle is a triangle-shaped muscle that covers your shoulder and is made up of three parts. Your posterior deltoids — or rear delts — are located on the backs of your shoulders. Your anterior deltoids are on the fronts and your medial deltoids are on the sides.
Your deltoids are part of your shoulder girdle which also includes your rotator cuffs, traps, triceps, and lats. (1) Your rear delts often work with these other muscles to assist in scapular movements.
- Posterior Deltoids: Your rear delts are responsible for horizontal abduction, shoulder extension, and shoulder external rotation. They pull your arms out and away from your body and back behind you. They also assist in stabilizing your shoulders.
Fill Out Your Shoulders
Your rear delts are small but mighty muscles on the back of your shoulders. Building strong and stable shoulders not only makes them look well-rounded. It can help to prevent injury, improve your posture, and increase your upper body strength for other lifts, sports, and activities.
Choose your favorites from this mix of the best rear delt exercises with different equipment and levels of difficulty. Engage those rear delts and pull away.
FAQs
Knowing which exercises to do is one thing. Knowing how to wield your knowledge most effectively is another. Here’s how to make the most of your rear delt training.
Since you’ll be mostly using isolation exercises for your rear delts, you’ll want to monitor your volume carefully. You want to push enough to increase strength and musculature, but you don’t want to overburden your muscles.
Consider doing three to four sets of one or two rear delt exercises, between one and three times per week. Your precise volume will depend on your experience level and goals.
Your shoulders are indeed involved in many pressing movements, but your rear delts are not significantly involved in push-ups. Your front delts help you out with the pushing motion, but your rear delts aren’t in use. Instead, build the backs of your shoulders with pulling movements.
You’ll need specific isolation exercises to really build mass and strength in your rear deltoids. Moves like the band pull-apart and cable face pull are perhaps the most direct ways to build your rear delts, but plenty of other pulling exercises help out, too. Think wide-grip lat pulldowns and even assisted pull-ups.
References
- Elzanie A, Varacallo M. Anatomy, Shoulder and Upper Limb, Deltoid Muscle. [Updated 2023 May 8]. In: StatPearls [Internet]. Treasure Island (FL): StatPearls Publishing; 2023 Jan-.