The pull-up gets a lot of credit for being the ultimate back-building exercise. We’re not going to dispute that claim. But if you’re the type of lifter to shrug off inverted rows as a weakling’s pull-up — well, you need to rethink your approach to back training.
When building a strong back, the inverted row is arguably one of the best exercises a lifter can do. Just because it’s easier to perform than a pull-up doesn’t make it less effective. Because you can do more reps, the inverted row is a great move to add muscle to your back. If you aren’t ready for pull-ups, it can help you prepare for them. And because you’re in what’s essentially an upside-down plank, your core will get stronger.
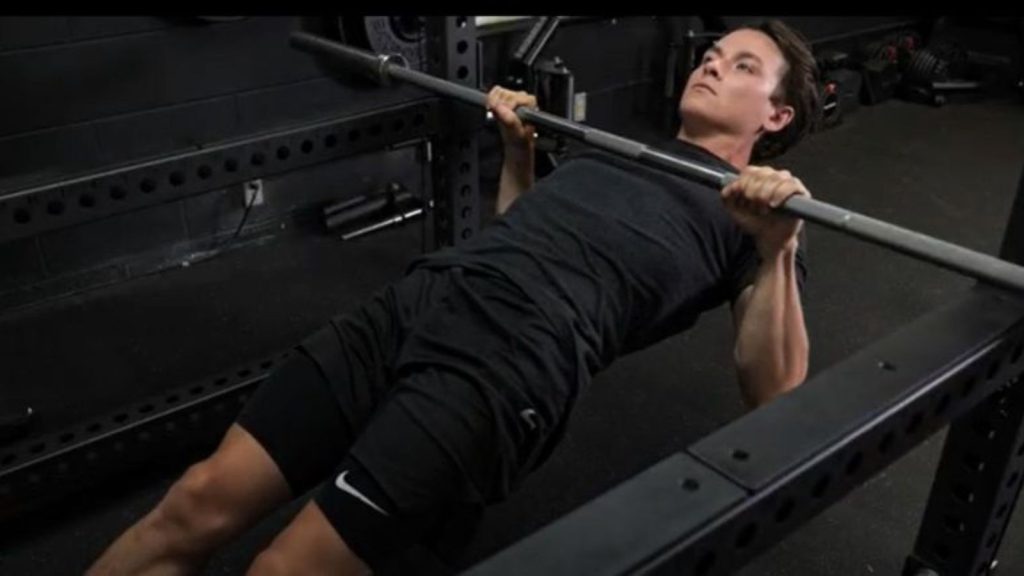
Below, we’ll teach you how to do an inverted row, outline the move’s benefits, variations, and provide set and rep recommendations.
How to Do the Inverted Row
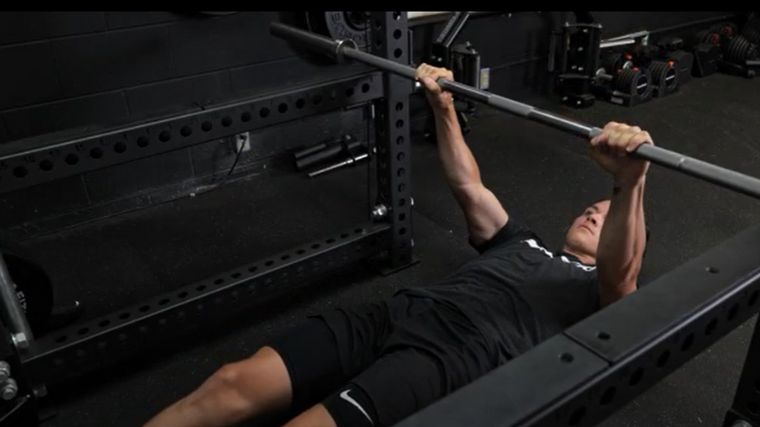
The below step-by-step guide explains how to perform the inverted row. Specifically, the inverted row is done with a barbell positioned in a power rack.
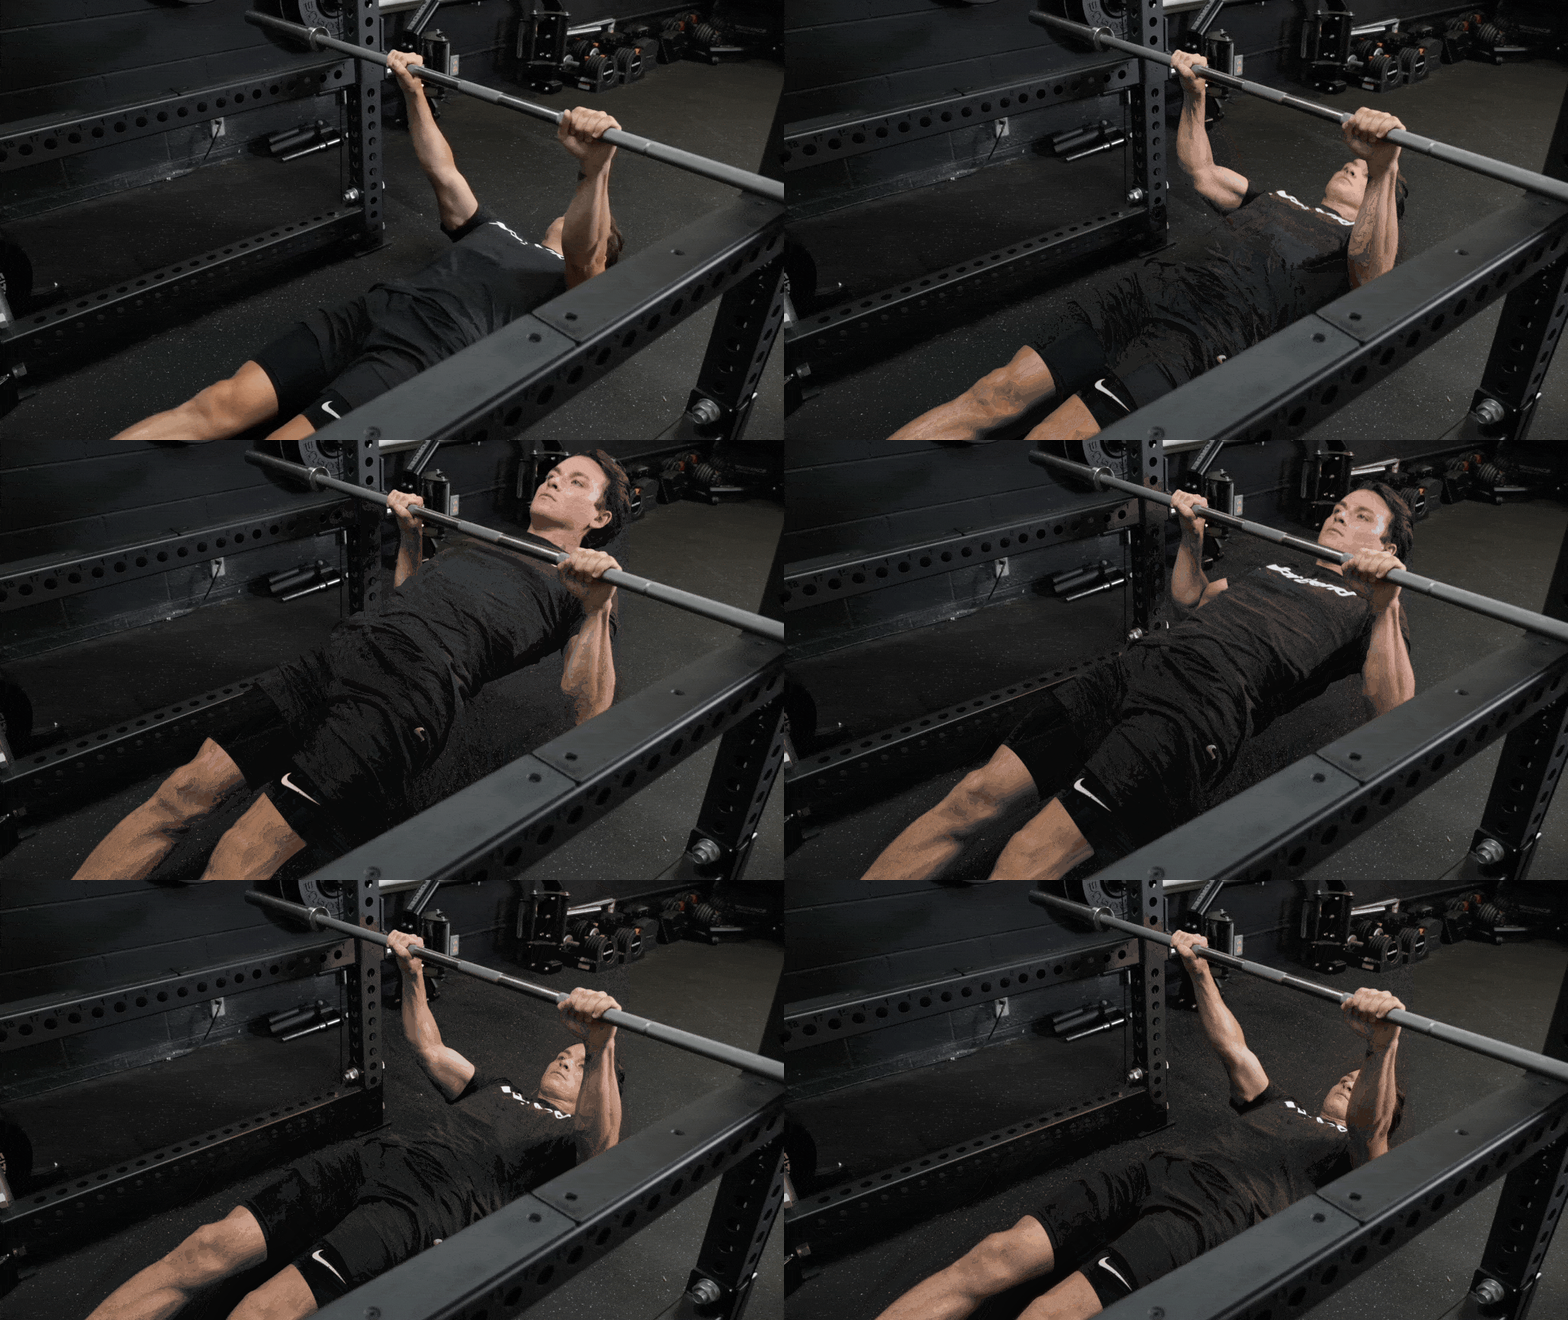
- Step 1 — There are a few ways to set up for an inverted row. You can lay a barbell across the J cups or safety spotter arms of a power rack. You can also use a Smith machine. Set the bar high enough so when you grab the bar with both hands and extend your arms and legs, your body isn’t touching the floor. If you’re using a Smith machine, adjust the barbell to the correct height. Lay underneath the bar, so it’s in line with your chest. Grab the bar with a grip that’s slightly wider than shoulder-width. Extend your legs in front of you, keeping your butt on the floor.
- Step 2 — Raise your butt off the ground and create a straight line from your head to your toes. If you were to flip your stomach down, you should look like you’re in a plank position. Pull with your arms and squeeze your shoulder blades together to row your chest to the bar.
- Step 3 — Once your chest touches the bar, hold this position for a second and then slowly lower yourself back down. Lower your body in a controlled fashion, maintain postures at the bottom, and repeat the process.
Coach’s Tip: If you’re still building your strength, set the bar higher so you’re more upright to make the lift a bit easier. You can also bend your knees while you’re horizontal and plant your feet instead of keeping your heels balanced on the ground. Regardless of your starting position, keep your core tight and your hips in line with your shoulders as much as possible.
Equipment Needed: Power rack, barbell, J cups, and safety spotter arms OR Smith machine
Inverted Row Video Guide
Check out our in-depth video featuring former Training Editor Jake Boly.
[Related: The Best Barbells For CrossFit, Weightlifting, Powerlifting, Deadlifts, and More]
Inverted Row Variations
There’s more than one way to do this exercise. Whether you’re performing a barbell inverted row or a Smith machine inverted row, the position of your feet — and the speed of your movement — can make a huge difference here.
Legs-Bent Inverted Row
Why Do It: A beginner will likely benefit by bending their legs 90 degrees at the knee. By bending your legs, you reduce the range of motion and limit the percentage of your own body weight that you’re lifting. This is also, generally, a more stable position.
[Read More: Six Benefits of Inverted Rows That’ll Turn Your Workout Upside Down]
- Set up as normal for your inverted row.
- Instead of balancing on the backs of your heels with your legs straight, bend your knees and plant your feet flat on the ground.
- Raise your hips so they’re in line with your shoulders. Perform your rows while maintaining this alignment.
Equipment Needed: Power rack, barbell, J cups, and safety spotter arms OR Smith machine
Feet-Elevated Inverted Row
Why Do It: This is the opposite of the legs-bent inverted row. Instead of giving yourself assistance with bent legs, you’ll make the move trickier as you place your feet on a weight bench or plyo box. The elevation increases your range of motion and makes you lift more of your weight — this is tough.
[Read More: Inverted Row Alternatives]
- Place a weight bench or plyo box where your feet would be in a regular inverted row.
- Set up as normal, but with your feet elevated on whichever surface you choose.
- Perform your rows, ensuring that your hips and shoulders stay aligned throughout your range of motion.
Equipment Needed: Power rack, barbell, J cups, and safety spotter arms OR Smith machine; plyo box OR weight bench
Tempo Inverted Row
Why Do It: This is just a standard legs-extended inverted row, but you perform reps to a set tempo. You’ll be spending a lot more time under tension, which stands to help you build more muscle and strength. You won’t be able to perform as many reps — try for six to eight.
[Read More: The Inverted Row vs. The Pull-Up — How to Choose the Right Movement for Big Back Gains]
- Perform a standard inverted row, but slowly. Take a full three seconds to lift yourself toward the bar.
- Pause for one-second pause at the top.
- Take a full three seconds to lower to full extension. Reset and repeat at this cadence.
Equipment Needed: Power rack, barbell, J cups, and safety spotter arms OR Smith machine
Inverted Row Alternatives
Whether you’re used to performing bodyweight inverted rows or weighted inverted rows (perhaps wearing a weighted vest), you might be searching for ways to reap the benefits of this move without the typical equipment. Here are some hefty alternatives.
TRX Inverted Row
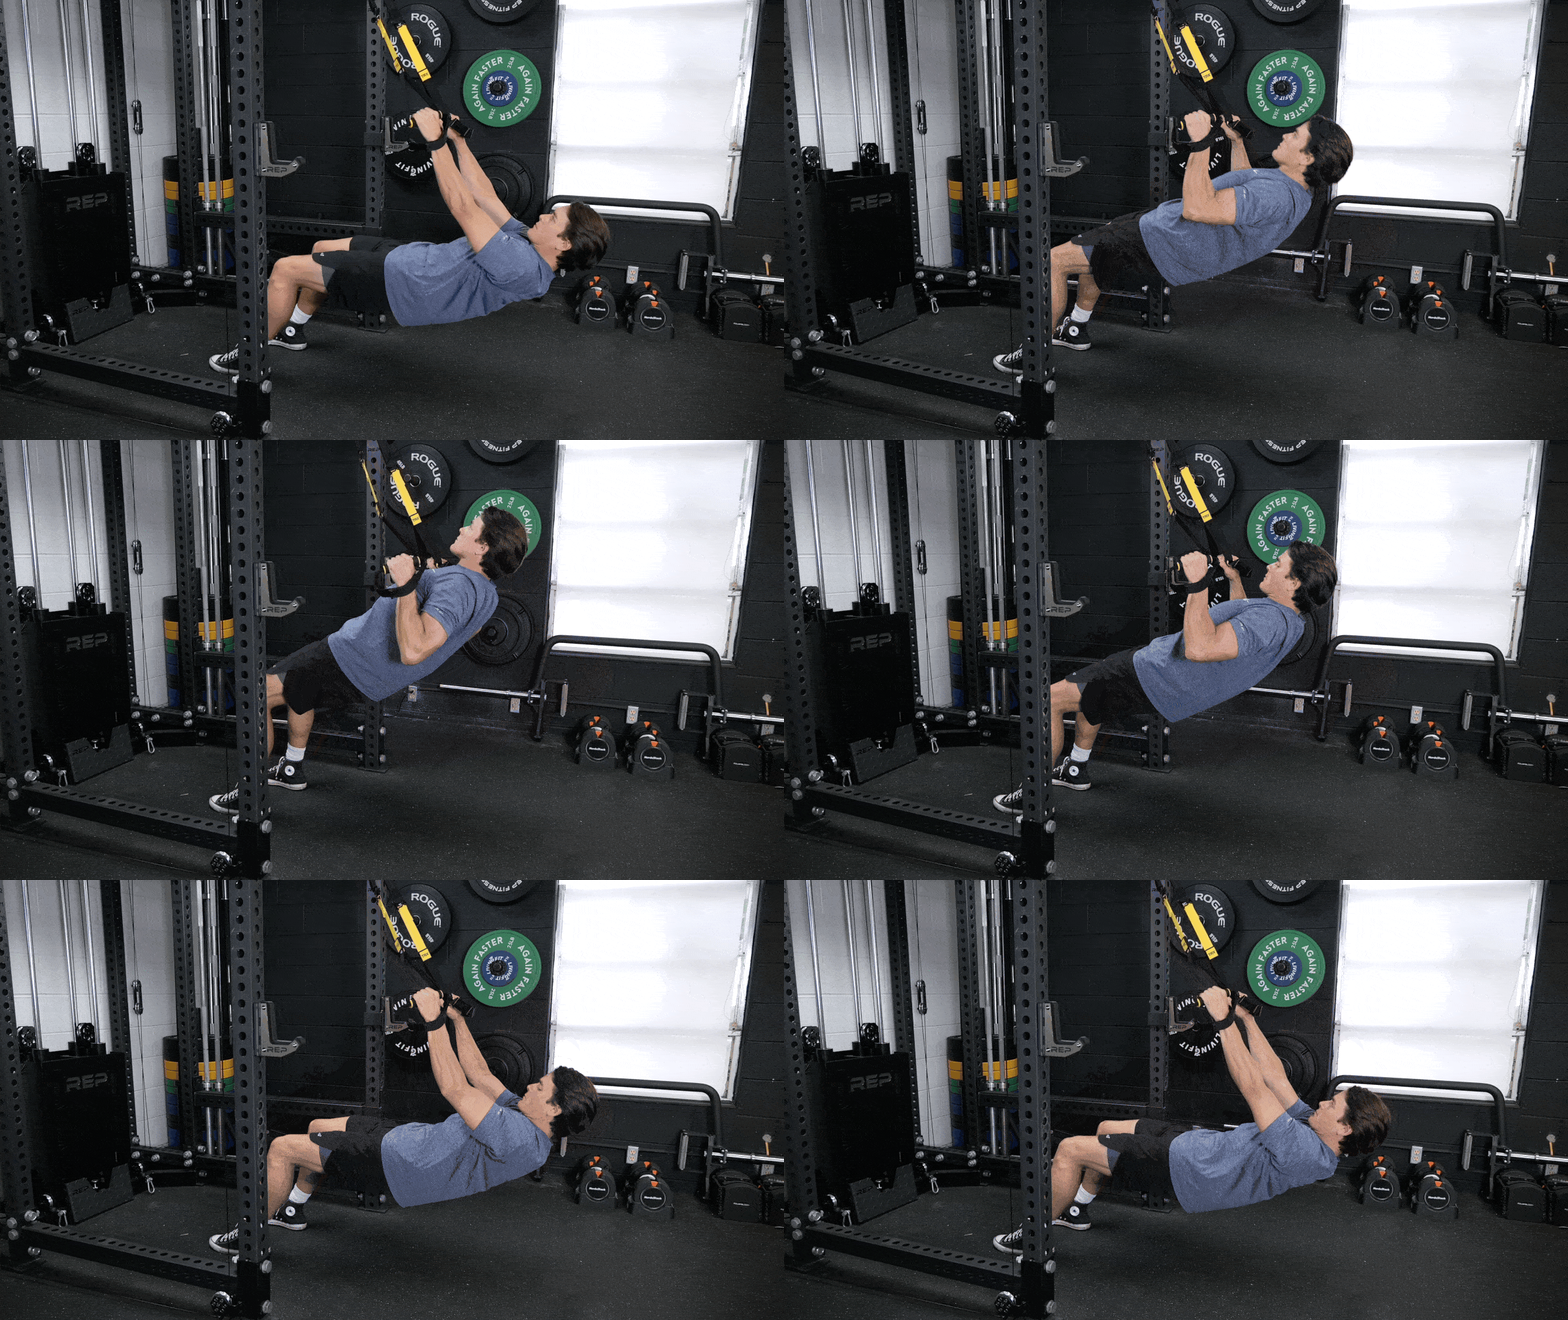
Why Do It: No available barbell? No problem. What’s really nice about this variation is that you can adjust the difficulty even more quickly than the typical barbell version. To do so, move your feet either closer or further away from the anchor point.
[Read More: Inverted Rows At Home/Bodyweight Options]
- Grab a pair of TRX handles and loop them around the top of any sturdy machine in the gym that can support your weight — like a cable machine or pull-up bar.
- Hold one handle in each hand and adjust your feet (facing the anchor) to get into the start position. To make it most challenging, walk your feet very close to the anchor point so that your body is largely parallel with the ground.
- To make this move more beginner-friendly, keep your feet farther from the anchor point so that your body is more diagonal and upright than parallel to the ground.
- Row your body weight to the handles slowly and with control.
Equipment Needed: TRX straps, cable machine OR pull-up bar OR other stable anchor point (even a doorway)
Chest-Supported Row
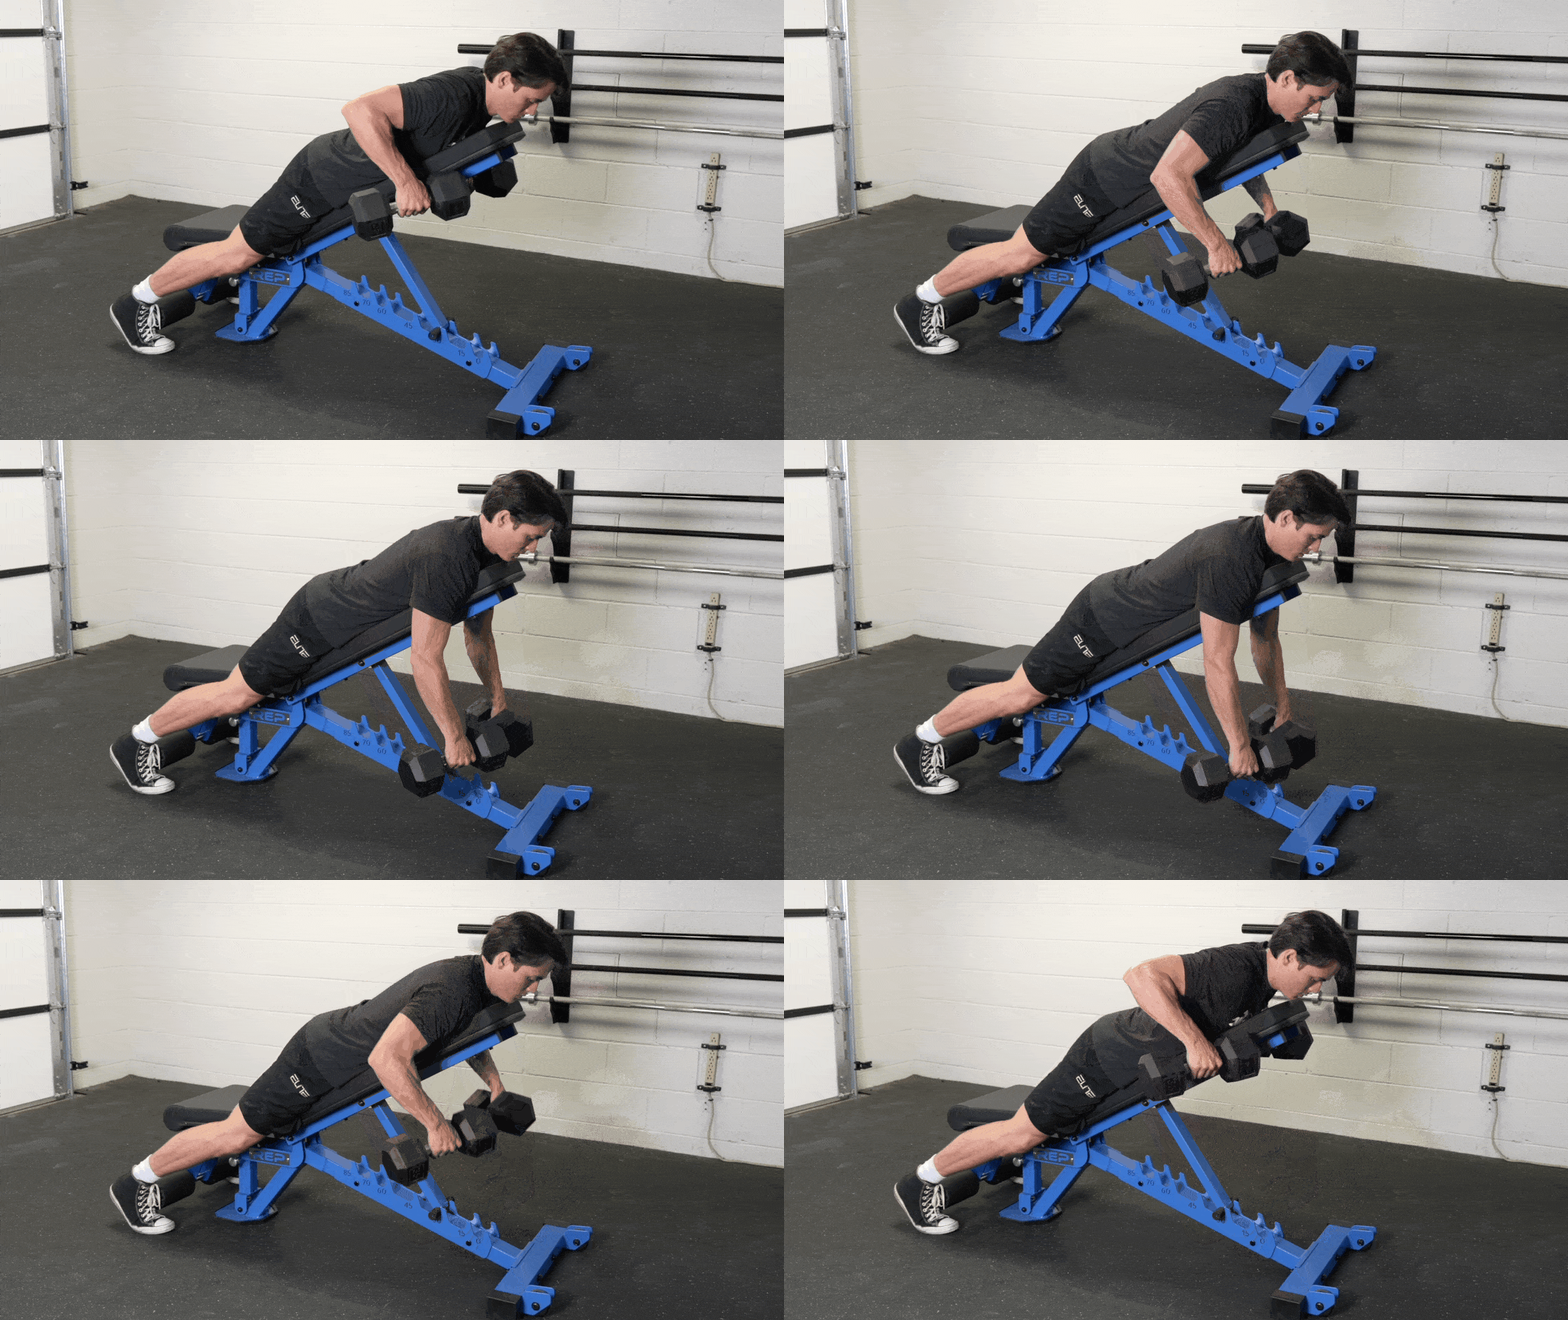
Why Do It: The incline chest-supported row is a great alternative to the inverted row. By supporting your chest on an incline bench, you take the momentum out of the equation and can focus solely on your back muscles.
[Read More: Barbell Row Alternatives]
- Set an adjustable weight bench to an approximate 45-degree incline (adjusted as needed based on your arm length and preferences).
- With a dumbbell in each hand, sit on the bench facing down (so that your chest is in touch with the bench).
- Row the dumbbells with slow control. Always come to full extension between reps.
Equipment Needed: Dumbbells, adjustable weight bench
T-Bar Row
Why Do It: Not all commercial gyms have a T-bar, but if yours does, you’re in luck. It’s similar to the chest-supported row, but you’ll often be able to lift a lot more weight since you can load weight plates onto the machine. With many types of these machines, you’ll be maintaining a hip hinge the whole time, bringing your core into the equation, too.
[Read More: How to Do the Reverse-Grip Bent-Over Row for Bigger Lats and Beefier Biceps]
- Load the necessary weight plates onto the T-bar machine.
- Step onto the foot plates and grab the desired handles.
- Bring your elbows back, rowing the T-bar toward you. Come to full extension between reps, and repeat.
Equipment Needed: T-bar set-up, weight plates
Who Should Do the Inverted Row
The inverted row can be used by strength, power, and fitness athletes to increase upper body strength, back muscle hypertrophy, and grip performance.
- Strength Athletes: From strongman athletes to powerlifters, the inverted row allows you to focus on your back muscles while not putting as much strain on your whole body as, say, a pull-up. And if you’re an athlete who struggles with pull-ups due to being in a heavier weight class, this move lets you get a lot of the benefits of the pull-up.
- Functional Fitness Athletes: Highly skilled CrossFitters can often bang out high-rep set after high-rep set of pull-ups. But everyone’s got to start somewhere. The inverted row is a great way to start feeling stronger and more confident with pulling your own body weight. Even for more experienced athletes, it’s a great way to burn out a heavy pulling session without burning out your whole body.
- Beginners: If your goal is to one day do a pull-up, inverted rows are excellent strength and confidence-builders. You’ll get a lot more experience with what it feels like to manipulate your own body weight while building the base of strength you need to get into pull-ups.
Inverted Row Sets and Reps
Here are three ways to program the inverted row into your training regimen.
- For Hypertrophy: The key here is to focus on the muscle contractions rather than just mindlessly moving your body. Additionally, the loads themselves do not need to be heavy to affect. Start by performing three to five sets to failure, with 90 to 120-second rest periods.
- To Increase Strength: You can implement tempo training and perform more reps to reinforce back strength with the inverted row. Do three to five sets of five to 15 repetitions under a slow tempo.
- For Endurance: Do two to three sets of 20-30 repetitions with 45 to 60-second rest. Don’t rush these reps — move slowly, and the fatigue will hit hard.
Benefits of the Inverted Row
Below are three benefits of the inverted row that strength, power, and fitness athletes can benefit from.
Easily Scaled and Progressed for All Levels
The inverted row can be easily customized to fit the lifters from complete beginners to the most advanced athletes. You can also modify this move in the middle of your set by adjusting your feet, which is a great driver of intensity and can help you hit failure to spur muscle and strength development. No external load required!
More Back Muscle
Because this is a bodyweight exercise, you can pump out many reps — slowly — for more time under tension. This gives you a lot of muscle-building stimulus while taking it easy on your body overall. Since you’re not using an external load, this move is generally easier on your joints.
Bodyweight Strength
The inverted row requires body awareness, grip strength, and core stability. This is a great way to reinforce each of those facets of fitness with new lifters and to help bridge the gap between machines, free weights, and bodyweight training. If you struggle with chin-ups or pull-ups, you can use these to condition the body, the mind, and the nervous system to these demands.
Muscles Worked by the Inverted Row
The inverted row is an upper body exercise that you can do to add strength and muscle mass to the back. That said, it may also add some volume to the biceps and forearms as well.
[Read More: 7 Row Variations to Build a Stronger and Thicker Back]
- Lats: The lats are a large triangular muscle that spans the entire length of your back. A strong back helps you in nearly every single endeavor as a lifter. Stronger back muscles — which also include your traps and rhomboids — also let you maintain better posture.
- Biceps: The biceps assist the back muscles during big pulling exercises. However, if you’re mainly feeling this in your arms, you’re likely not engaging your back muscles enough. Try performing some tempo reps or hold yourself at the top of the lift to help you place more tension on your back.
- Forearms: To row, you need to hold on. Your forearms will help keep your grip active and prepare your body for the rigors of holding onto the bar during moves like chin-ups, pull-ups, or even rock climbing.
Common Inverted Row Mistakes
Just because it’s often touted as being for beginners doesn’t mean you can’t mess this move up. Here’s what not to do when inverting your rows.
Tug With Your Arms
Yes, you’ll feel the most good pulling movements in your biceps, too. But if the primary focus is coming from your arms, you’re just not doing it right. Begin each rep from a completely full extension so that you are initiating the pull in your shoulder blades. Drive your elbows down behind you and focus on letting your arms support the movement, not drive it,
Let Your Hips Drop
No matter which version you’re doing, try to keep your hips and shoulders aligned. That way, you’ll be supporting as much of your body weight as possible. If you let your hips drop, you won’t really be pulling a good portion of your body. Keep your glutes and core tight during the lift to keep your whole body present.
Rush
Haste can, indeed, make waste. If you blaze through these reps, you’re likely to cheat yourself out of a lot of benefits. The more time you spend with your muscles under tension, the more muscle-building potential and strength you’re generating. Slow down instead of speed up to make the most out of this humble but mighty lift.
Row Your Body Weight
It’s not always weight plates on the bar. Sometimes, it’s your own body weight that can give you the best workout. With the inverted row, you’ll develop the skills and confidence you need to move your own body around. This builds a base from a stronger, thicker back with a lot less shearing forces than, say, a deadlift can produce. Move slowly, and the gains will come quickly.
FAQs
We’re here to answer all those pesky inverted row queries.
When looking to do inverted rows at home, you first need to find a stable base to support your body weight when pulling. This can be a beam or even a table (assuming it is sturdy and will not flip over). You would perform the same inverted row as discussed above.
Another option is to use something like the TRX system — a bedsheet with a knot in it will do — and set it up in the door jam. You can also throw a rope around a sturdy tree branch or playground swing set beam.
Yes. Inverted rows can grip, arm, and back strength. The angle is different from the pull-up (which is a vertical pulling movement). However, developing basic strength and muscle endurance in the inverted row can help increase one’s ability to train the pull-up more frequently and effectively.
You can train the inverted row as heavy as you want as long as you maintain good form. To load the inverted row, place your feet on a plyo box and then have a partner place a weight plate on your lap. Then carefully perform the inverted row as explained above.