
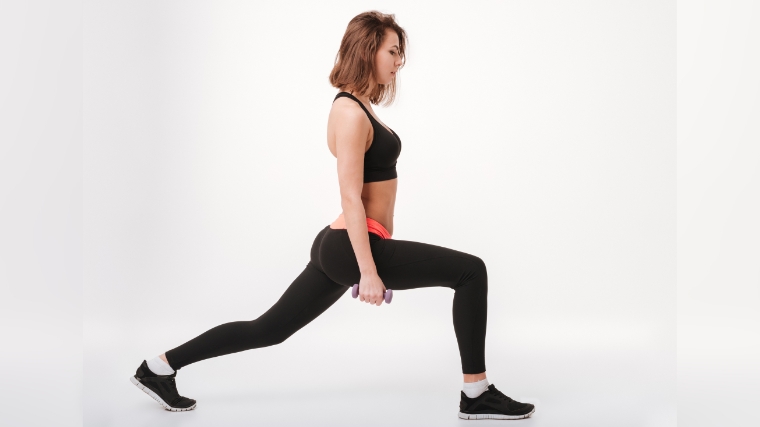
The split squat in all of its glory is quite a beast. While some athletes may utilize them more than others, you’d be hard-pressed to find a program that doesn’t dabble in a split squat or two at some point.
That’s because their grueling nature makes them one of the most bang-for-your-buck exercises around. Whether you’re trying to build muscle and strength or even work on your coordination, the split squat has some pretty alluring benefits.

On the flip side, split squats are also one of the notoriously dreaded exercises on anyone’s leg day list. They can burn, leave you breathless, and are oftentimes tricky to progress. Although they’ll likely remain either loved or hated, at least you can dial in your technique. Here are the keys to nailing your split squat form.
- How to Do the Split Squat
- Cues to Try with the Split Squat
- Why Your Split Squat Progress Has Stopped
- Mobility Exercises to Improve Your Split Squat
- Intensity-Boosters for the Split Squat
How to Do the Split Squat
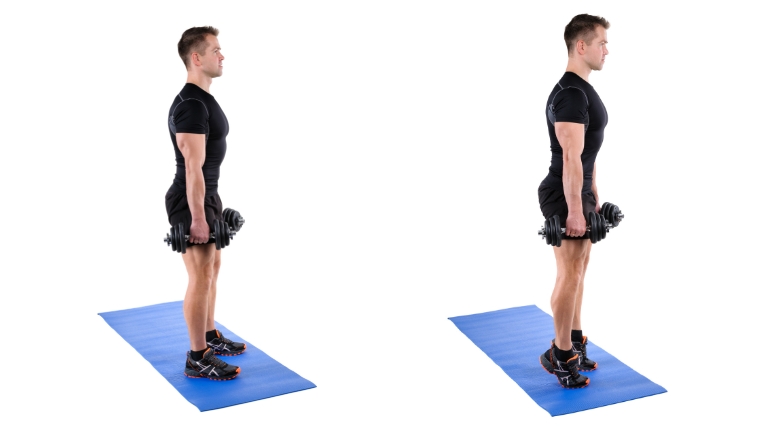
This move is perhaps the quintessential unilateral exercise for your lower body. You’ll emphasize one leg at a time.
Don’t skimp on reading this bit if you think you already know how to do a split squat. Here, you’ll find extra juicy details on how to maximize your exercise.
Step 1 — Stride Length
An excellent rule of thumb for determining your stance for the split squat is to perform a reverse lunge. Step back and descend into the reverse lunge until your front leg reaches a 90-degree bend.
When you can accomplish this without your back leg hitting the ground, stop and shift forward to the last place your back knee touches the ground. You want your back knee to reach the floor. At that point, you have found your stride length.
Step 2 — Body Weight Distribution
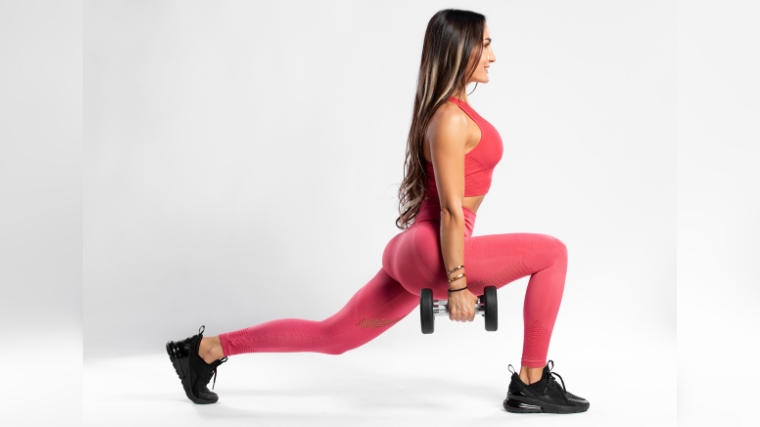
During a basic split squat, both of your feet will remain on the ground. What this means is that you will likely have a fairly even amount of body weight pressure on both the lead and back leg. In order to lift yourself up with each repetition, you will favor the lead leg — but it won’t be by as much as you may in other more advanced variations.
As a loose estimate, keep about 60 percent of your body weight on your front working leg. Your trailing leg will support about 40 percent of your weight.
Step 3 — Brace
An essential part of any split squat will be keeping a tight core brace. This will help with your balance and ensure that your legs can properly lift you through each repetition.
Keep your ribcage stacked over your pelvis. This will help you avoid any overarching through the upper back. You’ll use a very subtle forward lean, which will also help keep your body weight properly distributed between each foot. Once aligned, bear down and keep your core tight during the entire set.
Step 4 — Repetitions
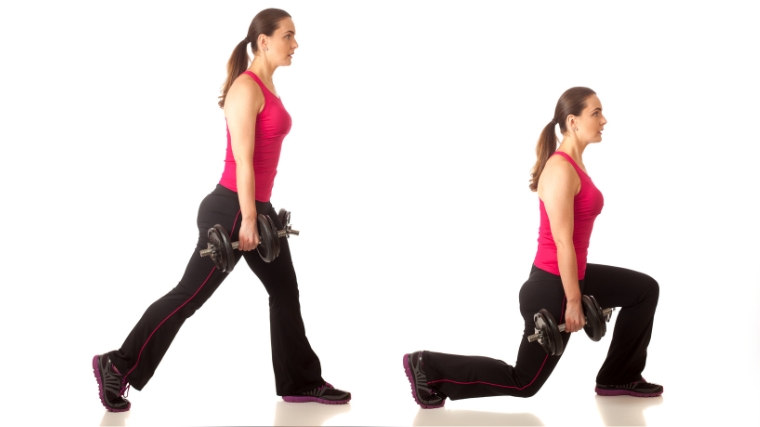
Once you have achieved your proper stance, body weight distribution, and brace, you can begin performing repetitions. Lower yourself under control until your lead working leg reaches approximately 90 degrees.
From here, drive through both legs with slightly more emphasis on your front leg. Raise yourself back to the top. Sink back down to repeat for reps. Keep your number even on both sides.
Cues to Try With the Split Squat
Although split squats are a commonly programmed exercise, there are some equally as common issues in executing them. Here are a few cues to try while mastering your split squat.
Heel Pressure
The main goal of any split squat is to retain even foot pressure throughout the entire range of motion. With that in mind, it can be extremely common for you to feel like you’ve got more weight distributed over your toes.
To help correct this issue, think of feeling more pressure through your heel. This does not mean that you’re trying to avoid your toes — instead, use this cue if you find yourself driving too far forward on your front foot. This cue can help balance things out. Think of driving through your heel to create a more equal foot pressure.
If you still struggle with finding this balance, think about how you would perform a step-up. The same foot pressure found with a higher foot placement is exactly what you’re trying to emulate in your split squat.
Drive Through the Big Toe
On the other hand — or foot — sometimes it may feel like you’re too heel dominant. This may manifest as your toes actually rising off of the ground while you stand up with each repetition. This is also not ideal, as it will make it more difficult for you to really recruit as much glute and quad musculature as possible.
In this case, think of driving through your big toe. Not necessarily the “tippy-toe,” but rather the base of the big toe where it meets the rest of your foot. Think of the ball of your foot here if it helps. This cue should help redistribute weight in the opposite direction and avoid any loss of balance or force production.
If this still is hard for you to execute, you can also think about performing a standing calf raise. This should help you identify the part of the foot you’re trying to press through here.
Feel Your Hip
Another common issue you may run into while performing split squats is not being able to sit into your hips properly. The split squat is supposed to utilize both your quads and your glutes. Chances are that if you can’t feel your hips kick in, you may be out of position.
Feeling your hips is best described as the stretch you get at the bottom of a split squat. Increased depth helps to ensure you are bending both your knees and hips as much as possible. If you are too far forward into your quad, you likely won’t feel any hip action. So, think of sitting back into it and feeling for your glutes.
Another way to think about feeling your hip is the pigeon pose stretch. This same sensation on the sides of your glutes should arise when you’re hitting great split squat depth in the right posture.
Why Your Split Squat Progress Has Stopped
The split squat is a full-body exercise that can be quite demanding on a ton of muscle groups. If your split squat stops progressing, here are some sneaky reasons why.
Grip Strength
Sometimes, your legs are willing and able but your grip is not. One of the major methods of progressing your split squat will be by adding load. But if your hands can’t keep a solid grip on the free weights, your set will end far too soon.
The Fix
The best fix for grip strength problems is to train your grip directly. To do this, use exercises such as timed holds and farmer’s carries. When you’re looking to boost grip strength, avoid using straps during your upper body workouts as much as possible.
If your primary concern is loading up your split squat as much as possible right now, you can also utilize lifting straps. Grabbing a pair of straps during your split squats will immediately improve your ability to hold onto the weight.
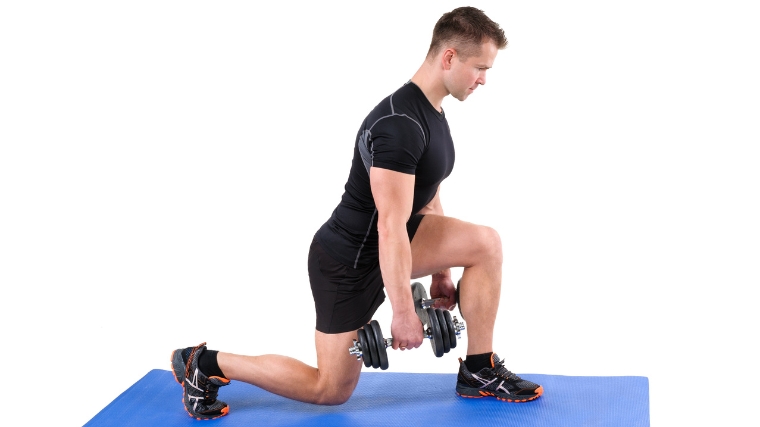
Load Position
The position and type of load that you choose during your split squats can dramatically affect what kind of result you can expect. A contralateral load placement — holding weight in the opposite hand of the working leg — will challenge your core to a significant degree.
Similarly, using the ipsilateral side for loading — holding weight on the same side as the working leg — will greatly challenge your hip stability. While these may also be assets long term, either unilateral variation may see your hip stabilizers or core hit fatigue before your legs themselves.
Regardless of position, holding weights in only one hand may decrease the overall amount of weight you can use. Then, your progress may stall.
The Fix
If you are trying to perform heavier split squats to increase your leg strength or size, adopting a bilateral loading style as opposed to unilateral may be a great fix. Using dumbbells in both hands helps to lower your center of gravity, improving your balance during the exercise. It also will greatly increase the total amount of load you’re able to use.

And if you really want to aim for a challenge, use a front-rack position to load your weights instead of holding them at your sides.
Position in the Workout
Many programs will place a split squat or its variations later in a workout. This makes sense, given that you typically want to perform your bigger movements first — think barbell squats and deadlifts. But this might mean that you have limited gas in the tank when split squat time rolls around.
The Fix
If improving your split squat is a priority, place it earlier in your workout. Instead of waiting until the last part of your day to perform the dreaded split squat, try placing them first or second. Attacking the lift earlier in your workout will allow you to challenge yourself with greater load or volume than you normally would later in the day.
Mobility Exercises to Improve Your Split Squat
The split squat is a highly coordinated movement that draws on several muscle groups at once. Having adequate mobility is key to safely and effectively executing your split squat. Here are a few mobility essentials to help stay split squat ready.
[RELATED: Best Mobility Exercises]
Pigeon Pose
The pigeon pose will help to stretch out your external rotators. You’ll likely feel a deep stretch across your glutes and the smaller muscles nestled in the same general area.
These muscles tend to tighten up from training, daily routines, and sitting for long periods of time. Hitting a pigeon pose prior to split squats can help maintain an appropriate level of hip mobility.
Kneeling Hip Flexor Stretch
Similar to your glutes, your hip flexors are highly active during the split squat. An easy way to boost mobility across your hip flexors for your split squat is to choose a stretch that emulates the position.
A kneeling hip flexor stretch is the perfect example here. You’ll be in a similar position to your split squat, but you’ll focus on the range of motion instead of the load.
Cat-Cow
Having adequate torso mobility is a huge plus when performing the split squat. This is especially true when using unilateral or front-rack loading styles. The ability for your torso to flex and extend will help you correctly set your brace prior to exercising.
A simple cat-cow is a great tool to ensure your thoracic spine is moving well before starting up for the day. Move through 10 to 15 breaths of this dynamic stretch and you’ll be ready to go.
Book Opener
Similar to thoracic spine flexion and extension, having adequate thoracic spine rotation is crucial for your split squats.
Performing a few rounds of book openers to help with torso rotation will allow you to have full access to those ranges of motion as you descend through your split squat. This will come in especially handy when you’re opting to perform front-rack split squats.
Intensity-Boosters for the Split Squat
As you progress through your split squat odyssey, adding some intensity boosters can be a great way to cap off a session or stimulate improved growth.
Rear-Foot Elevation
Elevating your rear foot is an extremely common variation of the standard split squat. Frequently referred to as the Bulgarian split squat, this variation intensifies the exercise by placing a greater amount of your body weight on your working leg.
A rear-foot elevation pushes you forward and removes your back leg from being able to drive up nearly as much force. Altogether, the intensity demand on your forward leg will skyrocket and new runways of progression will open up.
Tempo Training
Manipulating exercise tempo is another method of improving and intensifying your split squat without the addition of more weight. Slowing down your eccentric portion or adding pauses in key positions can help train your stability.
This method will also bring you closer to muscle failure in a safe (but challenging) way. You can use tempo to reduce the load during your split squats and then build it back up with intentionally controlled cadence.
Drop Sets
A drop set is a tried and tested method of adding intensity, particularly to the final set of a workout. All that is required of you is to get close to failure during the working set while using a significant load.
Immediately reduce the weight and continue for additional repetitions to failure. You can repeat this all the way until you reach failure with your body weight. Do not rest between the loaded set and the drop set. Continue uninterrupted before using the same method on the opposite leg.
1 ½ Reps
Similar to tempo training, performing 1 ½ repetitions can greatly increase the intensity of a set without adding more load. Spending this increased time working each leg is also a quick way to add volume to your workout.
Perform a full-depth split squat, rise about halfway back to the top, and finally descend back down to complete a full repetition. This would be considered a single 1 ½ repetition.
Split Your Squats for Double the Fun
The split squat will almost inevitably find its way into your leg day. Whether you’re using the classic split stance, a rear-foot or front-foot elevated version, or any number of loading combinations, there’s certainly a split squat out there for you.
With the common errors and cues accounted for, you’re now prepared to smash plateaus and progress long into the future. Remember your mobility, intensifiers, and exercise order if you’re really looking to get spicy.
Featured Image: SOK Studio / Shutterstock